We turn a family home's garage into a usable recording studio, and take reader Danny Williams through a number of gear maintenance, recording and mixing tips.
 When we arrived, the 'control room' end of the garage had no acoustic treatment, and some critical listening showed that it was far from ideal for monitoring.
Danny Williams has just finished an HND Music Production course at a local college and is about to embark on a science degree at university. Meanwhile, he has been lucky enough to talk his father into allowing him to convert the family home's garage into a recording studio, which also doubles as his rehearsal space.
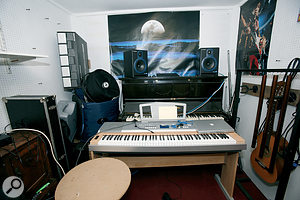
Danny plays both piano and drums, and when we arrived the small studio had a drum kit at one end (on a low riser to provide additional sound absorption) and an old upright acoustic piano at the other, which doubled as a speaker stand for a pair of Samson Resolve 65a monitors. His Yamaha DGX620 keyboard was set up directly in front of the piano, leaving little space for the M-Audio Project Mix I/O and Macbook Pro that formed the heart of his system.
Danny had already lined the whole space with pegboard, placed over around three inches of Rockwool. This actually worked better than expected in controlling the room acoustics, but he still needed help sorting out his monitoring, and arranging everything so that the space was more functional and less like a store room! After a brief discussion with Danny, we decided that it would be better if the upright piano was moved out: it was too high to make a good speaker shelf, it was out of tune anyway, and we were rather worried about the effect of the resonating strings on the monitoring.
Basic Setup
 In this picture you can see how to position acoustic treatment at the 'mirror points' on the walls and ceiling around the listening position — which will tame unwanted reflections, improving both frequency response and stereo imaging.
Danny's mum has a business making cakes, so we sampled some of her wares over a cup of coffee while deciding how best to tackle the project. Danny suggested that the piano would eventually find its way back into the house (where it would be tuned), but for the time being it could go as far as the entrance corridor to the studio — which is just as well because took the three of us to shift it that far! That left us without speaker stands, but there was an old bedside cabinet of about the right height, so all we needed was something of a similar height to use at the other side. Raiding Danny's dad's workshop turned up a chipboard table that was around ten inches too short, but a few sections of sawn-off fence post brought the speaker up to about the right height. To get the speakers at the correct angle, and to offer some resilient support, we used a pair of Auralex MoPads beneath them and then angled the speakers in to face the listening position.
This left room for the Yamaha keyboard in front of the monitors, and a piece of non-slip matting was used to position the Mac laptop on top of the right-hand side of the keyboard case, where it would be easy to see and use while mixing. A wooden linen-box proved to be exactly the right size to support the M-Audio Project Mix I/O, which was set up at an angle to the immediate right of the mixing seat, so that Danny could reach everything he needed while tracking and mixing without leaving the sweet spot (see photo overleaf).
Tests & Tweaks
 As well as acoustic treatment, you have to think carefully about objects you have in the studio: this old piano was out of tune, and the resonating strings had the potential to cause problems both for monitoring and recording — so we decided to give it a temporary home in the corridor outside!
Before making any further changes, we played some test material over the speakers to see how the room was performing, and although it had no obvious serious vices, we felt that the stereo imaging could be improved. The pegboard and Rockwool was doing a good job of controlling reflections at the bottom end of the spectrum, but there was still quite a lot of high-end reflection and scattering, which we thought could be cured with Auralex foam absorbers. We fixed the two-inch thick, 2 x 4 foot pyramid foam panels directly to the pegboard at the sides and front and above the listening position, using spray adhesive, and cutting the foam where necessary to go around shelf supports and other obstructions.
Firing up Hugh's test CD once again revealed very solid stereo imaging, but the speakers sounded somewhat on the harsh side. We checked out the switches on the rear and discovered a mid-range selector that offered -3dB, 0dB, +3dB or +6dB of adjustment in the upper mid range. With this set to the -3dB, position the extreme top was still a little brighter than we'd have liked, but we were at least able to achieve a less aggressive sound. We recommended that Danny use that setting and import some reference recordings into iTunes so that he could get his ears used to the way the monitoring system sounds playing back commercially mixed material. This is a good idea for anyone, because your ears can get too used to a sound after working with it for a long time. A brief interlude of familiar commercial material can help you to 'recalibrate' your ears.
Getting Control
 Ten o'clock already? Paul White discovers that there's more to life than Hob-nobs...
Although Danny was fairly familiar with ProTools M-Powered, he was less experienced with Logic 8, so we went through a few basics with him. This included the creation of a template song with aux sends already feeding suitable effects, and the use of screensets, which are particularly useful on a laptop with a relatively small screen size. The Project Mix I/O's moving-fader control surface can be set to emulate a Mackie Logic Control by starting up with the appropriate button held down, and this worked very smoothly.
We looked at a few of the software synths and sampler instruments on offer in Logic 8, using the caps-lock keyboard mode that allows you to play MIDI from the Mac's QWERTY keyboard. We then went to try the Yamaha keyboard as a controller, but initially without success: we set the keyboard to the correct PC mode with the MIDI out active and Local Off, but although the Mac was registering it as a connected USB device, it wasn't seeing it as a MIDI device. Danny thought he'd used the keyboard with a previous Mac without installing any drivers, but it turned out that a driver is necessary, so perhaps it had already been installed on that machine. Solving the problem was simply a matter of downloading Yamaha's MIDI USB driver from their web site, which — very sensibly — is a standard driver for all their current USB instruments. We had to take the computer into the house to do this because the range of the wireless Internet wasn't sufficient to reach the studio, but other than that it was straightforward, and this time the keyboard was recognised.
We showed Danny how to set up a new MIDI Object in Logic's environment to run the external synth as a sound source, as well as a controller, and also how to use the keyboard to control soft synth plug-ins.
Having got the system working, we had a listen to some of the mixes Danny had been working on. For most of these, he'd been mixing on some rather inaccurate headphones and the end result sounded somewhat strident over the monitors. With the more accurate monitoring system we had set up, he could revisit these mixes and make the necessary changes.
Guitar Recording
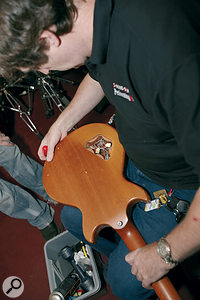
 Danny's guitar was suffering from an intermittent problem. We tracked this down to a faulty selector switch, which was easily fixed.
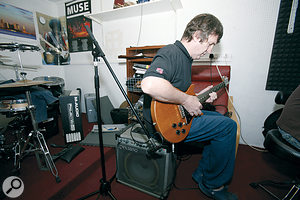
Danny also adds guitar to some of his recordings, and we decided to experiment with his Gordon Smith guitar and old Carlsbro amp to see what results we could achieve. We needed to dismantle the pickup selector switch on the guitar to try to cure an intermittent fault but, having done that, we found the amp very capable of producing a clean (or almost clean) sound, but the overdrive felt rather gritty. The obvious — and possibly the best — way around this would be to place a good-quality overdrive pedal before the amplifier, but we didn't have one available here, so we decided to try recording the amp via a low-cost Samson dynamic microphone and then use Logic's Guitar Amp Pro plug-in to add more overdrive if necessary. Experimenting with the mic placement, we found that a fairly high, edge-on position worked well, capturing the same kind of sound that we could hear in the room when playing. We ended up compressing the clean sound after recording it and then used just a mild overdrive to achieve a smooth, bluesy sustain, and this worked out surprisingly well, usefully extending the capabilities of an otherwise tonally limited amplifier. Of course, an alternative would be to simply DI the guitar and then process it with plug-ins, but even with the quality of amp modelling around now, there's something different and satisfying about the way playing through a real amp feels, and I often find it easier to obtain a better performance in this way.
He Bangs The Drums
 It pays to think about mic position: using Danny's Samson dynamic microphone, we found that a less-than-conventional position on the edge of the cone gave the best representation of the sound we could hear in the room.
Danny then played us some of the drum recordings that he'd made and asked if we could offer some recommendations. In a smallish room such as his, shielding the overhead mics from ceiling reflections is a good idea: pieces of foam cut to sit over the backs of the mics is a cheap and effective way to do it. Auralex do some rather more professional-looking foam mic shields, or if you can stretch your budget further, the SE Instrument Reflexion Filters are a good choice. A few duvets hanging around the room to soak up reflections will also help, because you can always put back a more suitable 'room' sound using artificial reverb. The same duvets can be hung behind your vocalist when using a cardioid microphone, to stop those over‑the‑shoulder reflections getting back into the sensitive side of the mic. Adding a Reflexion Filter or similar device to cover the rear and sides of the mic can also help.
With these recommendations and all the improvements to the studio layout and acoustics, Danny was in a much better position to get on with the business of recording and mixing, and it was time to take our leave.
Reader Reaction
 Danny Williams in his newly-overhauled garage-studio.
Danny Williams: "The sound is so much improved. Listening on the overhauled system to old mixes that I did using headphones, I now notice striking differences in terms of EQ and compression; the headphones had a much brighter sound to them.
"As for using the setup, I can now work much more easily, having everything at my fingertips. The studio is simply a nicer place to work. As soon as Paul and Hugh left, I cut up some foam tiles, which I placed over the back of the overheads. This really improved the boxy sound I was getting from the drums. I'm currently working in a songwriting partnership called Ducker, with Emma Howett.”
