This month, we look at how to connect, control and record hardware MIDI instruments in Live.
Although a lot of us desktop musicians give most of our attention to virtual instruments, there are still many hardware synths, drum machines and racks out there. The last couple of versions of Live have brought the software up to speed as a MIDI sequencer, and made it a serious alternative to the traditional packages as a main composition environment. Even if you have no desire to record MIDI, if you want to play a hardware synth or MIDI module you need to know how to get it talking to Live. Unfortunately, there's very little information in the manual or on-line about doing this.
Get Yourself Connected
First, you need to get MIDI and audio connected between your hardware and the computer. Obviously, this should all be taken care of if you already use the gear with another software package, but if you're getting an old synth out of the loft you'll have to start at square one. I recently needed to go through this procedure myself when testing some gear, so let's follow that procedure.
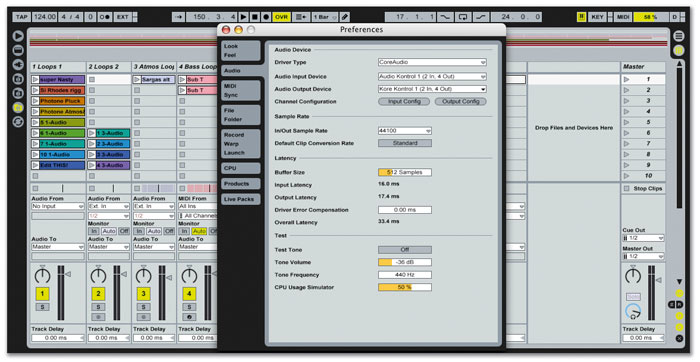
 The first thing to do is correctly configure your audio inputs in Live's Preferences window.I wanted to get an Oberheim Matrix 1000 rack up and running in Live, using a Native Instruments Audio Kontrol 1 audio and MIDI interface. I connected MIDI In and Out cables between the synth and the Audio Kontrol 1, and the Matrix's mono audio output to line input one on the same interface. Although I was using a Mac, Live pays no attention to what MIDI instruments are declared in the Apple Audio MIDI Setup utility, so as long as Live is aware of your MIDI interface, it can talk to whatever you connect to it.
The next step was to configure the preferences in Live, starting with the Audio tab. First I selected the Audio Kontrol 1 as the Audio Input Device, then clicked the 'Input Config' button, as shown in the screens at the top of the next page. The main reason for this was so that I could switch the inputs to two separate mono channels, otherwise only stereo pairs would be available for selection in the mixer. The next job was to configure the MIDI tab (as shown in the bottom screen on the next page). My controller keyboard, which appears in the MIDI Ports list as 'Keystation', was already connected via USB and ready to go. I needed to switch the Audio Kontrol 1 On for both Input and Output in the Track column. I also switched on Sync Output, which allows compatible devices to use MIDI clock to synchronise their LFOs and so on. This is also how you would synchronise a drum machine that can accept external clock.
Mixer Setup & Recording
Like a plug-in instrument, a MIDI hardware device is controlled from a MIDI track in Live. However, unlike soft synths, you can't monitor the audio using the same channel, so you need an audio track for each MIDI device if you want to monitor or record it. The screen to the right shows the track setup for playing and monitoring the Matrix 1000 in my example. The MIDI track's input is set to receive MIDI data from any input (which will be my controller keyboard). The 'MIDI To' section has been set to Audio Kontrol 1 and MIDI Channel 1. On the audio track, the 'Audio From' section has been switched to 'Ext. In', which then brings up the choice of inputs one or two in the menu below. The final step was to set the Monitor mode of both channels to 'In', and I could then play and hear the synth. All that was left was to adjust the input gain on the audio interface to get a healthy level in Live.
 The MIDI setup for controlling external instruments with Live.If you want to record something, you are now faced with a choice of recording as MIDI or audio. All you need to do is click the record button on the MIDI or audio track to arm it. Whichever you decide, you should also switch the Monitor mode on that track to 'Auto', and you'll then be able to hear both what you are playing during recording and any recorded Clips that you play back.
There's a difference in how the Auto monitoring mode operates between audio and MIDI tracks. When a Clip is playing back on an audio track, the input is muted. On a MIDI track, however, you can hear both a Clip that is playing back and what you play on the keyboard. Be sure to check whether MIDI Overdub mode is active in the Options menu, because if it is and you play the keyboard while a MIDI Clip is playing on a record armed track, you'll be recording into the Clip!
One cool consequence of working with a separate audio track is that you can apply audio effects to the track while you are playing and recording, but they won't be recorded to any audio Clips. This is because the effects are on the monitoring side of the signal path, so don't get recorded to disk. This leaves you free to change the effects and plug-ins at a later time, such as when you come to mix the track. However, if you apply any MIDI effects, like an Arpeggiator, to the MIDI track, and then record to the audio track, this will, of course, be part of the recorded sound.
Latency & Hardware Synths
 The track setup for playing and monitoring a hardware synth, as discussed in the main text.Latency is the delay between the signal leaving your synth to go through your audio interface and software, and emerging again. The computer has to give itself time, a 'buffer', in which to perform all the necessary signal processing. The bigger the buffer, the longer the delay in the signal path through the computer. Latency is more of an issue when working with external synths, as Live 's automatic delay compensation cannot shield you from its effects. In earlier times, people occasionally worried about the response time of their MIDI instruments, but that's a minor issue compared to the latency problem caused by monitoring audio through a computer.
Consider this scenario: I play my Matrix via Live, while also monitoring through Live as in the above configuration. The first problem is that I may notice a delay between striking the keys and hearing the results, and this might put me off too much to record properly. In fact, with this particular audio interface and the buffer set to the default 512, I get a total through-delay of 33.4ms, as reported in Live 's Audio Preferences. This would probably be very distracting for a concert pianist, but most of us computer musicians have got quite used to it and adjust unconsciously. When it is a problem, the solution is to monitor the direct signal from the synth. Most decent audio interfaces have a provision for routing input signals directly to the outputs (as well as into the computer). You can then turn down the audio track in Live just while you record.
 Adjusting the Track Delay.However, if I record the performance as MIDI, whether with direct monitoring or not, the problem will come back as soon as I want to monitor the signal through the computer again. I'll want to do this in order to process the synth track and mix the song in Live. One answer, of course, is to forget recording MIDI for external synths and just record everything as audio. However, staying with MIDI is more flexible, so it's worth finding a solution. The problem is that if you record with direct monitoring, the signal will sound delayed when you switch back to monitoring through Live. On the other hand, if you record while monitoring through Live, you will naturally compensate for the delay by playing the keys early, which will be reflected in the MIDI recording. This is fine until you decide to quantise the MIDI data you recorded, or draw notes in on the grid! In either situation, the problem can be fixed by using Live 's Track Delay feature.
The first thing you need to do is check the Preferences to find out how much latency you have. In my case this is 33.4ms. (You can ignore the Drive Error Compensation setting in this context: it's used to correct audio drivers that are not reporting the correct error to Live, and therefore messing up the Automatic Delay Compensation). Note the latency, and then go back to the mixer. Now enter the value (as closely as possible) as a negative figure into the Track Delay field on any MIDI tracks that are playing external hardware devices, as in the screen to the left. If you can't see the field, click the 'D' button in the master show/hide buttons at the bottom right of the mixer. The MIDI data on these tracks will now be sent early, and the audio will be heard in time with the rest of the song.
Note Off...
That's it for this month's Live workshop. Hopefully you'll be able to apply the lessons from the example we've looked at to your own external MIDI hardware. Using MIDI synths may not be as convenient in Live as virtual instruments, but it's well worth the effort to inject some fresh sounds into your music, and they are extremely CPU efficient!
Changing MIDI Programs With Live
Most of the big sequencing and audio packages have functions on their MIDI and instrument tracks for making patch (program) changes on the MIDI device they are controlling. This allows you to browse patches, but also means that the device recalls the correct one when you re-open the session at a later date. Unfortunately, Live doesn't have an equivalent track-based Program Change setting. Instead, you can set a bank and program in any MIDI Clip that sends a Bank Select and Program Change message when the Clip plays. This is fine for recalling sounds when you open a project, but is not much use for browsing sounds. Before we look for a workaround, let's see how the Clip-based Program Change messages work.
 If you select a MIDI Clip and display it in the Clip view, you will see that in the Notes Parameters section there are three fields labelled Bank, Sub Bank, and Program. Any values you enter here will be sent when the Clip plays. Different MIDI devices have slightly different ways of storing their patches and don't always respond in the same way. The standard is for patches to be stored in banks of 128. If a device has more than 128 Banks (very unusual), the Sub Bank command may be needed. In fact, you may find that only the Program Change command works. The Matrix 1000, for example, does not respond to the Bank commands sent by Live. Scanning the user forums suggests that Live 's Bank Select function is rather hit and miss, but there's been no word from Ableton about this. Each Clip can have a different Program Change, so you can have a MIDI track that plays completely different sounds each time you launch a new Clip.
So what about browsing sounds? The first and simplest answer is that due to Live 's lack of dedicated Program Change buttons, it's easier to use the front panel of your synth to browse through patches. However, if this is inconvenient because the synth is out of reach, there is an uglyish workaround, which is to use a MIDI Clip to send the Program Change messages. You could use a Clip on the MIDI track for the instrument, but it's fiddly because you'd have to keep switching monitoring modes and you may have other Clips on the track.
A better option is to make another temporary MIDI track, and assign it to the same MIDI destination. Then double-click in the first Clip slot to create a blank Clip. You can now enter values into this Clip to change patches remotely. As long as you are playing back and the Clip is looping, it will quickly send out any changes you make. Otherwise you will need to play the Clip manually to force the message to be sent.
Probably the best alternative is to use a MIDI librarian program, or find a dedicated editor utilty for your synth so you can remotely control it outside of Live.


