Try some guitar-amp modelling with Live, a couple of plug-ins and a bit of know-how.
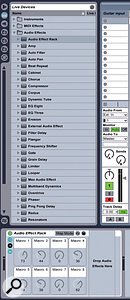
 Live's Audio Effects Rack allows you to drag in and drop Live and/or third party plug-ins. Once you have your effects and amps arranged here, and have Macro-mapped the controls, you can name the Rack and save it to your Library.
Guitar-amp modelling now offers such realism and convenience that it often requires a special occasion to make us mic up an actual combo or stack. Plug-ins such as Native Instruments' Guitar Rig and IK Multimedia's Amplitube evoke the essence of Fender, Vox, Marshall and more. But having just depleted your piggy bank for Ableton Live, you may not be ready to shell out another hundred or two for amp-modelling software. Fear not: if you bought the Live Suite, you can get a whole range of amp and effect sounds without any further spending by using the Amp and Cabinet plug-ins included with the DAW. (If you just have the basic Live, roughly £80 will let you add Amp and Cabinet à la carte.) By combining these two plug-ins with a few others — some included in the basic version of Live, some available free on the interwebs — you can dial up virtually any guitar sound. In this month's workshop, I'll show you how to build a software amp and effects rig that will have you thinking twice before pointing that SM57 at your amplifier.
Amping Up
 TAL Togu's free TAL-Dub delay plug-in will give you everything from slight ambience to full dub effects. You can map an expression pedal to the blend for real-time control of your delay amount, or to the feedback for some cool runaway repeat effects. The low-cut filter will help to ensure that your mix doesn't get muddy.
You're likely to find yourself using this rig on a variety of projects, so to make access easy, let's begin by setting up an Audio Effects Rack containing everything you need. First create a track called Guitar input. By routing this effected input to any track that requires guitar, you can avoid using multiple instances of your rack, saving CPU power. If you have bytes to burn, you can, of course, use as many of these racks as you like.
Drag and drop an Audio Effects Rack onto the Guitar input track and click on the icon with the three dots and three parallel lines. Drag the Amp and Cabinet plug-ins into the area that reads, 'Drop Audio Effects Here'. If your style is primarily clean, funky rhythm work, set the amp type to Clean (read: Roland JC120) and stick with the cabinet default settings. For traditional jazz, you might want to change the microphone from Condenser to Dynamic, eliciting a warmer tone. Boost mode will put you in the Vox area, especially with the 2x12 cabinet setting. The Rock amp offers classic rock à la Marshall — and here the 4x12 cabinet is suggested. Lead and Heavy also benefit from the 4x12 configuration to produce variations on heavy-metal grit in the Mesa-Boogie Rectifier zone. The Blues option is particularly expressive, offering a realistic, dynamic response to pick attack, and adding tube-like warmth to clean and slightly gritty settings.
At lower gain settings, all these amps clean up nicely when you back off the guitar volume. Feel free to experiment by varying the Gain, swapping out cabinet configurations, or changing the mic type and axis. As with real amps, higher Gain can add amp noise, so if you live for more distorted settings you might want to add Live's Gate plug-in to your rack.
Stomp On It
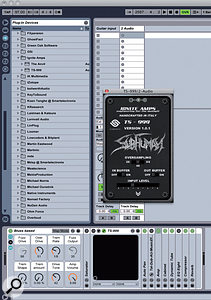
 A click on the double arrow at the bottom of the TS999 reveals a number of other parameter controls. Setting sample rate at 4x is a good place to start. Play with the other settings until you get the best sound for your guitar.
Live doesn't come with stomp-box models per se, so if you want an overdrive in front of the amp, download Ignite Amp's free TS999 plug-in (www.igniteamps.com). Place it in the Audio Rack in front of Live's Amp and — hey presto — you have a Tube Screamer-type drive to add at will. The rack configuration really starts to come in handy here. You can configure the TS999's drive and tone controls for the Live GUI by clicking Configure and rotating the knobs on the original GUI. It's easy to then set two Macro controls to modulate the amount, keeping these parameters available when collapsing the rack.
Overdrive is timeless, but these days fuzz is all the rage. The Saturator plug-in supplied in the basic version of Live can be set up to add an impressively dynamic Fuzz Face flavour. Start with the default settings, choose Hard Curve, boost the Drive to about 4dB, and pull the Output down to -7dB. If you wish to soften the sound, place it in front of a slightly overdriven amp setting, or combine it with the TS999 set for low drive. Here, too, you can map the Drive and overall Output to the rack controls. Unlike Big Muff-style fuzz, Fuzz Face fuzz is very interactive; the sound you get varies greatly depending on the type and amount of amp and overdrive gain stages further down the chain. It is also affected by the guitar's volume control level. The Saturator will clean up like a Fuzz Face when you back off your instrument volume, creating Hendrix-style rhythm tones unavailable any other way. This is all part of the fun, so experiment.
Like fuzz, tremolo has recently returned to favour. Live's Auto Pan can be used as a creditable mono tremolo: reduce the Phase setting and Shape to zero, choose sine wave, and adjust the Amount and Rate to taste. Creating modern chopper effects is as easy as turning up Shape and Amount, and/or choosing a harder-edged waveform. You can place this effect anywhere you like in the chain. I've changed the Rate to sync'ed mode, but for an authentic vintage effect you can leave it on the Hz setting. You will want to map the rate and amount to the rack Macro controls.
The basic version of Live also offers chorus and flanging plug-ins. The Internet is rife with free pedal-style emulations as well, so build up your rack as much as you think you need, but, as with a real pedalboard, the simpler the signal chain, the better the tone will be.
Heightened Reality
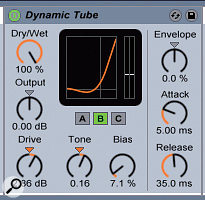
 Just a little Drive from Live's Dynamic Tube will add realism to your rig.
Your rig thus far should sound pretty good, provided you're using the best interface you can afford and making sure the input level of your guitar is not overloading or under-powering the DAW. Still, there are a few things that can heighten the realism of your virtual rig.
Live's Dynamic Tube plug-in will very subtly enhance the warmth of your virtual valve tone. You don't want to add so much drive that it distorts: you should just barely hear a rounder bottom and softer top end. Throwing in Live's EQ Eight will let you fine-tune any frequencies you feel need boosting or cutting.
Valves can impart a subtle quality of compression that is felt more than heard. Add Live's Compressor with a ratio of 2:1, an attack of about five milliseconds, a slow release, and a threshold of -26dB. This will make your rig feel more like the real thing, and help it sound more like a finished record. These effects needn't be mapped, as they are of the set-it-and-forget-it variety.
Air It Out
The true test of a real amp is how good it sounds in a room, without artificial ambience. Set properly, your rig should now sound pretty good dry, but who doesn't like a little delay or 'verb?
Live offers a couple of delays, but for analogue-aping awesomeness it's hard to beat TAL Togu's freeware TAL-Dub. This plug-in, available at www.kunz.corrupt.ch, does a great imitation of a classic tape echo, offering analogue-like warmth, ease of use, and a beat-sync option. Set it to manual, bring the resonance way down, and link the delays together to emulate an analogue delay pedal. For tape delay sounds, increase resonance to simulate changes in tone as tape delays repeat over time. By mapping the delay time and feedback to the Macro controls, you can link them with a MIDI controller to create cool dub effects. Do map the blend control as well, so you can quickly lower the volume as the feedback runs away, to avoid speaker or hearing damage.
Live's Reverb makes a perfect final link in your rack's chain. Use it on its Eco setting to save CPU power and mimic the lo-fi sound of springs, or bump it to High for lush, Lexicon-style reverbs. Turning the Stereo setting down to zero will let you place your guitar precisely in the mix, while still adding air.
Control Freak
Once you have your amp rack configured to taste and mapped to the Macro controls, you can set up a MIDI foot controller to turn individual effects on and off in true stomp fashion, and/or an inexpensive 'knobby' controller to quickly adjust parameters, as if you were twisting the knobs on a real amp or pedal.
Elaborate, effects-laden amp-modelling software, like Guitar Rig, Amplitube, and Studio Devil Amp Modeler Pro, is certainly worth the money, but you can learn a lot, have great fun, and cover a wealth of sonic territory for a pauper's price with this simple Live setup.


