We make your life easier with tips on how to work more efficiently with Live.
Live's combination of linear arranging and matrix-style clip triggering makes it easy to lose sight of what's where, so developing a consistent way of working can pay off in significantly better results. In this month's column we'll suggest some good habits to keep things straight while taking full advantage of Live's special features.
Name Names
If you're creating an arrangement from Session view Scenes, you'll save yourself a lot of head scratching by using an arrangement Locator to mark the location of each Scene in the arrangement and matching those Locators' names to the corresponding Scene names. Likewise, if you use Live 9's new Consolidate Time To New Scene command to create Scenes from the area between two Locators, match the Scene name to that of the Locator marking the beginning of the time range.
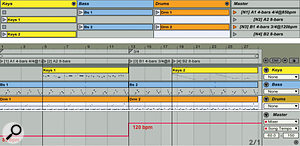
A handy feature of Scene names is that you can use them to set Live's tempo and time signature. The tempo and time signature must be separated from other text and from each other by at least one character ('Scene 4/4@120 bpm' or 'Scene 120bpm 4/4' but not 'Scene120bpm4/4'). You can include these elements in Arrangement view Locator names, although they will have no effect. For time-signature changes use the Arrangement view's Time Signature Change Markers and use the Master track's Song Tempo automation for tempo changes.LiveTech_0614_01
When your Live project includes several sets, you might want to serialise their names either chronologically
 Scene names can contain both time-signature and tempo changes as shown in the first and third Scenes (top). The Arrangement View Locators (bottom) use similar names to reflect the Scenes they came from. Time Signature Change Markers above the Locators are needed to effect the time-signature changes, and Master track Song Tempo automation is required to effect the tempo changes. You may also want to map similar computer keys to trigger Scenes and jump to the corresponding Locators, as indicated here by square brackets in the names. by starting their names with date codes (140228, 140228a, 140301 ...) or sequentially by starting their names with an index (01, 01a, 02 ...). I go one step further and always work on a set named 'Master', using Live's Save a Copy option for serialised backups. That also lets me save project notes in a Live Lesson associated with the song name 'Master'. (For more information on creating Live Lessons, see the November 2011 Live column.)
Join A Group
Grouping Live tracks can both rationalise and simplify your mixing and mastering, especially if you have a lot of tracks. The most obvious approach is to group tracks such as percussion, vocals, leads or pads that form a logical submix. Another strategy is to group tracks that you want to process with the same effects or route to the same Return tracks. Once you have settled on levels, send amounts and pan positions for the tracks in a Group, you can fold the Group so that you have to deal with only one channel strip when mastering. If you use a tablet or hardware control surface for mastering, you can often access all the Group strips in one or two control-surface banks once all the Groups are folded.
Grouping can be handy when you're creating an arrangement from Session view clips. Once you have a clip or Stop/Record button in any slot on a track, the Group containing that track will have a clip-launch or Stop/Record button in the corresponding Group slot. These buttons work exactly like Scene Launch buttons except that their range is restricted to the tracks in the Group; I call that a 'Group Scene'. Group Scenes are especially useful when creating an arrangement because you can keep one Group Scene running while triggering other clips and Group Scenes to play along with it.
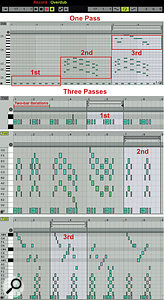
 Depending on the material and your playing skills, you can overdub parts in Arrangement view in one or several passes. For one-pass overdubbing, simply set the Arrangement view's loop brace to the desired length, activate the transport's Arrangement Record and MIDI Arrangement Overdub buttons, and go for it. For multi-pass overdubbing, set the loop brace to enclose the desired number of iterations in each pass and record each pass separately. After recording a pass, crop the clip to the best iteration and duplicate it to create multiple iterations for the next overdub pass.Groups are also useful for managing and archiving virtual instrument (VI) tracks. When you're using several MIDI tracks to play the same VI or using External Instruments to play different channels of a multitimbral instrument, group the relevant tracks together and then drag the Group to your project in Live's browser to archive everything related to that VI. Once you've done that you can export, resample, or freeze and flatten the tracks as needed to save CPU and then delete the source VI tracks. When you need to change something, just drag the archived Group back into the set. To speed the rendering-to-audio process, delete or deactivate any MIDI clips you don't need. For example, if you're at the arranging stage, there's probably no need to render Session view clips.
Overdubbing MIDI In Arrangement View
Session view is so handy for overdubbing clips that you might overlook the big advantage of overdubbing in Arrangement view: each overdub pass is captured separately. That allows you to go back to an earlier pass instead of starting over when you make a mistake. Here's the quick way to do it:
1. Set the Arrangement view's loop brace to the desired clip length and position it over the part of the Arrangement you're recording along with. (If you're recording solo or along with a Session view Scene, position the loop over an empty part of the arrangement and ensure any accompanying Scene doesn't contain a clip or Clip Stop button on the recording track.)
2. Turn arrangement looping on and set the record-start position to the beginning of the loop.
3. Activate the transport's Arrangement Record and MIDI Arrangement Overdub buttons and then start the transport.
When you stop recording, you'll notice that each pass is a separate section in the recorded clip, and that the clip's loop brace encloses the last pass. You can, of course, move the loop brace to an earlier pass and redo your overdub from there.
When you're not recording along with a portion of the arrangement, you can overdub in several passes, thereby allowing yourself multiple opportunities in each pass to get it right. For example, to give yourself four iterations when overdubbing a two-bar loop, set the Arrangement view's loop brace to eight bars. Now record four iterations of the first part in the first eight-bar pass and then crop to the best two-bar iteration and use the Clip view's Dupl(icate) Loop button to create four iterations of that. Repeat the process as needed for additional overdub passes.
A/B Comparison
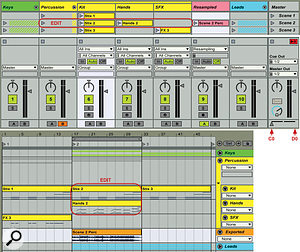
When the time comes to do some serious editing to a Live set, things go a lot more smoothly if you can easily compare the changes to the original version. The simplest way to do that in Live is to use the Crossfader, placing an audio rendering of the current version of the section being edited on the A-side and routing all the tracks being edited to the B-side of the crossfade. If the tracks you're editing are not already in Groups, you can temporarily group them together and route only the Group to the B-side.
When you're working in Arrangement view, set the arrangement loop to enclose the section being edited and use Live's Export At the top the percussion portion of Scene 2 is being edited and compared with a resampled version of the original. At the bottom the percussion portion of the part of the arrangement enclosed in the loop is being edited and compared with an exported version of the original. In both cases, the extremes of Live's Crossfader toggle between the original and edited versions, and MIDI notes C0 and D0 have been mapped to select those Crossfader positions. Audio/Video (Command-Shift-R/Control-Shift-R) to render the loop of the track, Group or Master as needed. When you're working on one or more Scenes in Session view, use Live's Resampling option to capture each of the Scenes as audio. After resampling or exporting, import the resulting audio clips to the corresponding clip slots or arrangement position on the new audio track.
If you're already using Live's Crossfader for other purposes, you can still configure the new audio track as just described and then create another audio track as a temporary output for the tracks being edited. In that case, configure buttons or MIDI note messages to toggle the Track Activator (aka mute) buttons of the two new audio tracks.


