
MIDI plug-ins are often overlooked, regarded perhaps as the poor relations of the more glamorous audio type, but they can give you real power-user status if you take the trouble to investigate their capabilities.
Even the most inexperienced user of DAW software such as Digital Performer generally takes the use of audio plug-ins for granted, sprinkling them liberally over the tracks of a typical multitrack mix. Where DP diverges considerably from some other software though, is in its use of MIDI plug-ins. It's sometimes easy to overlook these, and yet they're as intuitive and easy to use as their audio counterparts. Take the Quantize plug-in, for example: instantiate this on a MIDI track's insert slot and its settings can be tweaked repeatedly while DP works out quantisation on the fly, giving you tidied-up timing while leaving original MIDI track data intact. The diminutive Time Shift is equally useful, allowing MIDI data to be effectively replayed behind or ahead of its original position; a little bit of negative shift can compensate for MIDI latency or slow-speaking synth sounds, for example.
What Quantize and Time Shift have in common is that they're designed to work on MIDI tracks during playback: both of them 'look ahead' in a stream of pre-existing MIDI data, so that they do the right thing at the right time. There are some MIDI plug-ins, though, that can work on incoming MIDI data in real time, as you play, and it's two of these that I'll be focusing on this month. Between them they can take both problem-solving and creative roles, as we'll see.
Change Velocity
Most MIDI controller keyboards generate key velocity data, and most hardware and software instruments respond to it, often producing a corresponding variation in volume or brightness of sound. More sophisticated controller keyboards will offer a variety of response 'curves', varying the feel of the keyboard from light (requiring very little effort to achieve the highest velocity values) to heavy (requiring a sledgehammer). But even the very best will often only have a few fixed curves, and may offer no control whatsoever over release velocity response (even if they're capable of actually measuring it).
When you need more control, try DP 's Change Velocity plug-in on your record-enabled MIDI track — it's superbly flexible. First on a tour of Change Velocity are its five modes of operation. These are Set, Add, Scale, Limit, and Compress/Expand. All are easy to work with and can step in to help with a variety of MIDI tasks. Each is also capable of affecting either note-on or note-off velocity; a pair of radio buttons decide which.
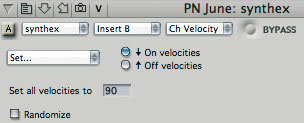


- Set (below) is dead easy. It renders all incoming velocities as a single new velocity, which you type into the value box (you can also click and drag in the box). Typical applications for fixed velocities include vintage-sounding, mechanical drum-machine parts, or even authentic harpsichord parts, especially if your harpsichord sound source and controller keyboard insist on being touch sensitive.
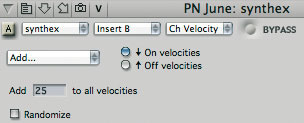
- Add (below) simply adds a fixed value to all velocities. In many cases this works like a volume control, and is ideal for notching up velocity if you've recorded a piano part, say, and now want to play it back using a different MIDI instrument or patch which is less sensitive overall to velocity. Note that you can dial in negative numbers, too, to make this mode behave as if it were called 'Subtract'.
- Scale (below) is a little more sophisticated and acts like a velocity multiplier. A setting of something like 120 percent here could provide a solution if you have a MIDI master keyboard (like some old Yamaha DX7s, for example) that doesn't transmit the full range of key velocity. You still get a natural, linear response, but the velocity range is expanded.
- Limit (below) is a good one. A setting such as 20 to 100 would make received velocities below 20 come out as 20 and those above 100 come out as 100, but the range in between is untouched. I've found this mode useful with multisampled instruments or drums where I specifically don't want to trigger some velocity layers. For example, I have a sampled upright bass sound that has a really aggressive pizzicato effect mapped to velocities of 110 and above. Useful sometimes, but when I don't want it intruding accidentally I simply limit velocities to 109, to effectively turn off that layer of samples.
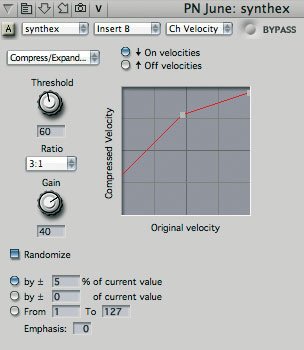
- Compress/Expand (right) is the most sophisticated mode and behaves very similarly to an audio compressor or expander, in that it has Threshold, Ratio and make-up Gain controls. These behave just like their audio counterparts, so that the net effect can be like combinations of the other modes. For example, set a Threshold of 60, a Ratio of 3:1 and a Gain of 40, and you get an overall increase in velocity (like you'd get with 'Add') but with the uppermost part of the 'curve' smoothly compressed (like you'd get with 'Scale'). The ratios in the form 'x:1' represent compression of the velocity range, while '1:x' represent expansion. At all times the graph display makes it pretty clear what's going on — you just run a line vertically up from the bottom of the graph (original velocity) to the red line to see what your 'compressed' velocity will be.
All five modes have a Randomise feature, which you turn on with a tick-box at the bottom left of the plug-in window. Unsurprisingly, this introduces random fluctations of velocity into the proceedings, and the amount can be controlled in terms of percentage, absolute value or range. The Emphasis value box can be set between -9 and +9, and skews the randomness towards lower or higher in the range.
Quick Fixes
Solutions to a couple of typical DP head-scratchers...
My virtual instrument doesn't show up as an output in MIDI tracks
First of all, the virtual instruments you have installed on your Mac won't appear as potential outputs in your MIDI tracks until you've actually instantiated them in an Instrument track. Importantly, though, they still won't show up unless that Instrument track has a valid audio output. Check to make sure the output is not trying to use audio hardware that is not currently enabled. You'll be able to tell because the output name will appear in italic text.
I can't hear audio scrubbing or other audio 'previews'
When using the audio scrub tool, or clicking and holding a soundbite with DP 's Audible Mode enabled (toggled with the little 'speaker' button in the Consolidated Window's title bar), you should be able to hear an audio 'preview'. If this doesn't work, hit Shift-U to open the Bundles window. Under the Outputs tab, check the topmost bundle in the list. It's this one that DP uses to play 'preview' audio, and if it's set to an audio output that is no longer enabled, or to a pair that is not connected to your monitoring system, you won't hear it. To fix the problem, just move your main output bundle to the top of the list.
Arpeggiator
If Change Velocity gives you MIDI control options you never knew you had, wait until you try Arpeggiator. As the cliché goes, it does exactly what it says on the tin: it's a great arpeggiator, combining preset patterns with full programmability, similar to the facility you get on some synths. Because it's a MIDI plug-in, though, and is active even when DP 's transport is stopped, it can be used to arpeggiate any hardware or software instrument at your disposal. Be careful — it's addictive!
Arpeggiator 's controls are split into three groups, relating to note duration and arpeggiation range, rhythm, and melodic pattern. There's a heck of a lot you can configure, so rather than going through it all blow-by-blow, let's look at how you'd achieve some common arpeggiation effects. These descriptions all presuppose that you've already inserted Arpeggiator on a record-enabled MIDI track that's driving a hardware or software synth.
 Vintage 'up-down' pattern, eighth notes, two-octave range (below)
1. In the top part of the window, choose a Range of +1 octaves (that's because 'Normal' represents one octave, so +1 gives us our two-octave range).
2. In the Rhythm section, 'Grid' is what's needed for this type of repetitive rhythmic value. Then choose an eighth note from the range of durations on offer. You might need to click the little Time Format button (in the Rhythm' section) a few times if you don't see the notation symbols to begin with.
3. Finally, down at the bottom of the plug-in choose 'Up-Down' from the Melodic Pattern pop-up menu. Playing some chords should now produce the desired effect. Play around with the 'Repeat top note' and 'Repeat bottom note' tick-boxes to get just the right effect.
Notes or chords repeated very fast, even after key-release (right)
1. For this tremolo-like effect, first set a duration of 30 percent (more on this in a moment)
 2. In the Rhythm section, choose a Fixed Value of 0:00.10 minutes (that's 0.1 seconds, causing 10 notes a second to be played). Again, the Time Format button provides access to the correct setting.
3. For Melodic Pattern, choose Chord Play. This doesn't cause any actual arpeggiation to take place, but sets incoming notes to be simply repeated; that's why the Range setting is not important here.
4. Finally, tick the Hold notes box so that the repetition effect continues even when you've released the key.
From these two examples it's easy to see how different settings can radically vary the type of arpeggiation achieved. One of the most important parameters is Duration. This defines the length of the note or chord with respect to the rhythmic value you chose — so if duration is 50 percent and you've chosen an eighth-note rhythmic grid, you'll hear notes half that length (ie. 16th notes). Set duration to 100 percent and each arpeggiated note will be sustained right up to the beginning of the next one. This is fiddly to describe but totally intutitive when you start playing around with different values. Here's a tip, though: the duration setting is overrided if you use a sustain pedal as you play, and you can get some great effects by pressing it momentarily during arpeggiation.
Other options? Well, in the Rhythm section the triplet, grid offset and swing options are reminiscent of DP 's Quantize function. The Fixed Value spacing gives the option (as we saw in the second example on the previous page)) of not always having to arpeggiate in strict 'musical' values. You might use it to define unusual beat and tick values that cause arpeggiation to go 'across the beat', or go in and out of phase with other, more conventionally rhythmic arpeggiated tracks.

As well as 13 preset patterns in the Melody section, Chord Play and 'As Played' give useful extra flexibility, with the latter producing arpeggio patterns that follow the order in which you depress the notes of your chord. Beyond these options, though, Arpeggiator is genuinely programmable — and that's where things become really flexible. For the next example, I wanted a specific effect: a rising, two-octave arpeggio, followed by a series of repeated notes, some with rests in between. Sounds complicated, but it's easy to achieve.
 Top: record your custom pattern in a MIDI track. Right: now set Arpeggiator to 'Learn' it. 1. First, simply record a single example of the pattern you want to work with into a MIDI track. Don't use any MIDI plug-ins, especially not Arpeggiator, as you're doing that.
2. Then, after quantising if necessary, select the MIDI notes of the pattern with the I-Beam tool, to make a precise two-bar time-range selection in that one track. This selection is about to be 'learnt'...
3. Instantiate your Arpeggiator plug-in, if you haven't done it already, and in the Rhythm section choose 'Custom'. Type a name for your pattern (perhaps 'Complex 1') in the New Rhythmic Pattern Name field, and click Learn. The pattern will become automatically selected in the pop-up menu just above.
4. In the Melodic Pattern section, choose Custom from the pop-up menu, and as in step three, use the text field and button to name and learn your melodic pattern.
Now try playing a chord. Your pattern should be heard as expected. If not, try putting DP in playback and get a metronome click going, to ensure that you're triggering the melodic pattern on the first beat of a measure. Think carefully about what notes you're playing, too, as Custom patterns are very dependent on an appropriate chordal input, and can go astray if you're holding down too many or too few notes. You might also find it makes a vast difference if you tick the Use Learned Duration option — otherwise it's Arpeggiator 's 'global' Duration amount that's used here. All these things become clear in practice.
It's worth noting that these custom patterns are saved within the DP project file, so there's no way to access them from newly created or other existing projects. Also, Arpeggiator can't accommodate chords in custom patterns — its playback of notes is strictly monophonic, and you'll get unexpected results if you try to make it do otherwise. However, you don't always have to define both a rhythmic and a melodic Custom pattern. You can mix and match, adding custom rhythms to the preset melodic patterns, or using simple rhythmic patterns for complex melodies. Flexibility is the name of the game.
Compact Control Surfaces
There's a lot to be said for having a hardware control surface allied to your DP setup. Some dedicated transport controls can save a lot of mousing and are great to have when you're using a laptop, which has no separate numeric keypad. A real fader is also a boon, especially if you work much with automation. These days you don't have to mess about with a generic MIDI fader box or spend big bucks on the likes of the Mackie Control either, because several affordable USB-based and DP-friendly models are already on the market. Here's a quick round-up:


 Contour Shuttle Pro v2 £80: This 'edit controller' has been around for a few years now, and is actually a very simple device. Its various buttons and wheels mimic conventional keyboard commands. As such, it has no specific integration with DP and doesn't need a driver, but can be set up very flexibly, albeit with a little effort initially. It works great as a simple transport control, and in replacing a range of forgettable keyboard shortcuts with single button-presses. www.contourdesign.com
- Frontier Tranzport £130: This, too, has been available for a while, and was reviewed in SOS in July 2005 (see www.soundonsound.com/sos/jul05/articles/frontier.htm). Its real strength is as a wireless remote control — brilliant for controlling DP from a vocal booth, distant master keyboard or separate quiet room. The integration with DP is considerable: the display can show track names, settings and level meters, and as well as basic transport functions you can arm, solo and mute tracks, and do a good deal more besides. A great little device. www.frontierdesign.com
- Frontier Alphatrack £150: For a small price premium over the Tranzport, the Alphatrack loses the wireless remote control but gains a motorised fader and touch-sensitive encoders, and even more sophisticated control of many mix features in DP. Click on a track in the Mixing Board or an editing window and its fader position, other settings and metering are instantly transferred to the Alphatrack. You can also switch tracks using the Alphatrack itself. Additional niceties include a touch-sensitive jog/shuttle strip. www.frontierdesign.com
- Presonus Faderport £150: Going head to head with the Alphatrack, the Faderport (reviewed this issue) has a motorised fader and a single encoder, more dedicated function buttons, but no display or jog/shuttle capabilities. It's arguable that little is lost by the absence of a display, since you'll be using the Faderport in conjunction with a computer monitor anyway, and the slightly more straightforward approach might suit some users better. www.presonus.com


News: A Sea Change From Waves
Waves, renowned for their high-end (and high-cost) MAS-format plug-ins, recently announced a significant change to the pricing of 'WUP', the Waves Update Plan. This is one of those subscription-like schemes, similar to Native Instruments' Komplete Care, where owners of plug-ins or bundles pay an up-front fee in order to qualify for updates as and when they happen. Previously, getting WUP'd was a pretty expensive option for anyone who'd let it lapse, with the cost increasing the more out of date you were. Under the new scheme, though, WUP is a fixed cost, and for a fixed term — one year.
For folks like me, whose WUP lapsed back in 2004, WUP is again an affordable and attractive option, although Waves devotees who'd previously bought years of cover in one go will find the new prices somewhat more expensive in real terms in the long run.
It's especially tempting for DP users to get WUP, as Waves' plug-in support for the MAS format on Power PC and Intel platforms is still in a state of flux, and looks like it might only now get straightened out after the release of Mac OS 10.5 — which, of course, is right upon us. With all subscription-based software pricing you never really know what you'll get for your money (which is why many people are opposed to it on principle) but a WUP that takes you well into 2008 looks like it could well come good for DP users. More information is available at www.waves.com, although UK-based buyers should speak to the good people at www.sonic-distribution.com in the first instance.


