DP is now fully equipped to take advantage of MPE. Are you?
Back in SOS October 2022, we learned some of the principles behind MIDI Polyphonic Expression, and how to set up Digital Performer (v11 and up) to record and play back MPE data. Since then, more MPE‑ready synths as well as MPE‑capable controllers have joined the party. So I’d like to share a few tips and impart a bit of advice for using MPE.
Getting Started
 Screen 1: MPE controllers such as the ROLI Seaboard range and Keith McMillen Instruments’ K‑Boards have software editors that can customise their response to suit your playing style.
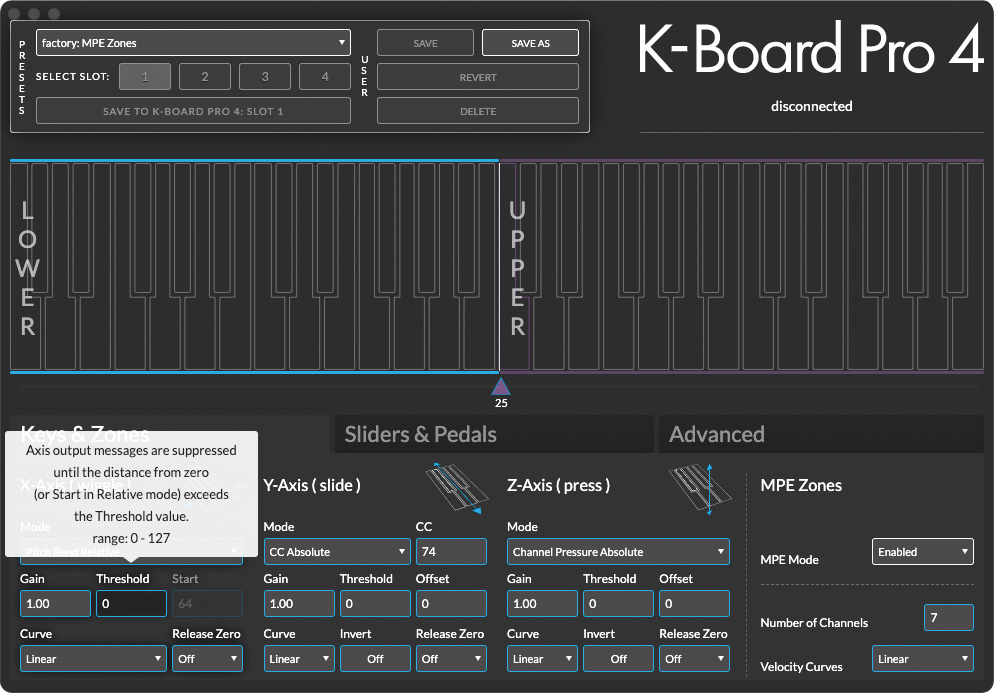 If you are approaching an MPE setup for the first time, you might need to make adjustments to your keyboard technique. Depending on your choice of controllers (I’m working with a ROLI Seaboard Rise 49 MkII and a Keith McMillen K‑Board Pro 4), making music on an MPE controller can feel like tapdancing on a waterbed, both dynamically and pitch‑wise. It’s worth mentioning that ROLI’s Seaboard MkII improves pitch accuracy considerably, but its response remains as accurate as your technique.
Velocity and pitch‑bend often elicit different responses on an MPE synthesizer compared with a conventional keyboard. You will probably need a lighter touch; fortunately, most MPE controllers can scale their velocity response or use custom response curves. There are other solutions to help your hands and MPE controller reach an agreeable compromise.
Relatively Speaking
You can be forgiven if you find playing an MPE controller a bit awkward at first; playing synthesizer keyboards is different from playing a piano, and playing an MPE controller requires yet another approach. Consider whether you need your synth to immediately respond to pitch‑bend or other controllers upon contact with the keys. If you need your synth to sound in tune, you’ll need to make sure that wherever you strike the key, pitch will be spot‑on: either starting at zero, or some other pitch within the range you intend. The latter requires a precision initial touch on the key’s horizontal axis, and can take some practice — violinists spend their lives making sure that their intonation is accurate. Likewise, you can alter the timbre of the synth gradually from the initial setting by sliding or moving your finger up the key, or you can land somewhere on the middle of the key to produce a radical change in timbre instantly. To address these issues, MPE provides Absolute and Relative modes for each gesture, including Key Pressure.
Glide (motion across the X axis of the key, which typically produces pitch‑bend) provides a good illustration. In Absolute mode, landing dead‑centre on the key will yield the expected pitch. Come down on either side of the centre and your note will be flat on the left, and sharp on the right. This is an excellent setup for creating a natural vibrato when you wiggle a finger from left to right, but difficult when you need to land on a specific pitch. Absolute mode assigns a range of values that always starts at zero at one pole of the axis, and increases or decreases as you advance your touch to the other pole. With Relative mode, any modulation along that axis starts at zero; pitch‑bend starts at the initial pitch of the key, modulation starts at a neutral state, and so on.
Another way to refine MPE technique is by setting sensitivity thresholds. In this way, modulation won’t start until you make more deliberate moves, and notes will not bend until you expressly move your fingers along that axis. Every MPE device I know offers software programming apps. The Dashboard app for ROLI MPE devices and Keith McMillen Industries’ K‑Board Pro 4 Editor offer easy‑to‑navigate graphical interfaces that simplifies the process, and a similar type of programming software (See Screen 1).
Bump Or Slide?
With all that said, sometimes you don’t want gradual modulation. It might be preferable for sounds to instantly change timbre (for instance) at first touch. In that case, you’ll want to opt for Absolute mode for the vertical axis. As with pitch‑bend, you’ll need to ensure that your MPE synth is set to respond in Absolute mode.
Another way to tame modulation is to dial back the synth’s response. To control pitch‑bend, for instance, try lowering the pitch‑bend range, which defaults to 48 semitones with MPE. Conveniently, the McMillen K‑board Pro 4’s third horizontal slider bar adjusts the synth’s pitch‑bend range, and the fourth slider controls pitch‑bend return time.
After The Fact
We can all get a bit overzealous in expressing ourselves in the heat of the musical moment, and sometimes we might find ourselves with an almost perfect take... almost. That can be especially painful when we have just one or two regions where we might have bent the notes just a little too far. Don’t fret; Digital Performer has a few effective ways to polish up those near‑perfect takes.
 Screen 2: MPE data can be displayed in DP’s MIDI editing window as points, bars or lines.
DP’s MIDI editing window affords several handy ways to view your data: as points, bars, or lines. Each view has distinct advantages, but I prefer viewing continuous data as lines, as its simpler view shows the original selection while ‘ghosting’ the edit as it is performed (Screen 2). In the illustration I draw a marquee around the continuous data (in this case, pitch‑bend), then click and drag to the proper level. It may take a bit of time to achieve precision, especially in the case of bending notes, but always remember that Undo is your best friend here, and a micro‑amount of flatness or sharpness can add a touch of humanity to the mix. It’s also important to select all of that group of events, rather than just the uppermost pitch‑bend event; you probably want the passage to sound smooth and continuous, rather than having the pitch abruptly corrected. The same aesthetic holds true for other continuous controllers.
For more precision, select the data, go to Region / Change Continuous Data (in the DP menu), and choose the data type. If your otherwise perfect pitch‑bend is sharp, select Limit to a Range and enter the highest and lowest values you desire. If it is flat, you can scale the data by a percentage or add or subtract a specific value to all events (Screen 3).
 Screen 3: The Change Continuous Data dialogue offers a number of options for manipulating your recorded MPE performance.
Let’s Get Crazy
Now that you know your way around MPE instruments and controllers (and presumably Digital Performer), I’d like to share a few tips and tricks.
DP’s region‑editing features open a can of interesting creative options. For instance, record a staccato passage with your synth responding in Relative mode. Be sure to strike different positions on the vertical axis. Then try quantising just the controller data for some interesting rhythmic modulation possibilities.
 Screen 4: The Insert Continuous Data command lets you be precise about which gestures you apply MIDI Learn to.
 Screen 5: Combine MPE with the MIDI Device Groups feature for a world of expressive fun.Some soft synths support MPE, but it may be that not all of the patches respond to all the usual gestures. For example, you might find a patch that would be perfect if only you could alter the timbre with Slide mode. Normally, your synth’s MIDI Learn feature would be your go‑to. Unfortunately, most MPE controllers send multiple gestures from your keystrokes, obscuring the message you need to send. Digital Performer’s got you covered though, with the Insert Continuous Data command in the Region menu (Screen 4). Send a short stream of data to your synth and you are good to go. While we’re at it, feel free to assign another parameter to respond to that controller: perhaps there’s a wavetable index you can sweep, or unison tuning you can modulate. Not all parameters will respond polyphonically, but that’s all right. You can create interesting timbral havoc with MPE Slide modulating filter cutoff and resonance simultaneously — it’s all fair game.
To that end, DP’s Device Groups can provide stunning sound‑design possibilities. In short, Device Groups let you stack multiple synthesizers as a single playable MIDI instrument. Load at least two MPE instruments, go to Studio / MIDI Device Groups, and a window will pop up. Click on the radio buttons naming the devices you have loaded (Screen 5). Audition sounds to find the ones that you’d like to layer; your MIDI Device Group will reflect your choices. As each patch will have a different response to Slide and Aftertouch manoeuvres, the results can be startling. While you’re at it, try setting the polyphonic pitch‑bend range to a different setting so that the final result yields an interval from a single note. More synths with different ranges can yield chords! One of the beauties of synth plug‑ins is the ability to load multiple instances, even of the same synth. I have had amazing results with Rhizomatic Software’s Plasmonic (Screen 6); it’s an MPE playground with no two patches sounding the same.
 Screen 6: Stack a few instances of Rhizomatic Software’s Plasmonic instrument for some MPE mayhem.
There’s plenty more to explore. DP11, with its combination of traditional MIDI and MPE manipulation, has opened huge wellsprings of musical creativity. It’s a powerhouse of expression, and I’m just getting started.
Just Ask The Axis

Here’s an easy way to achieve quantised X‑axis pitch‑bend with the McMillen K‑Board.
In the K‑Board Pro 4 Editor, it’s a snap to reassign the Y axis to pitch‑bend from its default assignment of MIDI CC 74. It’s actually easier to manage polyphonic bending than using the X axis, and great for pedal‑steel‑like performances. In combination with Device Groups, you can achieve some true sonic mayhem. There’s even a K‑Board preset that offers both lateral and vertical bending, so you can get a nice combination of long, continuous slides and polyphonic vibrato effects simultaneously. Notice how I’ve also remapped polyphonic pressure to send CC 74.


