Last month we looked at some basic applications of the Redrum module in Reason drum programming. Now it's time to move on to more sophisticated techniques for your rhythm parts.
In last month's Reason workshop feature, we looked at the Redrum drum machine, its built-in step sequencer, and how to build drum arrangements by chaining patterns together. At the end of the process, we converted the whole arrangement into individual note events in the sequencer, using the Convert Pattern Track to Notes command. This time, we'll look at some of the ways in which this data can be manipulated. The same techniques also work with drum tracks created using the NNXT sampler.
Firstly, why bother getting into all this when you've got the perfectly adequate pattern sequencer inside Redrum? There are several answers to that question. Firstly, if you want to make small alterations to data in some places and not others, it may be more practical to do it with individual notes than to create a new pattern and slot it into the pattern track. Also, when you use Reason 's traditional 'linear' sequencer in its Arrange View (all tracks showing), it's much easier to see what's going on in drum tracks if they contain notes rather than patterns (although you can have both). A more musical consideration is that Redrum patterns only allow three velocity levels per sample, so if you need anything subtler or more expressive than this, you need to use notes. Also, while the pattern sequencer can have its timing shuffled, if you want to groove-quantise the drums, or do anything that's not strictly grid-based, patterns don't cut it. Finally, there are other instruments in Reason that can be used for drums and percussion, in particular the NNXT sampler, and using the linear sequencer will allow you proper access to these.
Arrangement Groups
 The notes created by the 'Convert Pattern Track To Notes' function are arranged into colour-coded edit groups.Before getting down to the nitty-gritty, let's have a look at how arranging drum tracks as notes differs from using patterns. The first screen opposite shows an arrangement in the sequencer Arrange View. The top track is the drum part I discussed last month, which we converted to notes using the Convert Pattern Track to Notes command (under the sequencer's Edit menu). The track is divided into coloured blocks, called Groups. Groups act as single objects, so are easier to deal with than big clusters of individual notes. (They're useful in many situations besides drum programming: see the 'Get Into Groups' box for more details.) If you record drums in as notes using the keyboard, there will be no automatic Grouping on the track, and you'll just see a series of red lines, as in the ' Combinator 2' track in the screenshot. The reason why our drum track is nicely grouped is that when you use the Convert Pattern Track to Notes command, Reason cleverly places Groups where each pattern was in the pattern track. What's more, each instance of the same pattern will become a group with the same colour. In the regions where we used an empty pattern to drop the drums out entirely, no Group is created. For large-scale arrangement changes, you can pick up and move, or copy and paste Groups.
The second screen (above) shows what you see after double-clicking the first Group in the track, to open the Edit View. A useful feature of Reason 's sequencer is that it remembers the display settings you've set up in each of the two views (Arrange and Edit). These settings include zoom factors and which of the data 'lanes' are displayed. In the screenshot, the piano-roll (notes) view and the velocity view are showing.
Check Out This Groove
 Double-clicking a group in the Arrange View switches you to Edit View.With all the notes selected, this is a good time to try some groove quantising. I like to do this in the piano-roll view, as it's then easy to see the results of quantising. Choose a groove from the pop-up menu in the sequencer's tool bar (see the bottom screenshot overleaf). There are three preset Grooves, plus Shuffle and the User groove. (Note that if you had Shuffle enabled on Redrum when you converted the pattern to notes, the shuffle will already have been written into the sequence.)
The User groove is a clipboard that temporarily stores a groove template that has been created elsewhere in the song. This has been discussed before in these pages, but is worth a recap, as it is one of the most powerful ways to make different tracks in a song sit well together. You first select a sequence of notes from any instrument, then choose Get User Groove, from the Edit menu. Reason will analyse the selection and create a groove template based on how the selected sequence deviates from the grid. The selection must therefore have some rhythmic feel to it, or your User Groove will be no different to a regular grid quantise. Normally, you would select one or two bars from the performance you want to 'sample'. A common trick we've mentioned before is to find a REX loop that has a groove you like and use the Copy to Track command to create notes in the sequencer from it. You can then use 'Get User Groove' on these notes and apply it to your other tracks, instantly forcing the components of your song to gel together rhythmically.
 Our drum track as viewed in the sequencer's Drum Lane. The Velocity Lane reveals Redrum's Soft, Medium and Hard velocities. Getting back to our selection of notes, now that you've chosen your quantise type, choose a percentage from the pop-up to the right. If your drum sequence came from a Redrum pattern, this value determines how far the hits will be moved away from the grid. If you recorded the drums directly into the sequencer, the quantise percentage controls how far notes are moved from where they were recorded towards the groove template. Most grooves tend not to affect notes that fall on the beat, so applying groove quantise to a MIDI recording will tend to tighten up the timing, as well as introducing the groove. However, if your timing was quite sloppy, you can first apply a grid quantise (typically using the 1/16 setting), and then apply the groove quantise afterwards. Once you're happy with the results of your quantising, you can switch back to the Arrange View (click the first button in the sequencer's toolbar) and apply it to the rest of the track.
Get Into Groups
Groups are commonly seen in the Reason sequencer as a result of using the 'To Track' button in the Dr Rex loop player, but they can be used freely in any track and make arranging in Reason much easier. To create a Group, select a range of notes in any sequencer track and press Command-G (Mac) or Ctrl-G (Windows), or choose Group from the Edit menu. The selected area will become a coloured 'brick' that can be moved and edited as a single object. Different Groups are coloured differently, but Groups with identical contents are automatically assigned the same colour. Double-clicking a Group opens the Edit View, with the Group's contents selected and placed at the start of the viewable area. If you trim a Group by clicking at its edge and dragging, the bounds of the Group will be extended. This does not affect the contents, it merely extends the Group to encompass more adjacent notes. If there is another Group adjacent to the first, this will automatically be shrunk, as groups cannot overlap. Multiple Groups can be combined by selecting them and choosing Edit / Group again, or you can extend the first group until it encompasses all the others. You can also edit the boundaries of a Group with the Pencil tool.
Editing Notes
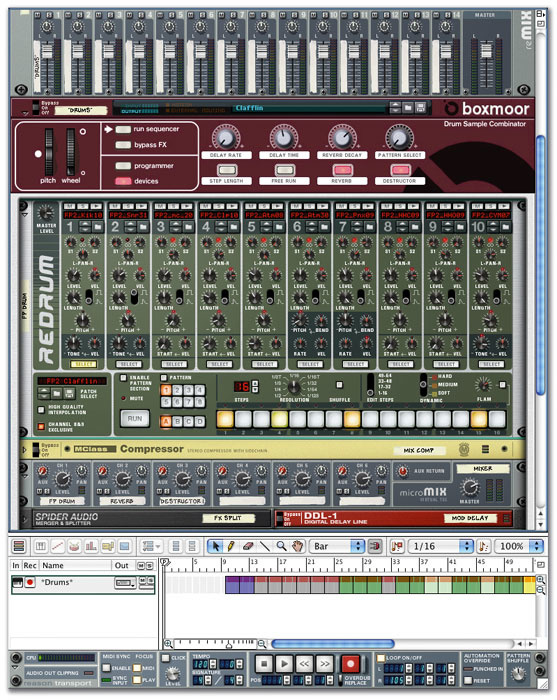
 Drum tracks created by step sequencing can be 'humanised' with a little groove quantising.There's much more you can do to your drum tracks in the sequencer — in fact, your preference may be to start work here, drawing in notes on the grid. Notes can be added, moved, deleted and extended, and may have their velocity altered. In the previous example, we worked in the piano-roll, or 'Key Lane' view. There's also a Drum Lane, as shown in the screen above. The data displayed here is exactly the same as in the piano-roll, except that only the 10 Redrum notes are shown, and the note order is inverted — i.e the channels run top to bottom. If you're working with drums in an NNXT sampler, the Drum Lane shows all 128 notes, simply labelled Note #1, Note #2, and so on.
To add a note on the Drum Lane or Key Lane, use the Pencil tool. The best method is to stay in Selection tool mode and hold down the Command key (Mac) or Alt key (Windows) to temporarily access the Pencil. This is because you can't delete notes with the Pencil tool, and if you're experimenting with a pattern you'll want to add and remove notes on the grid quickly. You should have Snap mode active, and mostly likely set to restrict your drawing to 1/16ths. If you click in the grid, a note 1/16th long will then be created; however, if you need to create longer notes you can click and drag. To create notes whose length is not restricted to multiples of the grid, hold down the Shift key. The initial placement of the note will still snap to the grid, but you can drag it to any length. If you need to remind yourself which note plays which sample, click the name of the note if you're in the Drum Lane, or click the keyboard graphic if you're in the Key Lane.
The 'Converted Notes' Sustain Problem
 sets Gate (top) or Decay mode for the sound going through that channel. The choice of position may be significant when a pattern is converted to notes.") The two-position switch (centre right of the channel) sets Gate (top) or Decay mode for the sound going through that channel. The choice of position may be significant when a pattern is converted to notes.Reason is very clever in the way it creates note sequences from pattern sequences and groups the patterns, but there is one problem that can occur when you do this. The screenshots in this article reveal that the notes created by converted patterns are very short. This is fine, except for notes sourced from any channels in Redrum that have their Gate/Decay switch set to Gate (see picture).
The two-position switch (centre right of the channel) sets Gate (top) or Decay mode for the sound going through that channel. The choice of position may be significant when a pattern is converted to notes.Reason is very clever in the way it creates note sequences from pattern sequences and groups the patterns, but there is one problem that can occur when you do this. The screenshots in this article reveal that the notes created by converted patterns are very short. This is fine, except for notes sourced from any channels in Redrum that have their Gate/Decay switch set to Gate (see picture).
When played from the sequencer, channels in Gate mode only sound for as long as the note triggering them is held. This means that they will be short and clipped off after you convert patterns to notes. In some cases, you may just want to switch the channels to Decay mode and set an appropriate Length. If that doesn't sound right, the solution is to select all the notes in the sequencer that trigger the problematic channel and extend them.
Velocity Editing
If your drum track started life as a Redrum pattern, the Velocity Lane will look something like the one in the top screen on the previous page, with most drums' velocities hard-quantised to just three values. Some variation in velocity will greatly enhance the feel of your drum programming. Velocity has an even greater effect on the NNXT-based acoustic drums, which respond differently to different velocities. Velocities are edited using the Pencil tool, or you can use the Line Drawing tool to set several notes to the same velocity or create crescendo or diminuendo effects.
 Here, the Pencil tool has been used to add some velocity variation to the hi-hat part.
Looking again at the top screen on the previous page, you may spot a problem: how can you change the velocity of the first kick drum when there are three other hits at that point, all with their velocity bars on top of one another? If you draw a velocity value at this point with the Pencil tool, all four hits will be affected. What you must do is click the note you want in the drum lane, which brings its velocity bar to the front, then hold down Shift while drawing in the value. This works across a range of notes too. For example, you might wish to introduce some velocity variation across all the hi-hat hits. To do this, first select all the hi-hats in the Drum Lane (or Key Lane). Now, while holding Shift, draw across the Velocity Lane with the Pencil tool, and each hi-hat that you pass over will be set to the Pencil's position (see screen above). As long as you keep using the Shift key, you will be able to make further changes to any of the hi-hats until you have the sound you want.
Reason News
- Free Refills: Line 6 are offering free 'Refills of the Month' at www.line6.com. A new download will be added each month for the rest of the year. The Refills are 'lite' versions and compilations of commercial Refills, and are each about 60-70Mb in size.
- Props On Tour: Propellerheads are taking Reason on tour around Britain and Ireland. The nine-date tour will stop at Sound Control stores in England and Scotland and at the London Calling exhibition and conference at Earls Court, before crossing the Irish Sea to Dublin. There are sure to be great give-aways at each event! Dates are as follows: 28th June, Sound Control, Bristol, 12-8pm (+44 (0)117 934 9955); 29th-30th June, London Calling at Earls Court, London; 1st July, Sound Control, London, 10-4pm (+44 (0)207 631 4200); 3rd July, Sound Control, Leeds, 12-8pm (+44 (0)113 242 6601); 4th July, Sound Control, Newcastle, 12-8pm (+44 (0)191 232 4175); 5th July, Sound Control, Edinburgh, 12-8pm (+44 (0)131 229 8211); 6th-7th July Dublin, Ireland (visit the www.futuresounds.ie web site for full details).
Final Flourishes
Once you've reached the point where your drum track has been fine-tuned and arranged, you may want to add fills, cymbal crashes and other points of interest throughout your song. It's much easier to do that at this stage than trying to account for it all from the beginning, when you don't know exactly how the arrangement for your song is going to turn out. The easiest method is to play through the song a few times and play along with your Redrum or NNXT, controlled from your keyboard or pads. When you know what you want, you can drop in and record. There are two options here.
First, you could record on to the existing drum track. If you do this, make sure you have the record mode set to Overdub (not Replace) in the transport bar. The other method is to use a separate sequencer track, which is safer and will make it easier to locate and edit your new additions. Choose Create / Sequencer Track, and name the new track 'Fills' or 'Extras', or whatever. Then, in the 'Out' column in the sequencer, choose the Redrum or NNXT and you have an extra track controlling the same device as your main drum sequence.


