
The arena of video production can seem daunting, but most audio engineers will find their skills transfer quite easily. In this introductory article, we cover the basic process of making a video from start to finish.
The music industry is in a constant state of flux, and there are now countless ways to distribute music digitally without ever signing a record deal. Though it's great to be able to sell your music directly to the paying public, ease of distribution goes hand in hand with rduced importance: it's expected of an artist to be on iTunes, so a presence on the digital music store no longer works as the promotional tool it used to.
As the number of web sites and TV channels climbs, and thousands of punters have signed two‑year mobile contracts for multi‑touch pocket computers, there's increasing demand for engaging promotional material. Unless the recording process itself is the focus of their hobby, most of those producing and recording their own music intend to release it, and for that release to be as widespread and popular as possible. For most artists, this extra promotion is likely to mean a music video of some kind, which can be embedded on a web site or social networking profile, given away as a download, or even broadcast via traditional TV services.
Artists find themselves in a privileged position these days, with the technology and software required to create promotional visuals being relatively inexpensive. Just as music recording made a relatively quick jump from the expensive and dedicated studio to armies of home enthusiasts, film‑making is set to do the same over the next few years. Specifically, recent advances in DSLR (Digital Single Lens Reflex — digital stills cameras capable of recording HD video) cameras have made extremely high‑quality video capture available for around the £600‑1000$800-1200 mark, dramatically changing the work‑flow of many established film‑makers and home videographers alike in just a few short years. The world of professional and semi‑professional video is rather up in the air at the moment, with home users grasping high‑definition creativity with both hands while the top dogs attempt to stay ahead of the game, by upping the picture resolution further and even introducing stereoscopic 3D programming and production.
I'm primarily a musician, but until recently I worked for a number of years producing, directing, lighting, shooting, editing and animating for an IPTV (Internet Protocol TeleVision, or TV over Ethernet) and marketing company. Before taking that post, I'd never picked up a video camera more complex than a handycam, and had only ever played with Final Cut for a couple of hours, so how was I not promptly ejected from my first video job? Because it's not really that hard to learn video production, and certainly not as hard as some might have you believe! Having a background in audio and an open mind really is enough to get you a large part of the distance.
Many skills used in audio production are easily transferable to video work, and in my experience competent audio engineers will have an easier time finding their way around video production than vice versa. Indeed, as with audio production, it's possible to quickly get into far deeper scientific detail than is really necessary for creating a satisfactory product, so I hope that this beginner's guide will give the average audio producer enough practical and technical information to set about making a video.
The guide is split into two sections, one for the right brain and one for the left, if you will! The 'practice' section talks about getting on and doing it, for the creative side that wants to make a video and make it now! Next month's 'background knowledge' section, meanwhile, concentrates on a useful level of technical knowledge, much of which draws parallel with audio equipment and processes that SOS readers are likely to be familiar with, which will hopefully help those new to video production to understand the core concepts.
Although much of the information presented here relates to cameras, depending on what you want to create, you may not even need one. Some innovative and successful viral campaigns have been launched with just a little thinking outside the box and a lot of patience (search "Apple Mac Music Video” on YouTube for a great example). Animation is quite high on the current trend list, and with 'twee' being big news at the moment, even a lack of drawing skill could be a plus point!
 Storyboarding your video can help save time when shooting, and can be used to remind you to enhance strong aspects of the song arrangement with visual flair. A storyboard needn't be a work of art in its own right, and as long as you can decipher your own drawings and handwriting, it serves its purpose!There now exists the technology to allow a producer to become an all‑round audio and video machine, providing a service above and beyond a CDR at the end of a recording session. Imagine being able to give a group or artist a package where the video perfectly complements the recorded music and production, and if you're a self‑recording artist, you could take your own creative vision from one medium into two.
The Process & Computer Power
The process of creating a promotional video can be broken down into pre‑production, filming, import and editing, post‑production (covered in detail next month) and export.
Pre‑production is often overlooked by those making a first foray into video, but it's of equal importance to practising with your camera and getting hold of some editing software. It's basically planning: organising your key players and making sure they've got everything they need; getting your camera (or cameras), storage media and batteries ready; sourcing lights and transporting everything to the right place at the right time; scouting locations and making sure everyone can get there. Anything that involves lists and phone calls is probably pre‑production and saves time and trouble later on.
Filming is just that: capturing your footage while keeping in mind the later stages. It's also advisable to keep a timecode log to make things easier when importing and editing the footage. Importing can be in real‑time, either recording the footage into the computer via a Firewire cable or plugging the camera's video outputs into a video interface (this last method is used far less at the level we're describing). With tapeless media (memory cards), the import is a matter of dragging the file onto the computer, though you may also want to 'transcode' the footage (more later).
Editing is the process of cutting up the raw footage into a finished piece, making the shots work with one another, and sometimes even making it look as though you had more cameras than you did! It will be the most familiar part of the process to anyone accustomed to using a DAW.
Post‑production involves giving the video interesting visual effects, if required, as well as adjusting colour for balance and aesthetics.
Export: Once post‑production is complete, you'll need to export the video for your intended destination, either for on‑line use, HDTV or standard‑definition PAL or NTSC TV.
Whatever your plan for a video, you'll need a computer on which to edit it, and there's a variety of editing packages available for PC and Mac. It's worth checking out exactly what quality of footage your computer can handle, or you may find that your ageing PC can't handle editing the footage you've just spent a day filming. Around a year ago, I edited a music video shot on a Sony Z1E HDV (High Definition Video) camera in 1080i format (image size of 1920 by 1080 pixels, 'interlaced'), using an Intel Core 2 Duo iMac running Premiere Pro CS4. It was capable, but did slow down at times, especially where I was trying to run multiple streams at once with real‑time colour correction on the video (see 'Post Production' section), and the 3GB 533MHz RAM limit was an annoyance. Now, running an i7 940 PC with 12GB 1333MHz RAM, the sluggishness has disappeared!
To put things in perspective, 48kHz, 24‑bit audio has a data rate of 1.4MB per second. HDV needs around 4MB per second, but it's compressed, so displaying it in real time involves uncompressing it in real time, which puts a lot of strain on the CPU. You can uncompress it before editing, but uncompressed formats have astronomical data rates, and can require the use of RAID disk systems to keep up. The other option is to transcode the footage into a less compressed format, but there is always a trade‑off between the low CPU use and high disk load of less compressed formats, and vice versa with higher compression ratios.
. Equivalent Macs will be able to utilise GPU acceleration in Apple's Final Cut Pro.") Gamers rejoice! If you have a powerful gaming PC, like this Alienware Aurora, you're almost certain to have plenty of power for HD video editing. Premiere Pro CS5 also includes a software engine that allows the computer to offload video processing onto certain models of Nvidia GPU (Graphics Processing Unit). Equivalent Macs will be able to utilise GPU acceleration in Apple's Final Cut Pro.In short, if your computer is relatively recent (of the Core 2 and above variety) with 4GB RAM or more of quick RAM, you should be able to work in HD resolutions, and if you've got something like an i7 and a large amount of RAM, performance will be smooth. If it's an older model, you should consider using an SD resolution, or perhaps upgrading if funds allow. With that out of the way, it's on to the first question.
Gamers rejoice! If you have a powerful gaming PC, like this Alienware Aurora, you're almost certain to have plenty of power for HD video editing. Premiere Pro CS5 also includes a software engine that allows the computer to offload video processing onto certain models of Nvidia GPU (Graphics Processing Unit). Equivalent Macs will be able to utilise GPU acceleration in Apple's Final Cut Pro.In short, if your computer is relatively recent (of the Core 2 and above variety) with 4GB RAM or more of quick RAM, you should be able to work in HD resolutions, and if you've got something like an i7 and a large amount of RAM, performance will be smooth. If it's an older model, you should consider using an SD resolution, or perhaps upgrading if funds allow. With that out of the way, it's on to the first question.
What Kind Of Video?
What kind of promotional video would you like to create? When it comes to selecting equipment and software, it's good to have in mind that an enjoyable, creative video shot in standard definition is likely to be a more successful promo than a badly constructed video in high definition, so get an idea of what you want to make before you embark on the main project. If you'd like to make a 15‑minute Thriller‑style epic, you'll need to plan a lot more than if you want to shoot a live performance of your band. Even so, the simplest of pre‑production work always saves time and potential grief in production and post‑production.
Most cameras have a timecode system, expressed in hours, minutes, seconds and frames, and this is a good friend to you, helping you log shots as you film and saving time on import and editing. Planning out a storyboard, however rough, will help immensely, and doesn't mean you can't follow a spontaneous impulse of genius on set. What it does mean is that if the lightning bolt of brilliance passes you by, you'll still have a lot of solid footage under your belt. There's nothing more frustrating than calling your shoot a 'wrap' (meaning,”Hey, we're done, let's party!”) and having to return in a couple of days, set it all up again and get that shot you missed. Putting a plan together can save you from having to head out filming again, but this time with a hangover! Whichever type of shoot you're planning, be generous with allowing people time to arrive and try to have more of everything than you think you need, especially batteries!
If you've elected to animate rather than film a video, you may want to use specific motion-graphics software such as Adobe After Effects, rather than laying out each frame in editing software. Motion-graphics software packages introduce many more concepts that won't be discussed here, but we'll cover them at a later date.
Performance Video
The performance video is arguably the most common music video. Find a nice location, get the band dressed up and looking their best, set up near some powerful lights (you'd be surprised how good workman's halogens from a DIY store are, though they do get very, very hot) and shoot. Warehouse shoots are a cliché, but that's because they can work very well! It's a well‑used setup to put a group in a warehouse of some kind, with some lights in the background to stop the camera from seeing all the pallets, dirty tarpaulins and beer cans, and to add some motion and contrast.
If you want to shoot a live gig, your location may not be so flexible; you might want to get a movie of your band's biggest support slot, for example. If so, it's advisable to have a still camera with a well‑composed full‑stage view at the back of the room, and one or two 'cutaway' cameras. Cutaways are typified by close‑ups of band members, taken from nearer the stage, and you'll need friends on hand to assist if you're using multiple cameras! If you're supplementing a hired camera with a cheaper one, use the cheaper one as your still shot, as you'll invariably want the more active cutaway shot to look nicer.
When you come to import the footage into your computer, you can lay your still shot on the bottom track, with the two other shots above, and cut between them. If both of the cutaways are ugly, you can fall back on the still camera. This can be done with two manned cameras, as long as the two camera operators communicate well. One holds a still shot and lets the other know, allowing the second to go crazy, albeit as smoothly as he can. They swap again after a while, and the result should be a natural rhythm. Walkie‑talkies can help here too!
Shooting a performance in multiple takes makes the shoot much easier, and is usually preferable. It also allows you to use only one camera, and gives much more freedom when it comes to location selection and the like. The boundary between live performance and story can start to blur a little, and then the fun really starts! Here your creative vision can be set free: even if you can't actually get the band to play at full pelt in a large bin, you could get them to mime to their song in a bin, while the song plays on a cheap boom‑box. You can usually use the audio from the camera picking up the boom‑box to sync the performance with the final recording in the edit suite, making the edit job easier. If you're going to do it this way, be sure to keep notes of the timecode at the start of each section, otherwise you may get lost amongst the varied footage in the editing process. If you still want a live feel, you can set the band up and get them to play along to a recording over and over again, taking different angles and getting the best performance out of each member. You may find it useful to storyboard your shots along with the song. If there's a great bass riff, you'll be able to emphasise that in video, perhaps by cutting to the player's hands at the vital moment, so you know you'll need to remember to shoot a good take of it.
When editing a performance video, try to reflect the pace of the song, cutting shots and creating visual stimuli as close to beats and musical events as you can.You only have have a finite number of frames in each second, so you can't get as fussy with video cutting as you can with audio. There will be no adjusting a fade‑out back and forth by a few milliseconds, for which we should be thankful! If the song is energetic, avoid long cross‑dissolves and fades, as they won't reflect the audio. If you have a slow ballad, you may find fading slowly to the piano player's hands works nicely. The same technique might be odd if he's playing flat‑hand boogie while standing up, splashing sweat and Brylcreme from his pompadour, so do think about editing in terms of musical equivalents.
Story Video
Taking a further step away from the live video, a story video could feature no members of the band, or could feature them as actors or cameos. The story video is effectively a very short silent film, and really lets you go to town with creativity. Is the lead singer a bit of a dislikeable clown? In a story video, you could dress him up in neon overalls and have him chased by your neighbour's dog, all the while lip‑sync'ing to the song! Or, better still, think of a narrative that really reflects the feel or tale of the song. A lot of big‑budget videos are a hybrid of story and performance, with the lead singer as a protagonist, perhaps wandering moodily around a city, lip‑sync'ing, interspersed with cuts of the band performing and a separate storyline.
Here there can be three separate narratives intertwining to make a whole. On paper, this reads like overkill, but it serves a few distinct purposes, one of which is to hold your attention. Quick cuts and evolving scenes grab the viewer, whether they're watching TV at home or looking at an iPhone over someone's shoulder on the bus. If the on‑screen action really reflects — or even acts as an extension of — the music, a video becomes more than an entertaining distraction. It's part of a steaming cattle branding on the viewer's brain: 'Your band name here!'
Understanding Cameras
Using a video camera is surprisingly similar to playing an instrument or working a mixing desk. As your hands 'learn' where to go on their own, the distance between having an idea and making it happen becomes much shorter. Before you spend too much money buying gear, hire a nice video camera and take some footage. Sony's V1 is a great option, being light and capable, with a decent lens. As an example of hire costs, a V1 costs £85 for a day's hire from Calumet Photographic in Londonand batteries costs $250 per day from one California web site. Keep in mind that a weekend will only cost the same as a single day from many hire companies, with you picking the camera up on Friday and returning it the following Monday. Another option is JVC's GYHM100E, which is a very small camera, and great for taking guerilla HD footage on the move. If your home computer isn't up to HD editing, hire a DV (standard definition) camera of high quality, like the Canon XL1s, for a couple of weekends. What you sacrifice in resolution, you'll gain in optical quality, versatility, and 'jumping in at the deep end' information osmosis! A quick Google search for "video cameras hire” is likely to give you plenty of options for camera hire in your area.
 records progressive HD footage to standard DV tapes, while the JVC GY HM100 records progressive HD footage to SDHC memory cards. Canon's XL1S is an older camera, shooting standard-definition footage to DV tape. It is, however, a more advanced model than the other two video cameras pictured, with a high quality, large lens and shoulder mounting. The Canon 550DRebel T2i DSLR (far right) is currently the least expensive DSLR to provide 1080p video, but is probably best combined with accessories, such as some kind of steady‑mount") The Sony HVR V1 (far left) records progressive HD footage to standard DV tapes, while the JVC GY HM100 records progressive HD footage to SDHC memory cards. Canon's XL1S is an older camera, shooting standard-definition footage to DV tape. It is, however, a more advanced model than the other two video cameras pictured, with a high quality, large lens and shoulder mounting. The Canon 550DRebel T2i DSLR (far right) is currently the least expensive DSLR to provide 1080p video, but is probably best combined with accessories, such as some kind of steady‑mount
The Sony HVR V1 (far left) records progressive HD footage to standard DV tapes, while the JVC GY HM100 records progressive HD footage to SDHC memory cards. Canon's XL1S is an older camera, shooting standard-definition footage to DV tape. It is, however, a more advanced model than the other two video cameras pictured, with a high quality, large lens and shoulder mounting. The Canon 550DRebel T2i DSLR (far right) is currently the least expensive DSLR to provide 1080p video, but is probably best combined with accessories, such as some kind of steady‑mount
 There are cameras designed for video, and there are those designed for still photography that include video recording as an extra, the aforementioned DSLRs. Video cameras are designed for a single purpose, and benefit from this focus in their ease of use. The issue with budget video cameras (now under £1500$3000 or so, but changing all the time) is that the sensor is (or sensors are) generally quite small and the lens cannot be changed. This results in low‑light performance being reduced (footage is grainy) and the cameras being unable to create a shallow 'depth of field'.
  A shallow depth of field can lend a cinematic quality to video, drawing the viewer's focus to a particular point in the shot. These shots were taken using a DSLR camera; creating an equally shallow depth of field using a budget DV camera would involve compromises. The left image shows a shallow depth of field, with the foreground and background blurred. The right shows a broad depth of field. This term describes the range of distance from the lens that is in focus. Film cameras are capable of creating a shallow depth of field, meaning that the subject can be rendered in pin‑sharp accuracy while the background softly blurs away. This phenomenon allows you to force the viewer's focus onto a particular area of a frame. It also reflects how the human visual system behaves in real life, and can make a scene more immersive than having everything in focus. Shallow depth of field and well thought‑out lighting can help to make video look cinematic, and although budget cameras can capture a shallow depth of field, you'll need to open up the iris and zoom in, so bear this in mind.
DSLRs benefit from large sensors, from 35mm at the largest, equivalent to the size of a frame of high‑quality Vistavision film, to around 21mm (expressed as '1.6 crop', or 35mm divided by 1.6) for the smallest of video DSLRs, which is equivalent to a 35mm frame of film. These cameras are also designed with easily changeable lenses, and there's a huge range of these available at all focal lengths (zooms) and qualities. In short, you can achieve an extremely shallow depth of field and a cinematic look for not very much money, with the cheapest full HD DSLR (currently the Canon 550DRebel T2i) being around £799$799 for the body alone. The downside to DSLR cinematography comes from the photography angle as well: all of the mechanisms — the zoom, the focus ring, the sensor and the software — are designed for stills capture, and can cause issues when shooting video. Zooming can be jerky, focusing 'breathes' (meaning that the edges of the shot change and the focal distance shifts), and the sensors suffer from lateral shearing and the 'Jello' effect. This is a colloquial term for the problems created by a certain type of light sensor (CMOS, details coming next month) used in DSLRs, where the image appears wobbly when the camera is moved quickly or subjected to hand shake.
. Finally, a Manfrotto tripod provides solid support and the ability to pan smoothly, something that's hard to achieve when using tripods designed for still photography.") Here's a Canon XH A1 HDV camcorder with a basic shooting kit. There are four batteries in this shot. The larger ones last longer but are heavier, and the charger is included just in case! Towards the bottom is a DSM light that mounts on the front of the camera, and a battery pack for the light, which attaches to the hand strap. Three Panasonic DV tapes are shown, along with a box for various filters (more on which in a later issue). Finally, a Manfrotto tripod provides solid support and the ability to pan smoothly, something that's hard to achieve when using tripods designed for still photography.Another limitation is the ability to record a maximum full HD clip‑length of around 12 minutes. This is fine for most situations, but just as well to be aware of. DSLRs are likely to be designed with video in mind over the next year or so, but for the moment they work best when augmented with plenty of accessories to help keep the issues at bay, so do consider the overall cost of equipment and suitability of each type of camera for your particular shoot.
Here's a Canon XH A1 HDV camcorder with a basic shooting kit. There are four batteries in this shot. The larger ones last longer but are heavier, and the charger is included just in case! Towards the bottom is a DSM light that mounts on the front of the camera, and a battery pack for the light, which attaches to the hand strap. Three Panasonic DV tapes are shown, along with a box for various filters (more on which in a later issue). Finally, a Manfrotto tripod provides solid support and the ability to pan smoothly, something that's hard to achieve when using tripods designed for still photography.Another limitation is the ability to record a maximum full HD clip‑length of around 12 minutes. This is fine for most situations, but just as well to be aware of. DSLRs are likely to be designed with video in mind over the next year or so, but for the moment they work best when augmented with plenty of accessories to help keep the issues at bay, so do consider the overall cost of equipment and suitability of each type of camera for your particular shoot.
Despite the popularity of abstract 'test' shoots on video web sites, I'd advise against them. That's not to say you should shoot a complex scene straight away with no practice, but that you get much more out of a 'mini project' than sedate, controlled tests. Pack up as many batteries and tapes/memory cards as you can, and get as many different kinds of footage as you can on your first day of hire. Get outside and shoot the birds in the trees, the piles of rubbish under the bridge and the crazy man at the bus stop. Shoot moving subjects and still subjects, bright places and dark places. Try and shoot in a shopping centre and out‑run the security guards while still recording. In other words, enjoy the camera and put yourself to the test. This will let you see how your chosen piece of equipment performs under many conditions, and you'll have a lot more fun editing a montage of your madness that night. If you've hired over a weekend, you'll have had an extremely long day, but you'll have one (demented) film done, and still have another day left with the camera! Watch the movie back, or try burning it to DVD or uploading it to YouTube, then get up the next day and do it all again! Unless it's really not for you, and moving pictures bore you, you'll want to go and hire the camera again next week, or perhaps even buy one of your own! We're all much more familiar with the 'language' of cinematography than we're aware, and you'll find that the next film or TV programme you watch will appear in quite a different way.
When you get to the point of actually shooting your film idea, look at your storyboard and see how those shots relate to ones you took in your mini‑project. This will make it easier to be prepared for potential problems under similar conditions on set. Keep notes, if you can, and be sure, just as you would be when recording a song, that you get the best performances from everyone and everything in your scene.
Importing
Importing of footage will either involve playing it in real time via Firewire, or video cables into a video interface, or dragging a file from the memory card to the computer. It's a good idea, as with sample packs and the like, to keep the footage on its own hard drive, separate from the system drive, and also to allow the editing program to keep its working files, or 'cache', on yet another drive. If you don't have this luxury, don't worry too much, just make sure you don't try to edit uncompressed HD footage! My aforementioned Sony Z1 music video was all edited on the system drive. It wasn't ideal, but it worked and was completed on time.
If you've kept timecode notes, you can use them to speed up the import process and save disk space, by only importing the footage that you'll need. All non‑linear editors (NLEs: see next section) will be capable of controlling the camera transport over Firewire, and you can give them a 'batch' of timecode periods to capture, name the relevant shots as on your timecode sheet, and leave the machine doing the dirty work. If you've used a DSLR, you won't have timecode and may have to search through manually for your footage. Just keep reminding yourself how nice the depth of field is, and this shouldn't be a problem!
If the footage has been dragged from a memory card, it might be a good plan to 'transcode' or convert it to an I‑frame codec, a format where each frame is a distinct image, about which there will be more next issue. This will allow you the most headroom and resolution for editing and colour correcting. Let's say that someone had recorded their band with 24 tracks of MP3 audio; you'd want to convert it to 24‑bit WAV or AIFF for editing, and the same is true with compressed digital video. That said, if you don't have the computer power to work with larger and less compressed I‑Frame files, you may still get away with editing in the recording format, but will sacrifice some flexibility and clarity. Final Cut Pro likes to work with its built‑in I‑frame format, called ProRes, while Premiere Pro CS5 supports editing in many native formats without so much loss of quality. NLEs are just like DAWs: they all perform similar functions, each with their own quirks.
Non‑linear Editing
When you've done importing and you're ready to edit, you'll come across most of the obvious similarities between the disciplines of audio and video editing in the non‑linear editor, which is the video equivalent of the DAW. Popular examples inclue Adobe Premiere Pro, Apple Final Cut, Avid Media Composer and Sony Vegas, among many others.
These editing packages are described as non‑linear because you can access any frame at any time, rather than having to reel through a spool of film to find it, something I'm thankful I've never experienced, despite the retro appeal! The timeline, transport bar and tracks will be familiar to DAW users, the key difference being that an NLE shows at least one video screen by default, which will display the footage being played from the timeline. There is also usually a second window that can be used to view a piece of footage on its own, and select its 'in' and 'out' points.
Another difference to be noted is that the order of tracks makes a difference to the video output. This ordering can be a stumbling block for beginners, until one realises that the viewer effectively looks down through the video tracks as if looking through a pile of tracing paper or transparencies on an overhead projector (if you're not too young to have used one!). The top track appears first, and those beneath are underneath. This can be useful for placing a single, long shot at the bottom and dropping cuts above it, bearing in mind that multiple simultaneous streams of video put more of a strain on system resources than a few tracks of audio do.
 Just as with DAWs, context‑sensitive tools will help when resizing and editing video. Here a clip is being resized in Final Cut Pro and the mouse pointer has changed to show that the footage length can be altered.Automation curves are present in the NLE, in the form of keyframes, as are audio tracks and an associated mixer. (A keyframe, by the way, is a frame where a transition between two states begins or ends, and you can read more about them in our review of the Sony Vegas Movie Studio NLE elsewhere in this issue.) There's usually a box at the top left of the screen that acts a 'bin' for your footage (a phrase taken from the days when there literally were bins of film in the edit suite!) and getting footage onto the timeline is as simple as dragging and dropping it to a particular place. Since video works across time in Frames Per Second (fps), you have even fewer possible edit points to worry about in every clip. Editing in PAL (see 'Formats & Resolutions' box) will leave you only 25 choices for where to put your cut, and that's a lot less than the 48000 possible cut points for an audio file at 48kHz!
For a most music videos, it's best to put the audio track into the timeline before you start dropping in video clips. Now that the footage is in the bins at the top left of the NLE, it can be viewed in a preview video display, where you can choose 'in' and 'out' points for the clip and drag the result to the timeline. You can also drag the left and right sides of the video clip on the timeline to change where it comes in and out of view, just as you would in a DAW with audio clips. Transitions and other edit effects are built into most NLEs, though many look dated and some look hilarious, bringing back memories of bad corporate training videos. Irony and 'retro' is popular these days, but requires a particular audience with particular 'meta‑humour' (a posh term for widespread in‑joke) to function correctly. If you can pull it off, go for it. If not, your video may just look tasteless!
Once you've got the edit playing just how you want it, it's time to carry out the video equivalent of mastering: post‑production, which we'll cover in more detail next month.
"If you've been producing music for a long time, the transition can be made easy by applying similar discipline to the visual equivalents: treat colour correction like surgical equalisation, and exposure and gain like proper gain‑staging in the studio.”
Now your video is cut together, you'll want to make it look nice for as many different monitors and formats as possible, whether it's being played back on a domestic HD TV, an iPhone or a computer monitor. As with monitors in the audio world, which are designed to give the user an uncoloured sound that will translate well onto a broad variety of playback systems, there are video monitors designed to do the same. But let's say, for the sake of argument, that you don't want to blow a grand on a monitor and would like to use your standard display instead. For a few hundred pounds you can buy a device that sits on the screen and looks at the output of the monitor, making adjustments via special software in an attempt to get the monitor looking as neutral as possible, much like room‑correction devices for audio setups. The analogy doesn't stop here, though, and just as with audio, the performance is limited by the quality of the monitor itself. An inexpensive option is to keep referencing your video on different monitors and try to strike a balance, or to burn DVDs and make exports regularly for testing. Consumer monitors may be designed not to display the extremes of white, black and all the colours, so do compare different outputs.
Accurate monitoring is preferable, as you are about to adjust the colour of your piece to suit each shot. The two stages are known as colour correction, which involves tweaking balance problems; and grading, which generally involves being a bit more extreme with the settings for a particular aesthetic. This is something of an ideal, as such processes naturally bleed into one another, but the concept helps you to keep in mind the goal you're seeking at each stage. Most NLEs have colour correction plug‑ins built‑in, and some include separate software. Apple, for example, include a grading programme called Apple Colour with Final Cut Studio. Images to show a sequence of colour correction. Here's a close‑up still of a cat, from a short film! The first image shows the original footage. The white balance was not set correctly so the image looks very blue, and it's quite washed out. The second image shows the results of simple colour correction, restoring some of the natural colours of the image using Adobe Premiere's Fast Colour Corrector. The final image shows a more dramatic result of what is often referred to as 'grading'. Using a variety of plug‑ins, the green has been enhanced and the contrast made more extreme.
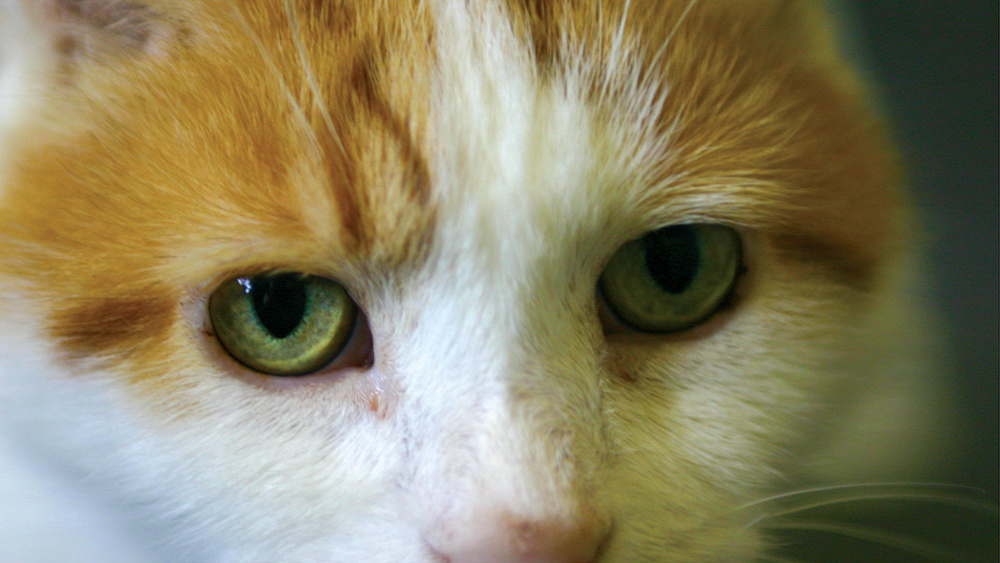

Colour correction and grading can be quite a long process, but the nicer your original footage looks, the less time you're likely to have to spend colour correcting. Common processes are crushing the black range a little (so that blacks are deeper and not washed out), shifting the centre point of the 'mid' tones, and subtly changing the colour hue of the dark, middle and lightest sections of a shot. These tasks are usually carried out with either one or three colour wheels, and the best way to get used to their controls is to yank said controls about with gay abandon. Grading can be used to make a shot look as natural as possible, or it can be used for to very dramatic effect. The blockbuster movie 300 was shot in studios, and the raw footage looked very washed‑out, with little contrast. The producers knew, however that they were going to rely on post‑production for the look of the film, including using chroma‑keying to replace studio walls with computer‑generated backgrounds. In the 'grade', they crushed the shadows and the highlights, as well as adding strong colour casts to the mid‑tones. The result was an extreme comic‑book effect that suited the graphic‑novel origin of the adaptation. It's important to be using a version of your footage in as uncompressed a format as your hardware will handle when colour correcting and grading, as higher bit‑depth give finer detail and smoother results.
Getting It Out There
Once you've completed your masterpiece, it's time to export, in — you guessed it — much the same way as in your DAW. Exporting is an off‑line process, and will push your CPU to the limit, so the more power, the better!
Here, the most confusing part will be selecting the correct format, as many more video codecs are in common use than audio codecs, but luckily most NLEs have presets. If your video is going on‑line, you'd best use a 'progressive' frame rate, and if you're heading for standard‑definition DVD you'll need to use a PAL or NTSC interlaced MPEG2 preset, dependent on what part of the world you're in. If you're lucky, your NLE will have a preset called PAL DVD or NTSC DVD. For most of us, the final destination will be YouTube or Vimeo, or perhaps embedding in our own web site. Luckily enough, many such sites will provide ideal bit rates and frame rates to use when exporting or transcoding your final video. Most NLEs will allow you to export especially for mobile devices, and Adobe Premiere Pro and Apple Final Cut Pro include presets for various devices and web sites, making everything easy. It's also a good idea to keep a version in Motion JPEG or another lossless format if you have the hard disk space, just for the sake of your archives!
Closing Words
The world of video production includes just many minutiae as the world of audio production, and they are as arguably unnecessary if all you want to do is make a promo. If you've been producing music for a long time, the transition can be made easy by applying similar discipline to the visual equivalents: treat colour correction like surgical equalisation, and exposure and gain like proper gain‑staging in the studio. Although many phenomena are unique to digital video, the gradual homogenisation of DSP and codecs allows similar knowledge to be used across the board. There's so much to be written about each and every stage of video production that I found it hard to keep this article to this length! There are books full of nothing but lighting techniques, hundreds of web sites covering the tiniest of tips for each NLE, and useful knowledge can be gleaned from photography books — even those from the pre‑digital era. The development of techniques is just as satisfying as with audio production, trying a new lens rivals the enjoyment of putting a new mic or compressor to work, and the end result of seeing a video on‑line with positive comments creates the same buzz.
Hopefully, if you came to this article with the plan of some day making a video, you'll now feel more confident that your skills will be useful, and if you came to it with only a passing interest, I hope it's piqued a little more. I chose to move into video because there just seemed to be more work going, I found, as I applied for jobs, that positions in audio production and engineering were thinner on the ground than those in video and motion graphics. This seems in part to relate to the rise of home recording, which appears to have led to a lower number of more specialised recording and mastering studios, and hence less professional full‑time work. There's no doubt that the same will happen to film making, but what's truly exciting is to be standing at the dawn of a new era for film and video. Over the next few years, we will see the price of high‑quality equipment tumble, and technology we could only dream of owning last year will practically fall into our laps. The gap between having an idea and making it a reality is ever shrinking, and though it is unlikely to ever close completely, it makes building a bridge to the other side just that little bit easier.
First‑time Shooting
 at the same time, so a performance of the song goes hand in hand with a related narrative.") The artist in this picture, Ocean Reid, wanted to show the down side of touring, so here we see him cleaning his teeth in a pub bathroom! He was lip syncing to the backing track (played from a mobile phone) at the same time, so a performance of the song goes hand in hand with a related narrative.
The artist in this picture, Ocean Reid, wanted to show the down side of touring, so here we see him cleaning his teeth in a pub bathroom! He was lip syncing to the backing track (played from a mobile phone) at the same time, so a performance of the song goes hand in hand with a related narrative.
Here are a few points that are easily missed by first‑time shooters...
- Clipping
Just as with audio, you don't want to 'clip' too much, unless you're convinced it works in context. Clipping in visual terms is over‑exposure, or over‑saturation of one colour, where instead of detail you have a block of red, for example, or a pure white sky. High‑quality cameras — like much equivalent audio‑equipment — record a high dynamic range, except that with pictures the range refers to detail captured in dark to light areas of the shot rather than energy of audio. This means that if you under‑expose (darken) your shot, giving yourself headroom to stop it clipping, you can raise the detail at a later stage.
Unfortunately, the current state of technology means that all except the most expensive cameras record video with a large amount of compression, so the dark areas can get grainy, or 'noisy', when you bring the lightness back up. Sometimes this works, but bear in mind that you can't put back any detail that isn't there. Most cameras have a 'peaking' or 'zebra' setting that will give you a helping hand by showing black and white lines rolling across over‑exposed portions of a shot.
- Gain
Another parallel with audio recording is the link between gain and noise. If you're shooting in a dark place, you can open the iris or aperture of the camera lens to let more light in (other associated phenomena come into play as well), but sometimes this isn't enough. Gain can be applied to the image to increase the brightness, expressed either in dB or as an ISO or ASA value, harking back to the days of film, when higher ISO or ASA values denoted greater light sensitivity. Visual noise is extremely distracting, and even with built in noise‑reduction it usually results in the dark areas of the picture dancing with colourful pixels, which is not a pretty sight. This is the fault of the size of the sensor or sensors in the camera, as well as the compression formats used to get all that data to a card or tape in real‑time. Larger sensors and less compression mean less noise and more dynamic range, as well as more room for gain. I'll be explaining this further next month, but for the moment it's enough to know that you should use high‑gain or ISO as the last resort, instead of the first, which can be the temptation.
- White balance
Be sure to check your white balance regularly against a piece of white card or thick white paper. This will involve covering the majority of the frame with a white piece of card and usually pressing a White Balance button (refer to your camera's manual for details).
When you notice the picture has a blue or red cast, it's time to reset the white balance! Although our visual system adjusts effectively to different‑coloured light sources, sensors 'see' daylight as a very different shade of white to artificial light. Shades of white are expressed in temperatures, with daylight ranging from 2500 (very red) at the beginning and end of the day to 10000k (extremely blue) on the brightest of cloudless days. Average sunlight is around 5500k, which is quite blue, while 3200k is the tone of a standard tungsten bulb, having a red‑orange tone. Video footage shot throughout a day without white‑balance correction will vary in a similar way to the sound of a recording of a singer wandering through a variety of different acoustics! White balance is one of those things you can sort out after the event, but it saves a lot of hassle later on if you can do it on the shoot.
- Image stabilisation
Be aware of built‑in image stabilisation in either the lens or camera. It's great when you and your subject are standing still, but if you're panning or moving or rolling down a hill, the image will judder as the camera tries to keep up (either digitally or by physically moving the lens elements).
- Be prepared
Take another battery and more storage media! Your best shot will come when the battery is on the blink or the tape or card fills up.
- And finally...
It's probably not broken, you've left the lens cap on. You wouldn't believe how many times it happens.
Formats & Resolutions
Video formats are expressed in resolution (dimensions in number of pixels), frame or field type (interlaced or progressive), and the number of images displayed per second (frames per second, or fps). Another factor, the aspect ratio, is useful for describing the shape of the picture.
Broadly speaking, resolutions can be divided into SD, which is standard definition, and HD, which is high definition. PAL runs at 720 x 576 pixels and 25fps, interlaced using 50 fields per second, with the widescreen version running at the same resolution but with different shaped pixels (anamorphic). NTSC is 720x480 at 30fps, interlaced using 60 fields per second, with a similar pixel-ratio method for creating widescreen formats. Interlaced pictures are displayed by alternating odd- and even-numbered rows of pixels at twice the standard frame rate (50i instead of 25p fps), a process originally introduced to combat CRT screen flicker.
High‑definition formats are comprised of 720p and 1080p. These are named because of their resolutions (1280 x 720 and 1920 x 1080 pixels respectively) and suffixed with 'p' for progressive because the frames are displayed as entire pictures in sequence, rather than being constructed from alternating fields.
On‑line, the PAL and NTSC standards will run progressively, rather than interlaced, and sizes such as 360p, 480p and 576p are more common. SD resolutions are more confusing than HD equivalents, and interlacing will hopefully soon be a thing of the past, with the advent of on‑line distribution and modern progressive cameras.
With regard to aspect ratios, the old televisual standard was 4:3, but most modern televisions display at a ratio of 16:9, or widescreen. There are other ratios for cinema, generally even wider, but most home producers use 16:9 widescreen, as it provides the best degree of image width and compatibility. Most video hosting sites can now handle some degree of HD content, with YouTube displaying up to 1080p and Vimeo hosting 720p for free accounts and 1080p for paid subscribers. YouTube allows embedding of HD content for free, while with Vimeo you'll need to be a paid subscriber. This will all be explained next month, but most editing packages (NLEs) will have plenty of presets, and may even include one designed for your camera.
Anatomy Of A Non-linear Editor
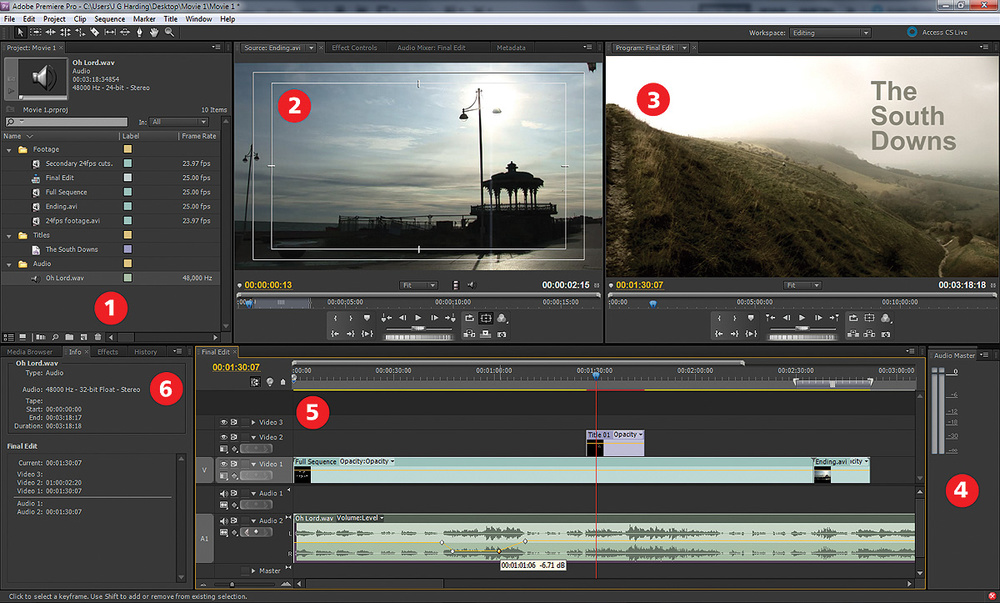
On the right is a screenshot I've taken from Adobe's Premiere Pro CS5 Beta non-linear editor (NLE), the full version of which should be available by the time you read this. What's presented is the default layout, and I find it very efficient, but panels can be moved and resized to your taste if you find that they get in the way.
1. Here at the top left, folders called 'Bins' store video footage, audio files, stills and generated footage (such as titles). Information about the currently highlighted piece of footage is shown in the 'Info' box, below.
2. The source monitor tab displays source footage, and the highlighted section of the timeline shows the current in and out points. The white boxes overlaid on the image are the 'Title Safe zone' (inner box) and Action Safe zone (outer box). These are so called because some TVs crop the image, and areas outside may not be seen on TV. This is not a problem with on‑line video. Do you notice the vertical white line extending from the sun? This phenomenon is related to sensor technology, and will be covered next month
Other tabs here include Effect Controls, where video plug‑ins can be added and adjusted, the audio mixer, which includes the ability to insert plug‑ins, and a metadata panel, for reading and adjusting metadata embedded in video files, such as clip name and shoot notes.
3. This view shows the frame at the current transport position in the main time‑line below. As with the previous window, there are transport controls among others. Here we can see a title overlaid onto some footage I shot on a misty morning, on the South Downs.
4. The master audio meter is displayed here for quick reference.
5. Here is the timeline for the currently open 'sequence', or collection of clips. We can see audio tracks at the bottom, complete with some automation points, highlighted, two video clips on the track called 'Video 1', and a title (Title 01) on track 'Video 2'. Note that as the title is above the footage, it appears on top of the image of the South Downs. If the tracks were reversed we would not see the title, as it would be underneath the footage.
6. This panel serves as a browser for locating footage, selecting plug‑ins and looking through the history for any mistakes you've made. The 'Info' tab is selected, displaying information for the clip highlighted in the Bins at the top, in this case an audio clip called 'Oh Lord'.