 Screen 1: The new Combinator has a fully customisable panel and a built‑in summing mixer.
We dive into the newly improved and expanded Combinator.
One of the key components of the Reason Rack, the Combinator is a device that contains other Rack devices, allowing you to make a section of your Rack self‑contained and portable, add macro controls, or effectively turn a multi‑device patch into a new instrument or effect chain. Even if you don’t combine devices yourself, you’ll almost certainly have used it regularly as it’s the host to many of Reason’s factory presets, and most third‑party sound libraries.
Sound designers have long wished for a Combinator with extended functionality, especially one that goes beyond the limit of four macro knobs and four buttons. Reason 12 delivers this and more with a huge update to the Combinator, bringing a completely customisable and resizable panel, an internal mixer, and of course support for high‑resolution graphics and skins. This month we’ll have a look at what’s new and how you can start building in the Combinator.
Combi Recap
The Combinator is like a sub‑rack: a box containing its own Rack that behaves just like the main Rack. You can drop devices into a Combinator and connect them together, or select a group of devices in the main Rack and Combine them (Edit / Combine, or Right‑click / Combine).
Combined devices can continue to act independently and connect directly to the world outside, but more often than not you set up a Combi to consolidate devices into a single entity with its own top‑level audio, MIDI and CV connections. To facilitate this the Combinator has internal audio connections for passing audio in and out. When you choose the Combinator as a MIDI target (or connect Note/Gate inputs) the notes and control data can be passed through to devices inside, and can be filtered in various ways to set up things like splits and layers with two or more instruments.
The controls on the Combinator can be mapped to controls on the internal devices to create macros. At the most basic level you could put a single device into a Combinator and create a simplified panel, calling out the controls relevant to the sound you’re using, and focusing them to a range of values. Macros can point to different devices inside the Combi, and control multiple parameters simultaneously. You can save your own effect chains with custom performance controls. You can save snapshots for live shows, with a different Combinator configured for each song. And you can create patches to share, or to include in a sound pack.
Sound designers have long wished for a Combinator with extended functionality... Reason 12 delivers this and more.
In The Box Mix
Screen 1 shows what the updated Combinator looks like when created from scratch in the Rack. I’ve opened the new Configure pane, which is where a lot of the new stuff is. If you are familiar with the original Combinator you can get stuck in and use it in much the same way as before. When you drop an instrument into the Combinator its output will be auto‑cabled so that audio is passed through to the Combi output.
Audio now goes via a line mixer built into the Combinator. This mixer does not have any level controls, panning, or effect loops, so if you need anything more than simple summing you should use the Line Mixer device as you would have in the past. If it’s just level adjustment you need though, most devices have a master output gain that you can assign to the macros.
The default Combi maintains a similar panel layout to before, with four knobs and four buttons. However, notice that the ‘Run Pattern Devices’ and ‘Bypass All FX’ buttons are absent. These are now optional controls which can be added if you need them. Also gone from the main control panel are the ‘Show Programmer’ and ‘Show Devices’ buttons. These have been moved to the main nameplate strip and renamed as Editor and Devices, keeping them out of the way now that you can create your own panel layout.
Program Change
The Editor (formerly Programmer) is the fold‑out panel where you set up how MIDI is handled, and configure macros. A list of all devices in the Combi is shown on the left, macro assignments for the selected device are displayed on the right. Tick boxes next to the devices determine which devices receive MIDI notes that are sent to the Combinator. When you select an instrument device, you can set the note and velocity ranges it responds to, allowing you to configure a keyboard split and velocity‑dependent layers if you wish. You can also transpose here.
The macro grid is where you map the panel elements to the device controls on combined devices. You can choose a Source and Target from the drop‑downs in the grid, or you can right‑click a control directly on a device and choose Map To Combi Control / [name of control]. Each assignment row has a bar for setting the control range the macro covers; control polarity can be reversed by setting the Min marker to the right of the Max.
The macro editor has had some significant upgrades, which are not immediately apparent compared with the headline customisation features. Firstly, the grid is no longer constrained by a limit of 10 assignments per device. Even with only eight macro controls this was rather limiting when you wanted a knob to do several things at once on a device. With the Combinator 2 (if we can call it that) you can keep adding new rows to the grid to facilitate any complex panel you might build.
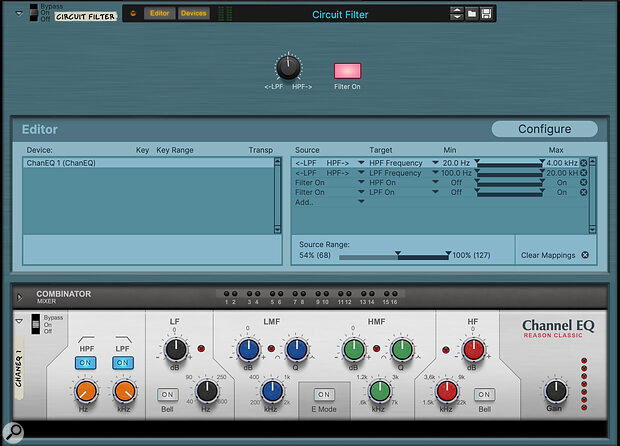
 Screen 2: Using the Source Range setting to create a high‑ to low‑pass performance filter.
The other new mapping feature (‘Source Range’) lets you set the range over which a macro is active for a given control. We’ve always been able to set the range that a macro adjusts a target parameter, now you can map that range over, say, the first half of a macro knob’s travel. I admit it wasn’t clear to me why you might want to do that at first, but I then thought of several scenarios where it would be cool for a knob to do different things at different stages of its travel. For example you could have several layered sounds that fade in and out and take over from each other as you turn the macro.
In Screen 2 I’ve used this new Source Range setting to make a DJ‑style performance filter, like the one on Novation’s Circuit. This Combi simply routes audio through the Reason Channel EQ module and uses a single macro knob to control the cutoff frequency of both the low‑ and high‑pass filter stages. I’ve set the Source Range control so that the knob only starts adjusting the low‑pass filter frequency when anti‑clockwise from the central position, and the high‑pass frequency when clockwise. I’ve actually left a neutral spot around the centre to make it easy to return to a clean signal, and added a button that lets you switch both filters on or off at the same time.
 Screen 3: The factory library has several Combi templates, like this classic synth layout.
Custom Panels
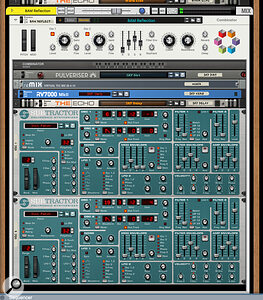
 Screen 4: With some thoughtful panel design, a simple layered patch can now become a versatile new synth.In my example I’ve made scant use of the new panel design features. Luckily there are some much better examples to be found in the factory library and some of the newer packs available in the Reason+ Companion. There is in fact a templates folder, which is where I found the classic synth example in Screen 3 (above). The 8AM Reflection patch from the factory sounds in Screen 4 is a great example of how quite a simple patch can make a whole new instrument. Here, two Subtractors are layered into a combined synth voice, with panel controls for the oscillators, envelopes and filters.
To start adjusting a panel layout, open the Editor and toggle to the Configure page (Screen 1 again). You can now pick up and move existing controls or select them in the Panel Elements list for editing. The left‑most section lets you add new macro controls: knobs, switches, mod wheels, and the old Run and Master Bypass buttons. The Settings section is where you choose the type and appearance of each control. Control elements can be set as knobs, faders or wheels, with a number of designs and sizes to choose from. Finally, the right‑hand section sets the overall panel appearance, including the background colour or custom skin. A real surprise is that you can change the size of the whole device, from 1U to 6U high, giving you much more space to design your ultimate Reason device.
Next time we’ll look in detail at customising your panel, as well as some more Combinator tips and ideas.


