 Screen 1. Any sample can now be used as a wavetable or spectral filter shape in Europa.
The latest version of Reason introduces new Player devices and a big update for flagship synth Europa.
I was fortunate at this year’s Superbooth to be working next door to the lovely Propellerhead folk. Not only did I get to hear some incredible bleeps and growls from the upcoming Noise Engineering Rack Extensions, I also got to explore some big new features in Reason 10.1...
Making Waves
We looked in depth at Reason 10’s flagship synth Europa back in December. It’s a really clever and versatile wavetable synth, featuring multiple shapers/modifiers and spectral filters that dynamically regenerate the source wave. The updated version in Reason 10.1 can import a sample for use as the wavetable source or spectral filter shape. Forget how a regular sampler works, the stuff you can do here with a single sample is mind-blowing.
A standard Reason device file loader (labelled User Wave) has been added to the Europa panel at the top of the Engine Mixer section. This accepts any WAV file or RX2 slice from the Browser, or you can sample in directly. To use the sample as your wavetable select User Wave or User Wave Smooth from the source selector in one of the Engines. The Smooth option helps get clean results from complex audio sources. Remember, this isn’t a sampler so you won’t hear your audio file played back when you trigger a note. The oscillator plays back a short window (or grain) of the sample. You can scan through the sample using the Shape control to adjust the section of waveform that’s being looped.
Europa guesses the pitch of your sample unless you give it an audio file that’s exactly 2048 samples long, in which case it will assume it to be exactly one cycle of the waveform. (This follows a convention used by Xfer Records’ Serum wavetable synth). Also like Serum, Europa is able to somehow magically take your audio file and convert it to a smooth series of waveform ‘frames’. One last bit of Serum talk: there are loads of Serum wavetables freely available on the web that will now work perfectly in Europa. Bonus!
Dynamics
Sample import worked perfectly in Europa for creating new oscillator sources from static synth waveform samples. But for more complex audio files, dynamic modulation of the wavetable position is required to reveal the character of the original recording. As with the preset wavetables, this is achieved by mapping an envelope or LFO to the Shape parameter. You don’t have to use traditional wavetable-type audio with definite individual frames. Any audio with movement can be used, making Europa behave like an unusually smooth granular synth. A little Shape LFO applied to an Oberheim Xpander string patch sample was instant awesomeness.
If you want to make a sample play back in a linear way, you can use a simple ramped envelope to modulate the Shape (as in Screen 1, above). The mod amount sets the range of playback within the sample, and the Envelope time determines playback speed. Manually adjust the Shape control to set the start position within the file. Set the envelope to Key Trig mode to have it restart with each note played. I had particular fun using this setup with speech samples. Europa proves to be a deep sound design tool here because of its spectral Modifiers. Try toying with the playback rate and Formant modifier on speech to see what I mean.
When Is A Vocoder Not A Vocoder?
When it’s a dynamically animated spectral wavetable re-synthesising filter, obviously. An imported User Wave can also be used by Europa’s Spectral Filters. As with the oscillators, simply choose this from the bottom of the list of filter profiles. The filter will impose the spectral fingerprint of the sample (or rather a particular point in the sample) to the audio coming from the oscillator. The Frequency control will shift this filtering up and down, while the Resonance control sets the analysis position in the sample.
Most of you will be thinking ‘vocoder’ at this point, and you can certainly use it along these lines. By modulating the Resonance control, the filter shape will be tracked to different points in the sample, changing the filter character over time. Using an upward ramping envelope you’ll hear the original audio in the sample shaping the sound engine. The result is a uniquely smooth and malleable vocoder.
This One’s For The Players
Reason 10.1’s other big news is that the Rack has been opened up for third-party Player devices. We covered Players in the December 2016 issue, but to recap these are MIDI processors that snap on to the top of instruments in the Rack and manipulate what you play in various ways. The three standard Players have self-explanatory names: Dual Arpeggio, Scales & Chords and Note Echo. Each are powerful performance enhancers, but get even better when combined. For example, you can route a scale-constrained Chord player into the Arp and play in-key arpeggios from single notes.
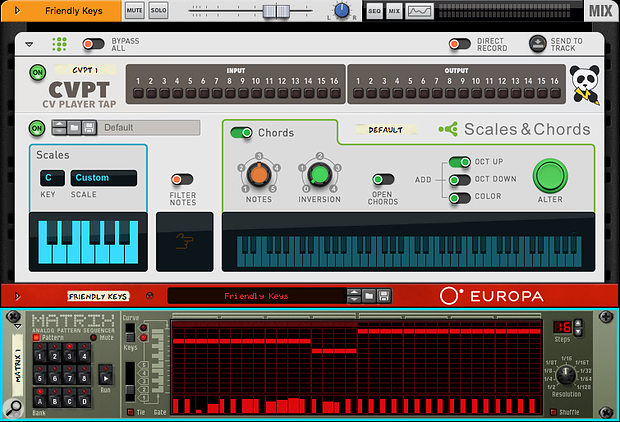
You can now buy add-on Players from the Prop Shop, or add them to your Subscrib-o-meter pack. As I write there are nine new Players available on the store, including an excellent free utility from Lectric Panda that you can use to input and output CV/gate sources to and from other players. Suddenly any CV/gate-based sequencers, such as the mighty Matrix device can be used in conjunction with Players (see Screen 2).
There are a couple of premium devices that showcase the potential of Players. From Lectric Panda again is Kompulsion: a superpowered arpeggiator/sequencer that did wondrous things that I don’t fully understand when I was shown it. I’ll report back later on this one. Another veteran Rack Extension developer Robotic Bean have created Euclidean Rhythms. This generates real-time rhythmic variation into your playing and is really effective and fun.
 Screen 2. Lectric Panda’s free CVPT device is a bridge between Players and CV sequencers.
Drum Sequencer
The star of the show was Drum Sequencer, developed by Propellerheads themselves. This was given away for free up until the end of May, so I hope you all spotted it in time. Drum Sequencer is an eight-channel, 16-step sequencer designed for drum programming. It can store up to eight patterns, with instant take-over on launch: exactly how I like it. Pattern arrangement can be automated using the standard Pattern Lane workflow in Reason’s main Sequencer.
Drum Sequencer’s eight channels default to chromatic notes from C1, meaning they’ll line up with Kong’s first eight pads, and most other MIDI-based drum patches in Reason. This can be changed manually or via a Learn function. On the rear are Gate outputs for connecting modular triggers to any other devices within the Rack. Patterns are created by clicking in the grid, or by real-time recording. To record, simply click the Rec button on the panel and play in from your MIDI keyboard or pads. There are some limitations: real-time recording is always quantised to 16th notes, and if you switch Patterns while recording, any notes you’ve captured appear in the new pattern and leave the original blank.
While the Drum Sequencer appears quite simple, it offers some unusually deep possibilities. Each track can be a different length, set by dragging the numbered token at the end of each lane. A global Reset Step with values from 1 to 128 (and Off) allows you to periodically restart all lanes from step one to rein in random polyrhythms and phasing loops. As well as the conventional velocity lane per channel, you get Repeats and Probability. Repeats let you flam or re-trig notes up to eight times per step, and there are 3/2 and 3/4 modes for creating triplets and off-meter repeats. Probability sets a percentage chance of any particular step triggering, providing another method for introducing variation into a drum track.
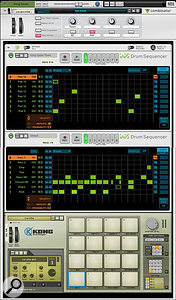
 Screen 3. Here, two Drum Sequencers are chained to a Kong drum machine, with global controls courtesy of a Combinator.The right-hand column toggles between Speed and Slide views. In Speed view you can set playback rates and direction independently per channel. Slide mode lets you push or pull the timing of each lane with respect to the grid. The column to the left of the lanes also has multiple modes, selected from the pop-up (labelled Preset by default). Each mode provides ways to manipulate the sequence data per track and globally. This is where you’ll find Clear, as well as Copy and Paste operations for moving sequences between the eight Patterns. You’ll also find Random for generating inspiration, and Alter for subtly changing an existing pattern.
An obvious application for the Drum Sequencer is to attach a dedicated, Rack-based sequencer to the Kong drum machine. The lack of built-in sequencing in Kong has meant it’s often overlooked compared to the original Redrum, which is a shame as it’s a brilliant drum instrument. It works pretty well, at least for the first eight pads. If you want to go further you can attach two Drum Sequencer devices to one Kong and load up a preset template. This does mean you’re juggling two lots of pattern controls and record/play buttons, so I put everything in a Combinator and mapped master buttons and a knob to these controls (see Screen 3). I will say there’s a lack of hardware mapping support that means Drum Sequencer doesn’t bring a satisfactory controller-based Maschine- or Push-style workflow to Kong, but with the Player format now open, it may just be a matter of time.


