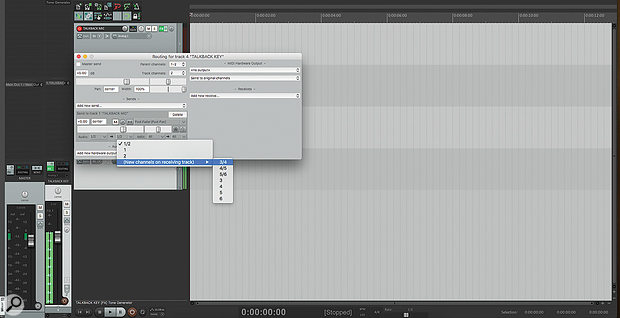
 Sending from our Talkback Key track to the new channels 3 and 4 of our Talkback Mic track.
Create an auto‑ducking talkback facility using Reaper’s ReaGate plug‑in.
One thing I missed when I first moved from a hardware console to a software‑based setup was the ‘push‑to‑talk’ talkback feature. It’s super handy when you’re recording performers in other rooms — you just press the button and it mutes the monitor mix and activates your talkback mic so you can communicate with the artists. Release again and your mic is muted, with the monitor mix restored. There are monitor controllers and audio interfaces that offer this functionality, but as computers have grown more powerful and system latency has diminished more and more people are constructing their monitor mixes entirely in their DAW software.
In this column, I’ll explain how to set up a push‑to‑talk function using Reaper’s in‑built tools, and suggest a couple of nifty variations. In the process, we’ll use Reaper’s flexible routing and the side‑chain capability of the ReaGate plug‑in.
Track Setup
This rig involves four tracks: a mic input; a monitor submix track; a main monitor bus; and a ‘key’ track, which we’ll use to toggle the talkback on/off. (The purpose of each will become clearer as we proceed.)
Start with the mic input. Create a new track called ‘Talkback Mic’ and set the input to whichever hardware channel you’ve plugged your mic into. Hit the track’s record‑arm button and you should see the meters move when you speak.
Next, right‑click the record‑arm button and select ‘Record: disable (input monitoring only)’, then click to engage Record Monitoring. This disables track recording, but still allows audio to pass through the track — it just won’t be stored on the hard drive when in record mode. We also want to prevent audio from passing to the main output, so click on the Route button and, in the track routing dialogue, untick the Master Send box. Finally, add an instance of ReaGate to the track (we’ll configure this later).
Now for the monitor submix track. Ordinarily, we’d use track sends to construct a monitor mix directly to a hardware output, but here we’ll send it to this submix track so we can mute or duck it underneath the talkback mic. To do this, just create a new track, called ‘Monitor Submix’ and again untick Master Send and add a ReaGate plug‑in.
Next, we’ll turn our attention to the main monitor bus. This isn’t strictly required — we could just route everything directly to a hardware output — but it keeps things tidy and allows us to control the level and apply effects to the monitor output as a whole. Again, this is very simple: create a new track, name it ‘Monitor Bus’ and, once more, untick Master Send. While you’re in the routing box, create a new hardware output send from this channel to your monitoring headphones’ hardware output.
Lastly, we need a ‘key’ track, which we’ll use to trigger the gates on ‘Monitor Submix’ and ‘Talkback Mic’ and thus toggle between them. Create a new track called ‘Talkback Key’, and (you probably guessed) untick Master Send. Then open the FX tab, and add the Tone Generator (a JS effect). The track meter should jump up to ‑12dBFS and stay there, but if you’ve unticked Master Send you won’t hear it — which is exactly what we want.
Connecting It All Up
You should now have four tracks, but they don’t interact at all yet. Connecting them all together can get a little convoluted, but if you follow through step by step, you should hopefully be OK...
First, create a send from channels 1 and 2 of ‘Talkback Mic’ to inputs 1 and 2 of ‘Monitor Bus’, and repeat to send ‘Monitor Submix’ to ‘Monitor Bus’. Both your talkback mic and your monitor sub‑mix should now be routed to the monitor bus. For the moment they’re just mixed together, but the next step is where the clever stuff happens...
We want to use the ‘Talkback Key’ signal to trigger the gates on ‘Talkback Mic’ and ‘Monitor Submix’, then invert one of the gates — that way we’ll alternate which signal gets sent to ‘Monitor Bus’.
Next, create a send from ‘Talkback Key’ to channels 3 and 4 of ‘Talkback Mic’ (see the opening screenshot). Click on the button to bring up the routing box, select ‘Add new send’, and choose ‘Talkback Mic’ from the drop‑down. By default this will send to channels 1 and 2, so from the drop‑down choose ‘(New channels on receiving track) ‑> 3/4’. This turns the destination into a four‑channel track, and creates sends to the second pair of channels. We’ll use this pair as a sidechain input to the gate. Repeat the process, but this time with ‘Monitor Submix’ as the destination. You should see the track meters on ‘Monitor Submix’ change to four‑bar types rather than two, with the second pair of bars sitting at a constant level to match the ‘Talkback Key’ track.
Almost Done!
Now open up the FX window for ‘Talkback Mic’, access the ReaGate settings, click on the ‘Detector Input’ drop‑down, and select ‘Auxillary Input L+R’. This should configure the gate to use inputs 3 and 4 as a side‑chain key. Move the threshold slider (on the very left of the plug‑in window) to somewhere below the indicated level of the key signal.
 Configuring ReaGate to key from the sidechain ‘auxiliary’ inputs 3 and 4.
Next, do the same thing on ‘Monitor Submix’ but invert the gate behaviour. As before, open the FX window for ‘Monitor Submix’, insert and configure ReaGate as before, and move the threshold slider so it sits a little below the key signal level. Then, in the Output mix section, ensure that both the Dry and Wet sliders are set to 0.00 (type the value in the box, or double‑click on the slider and it’ll jump to zero). Now, just check the ‘Invert gate (duck)’ box, then close the window.
Now when ‘Talkback Key’ outputs tone, the gate on the mic channel should let signal through to the monitor bus. When you mute ‘Talkback Key’, the ‘Talkback Mic’ gate will slam shut, and the ‘Monitor Submix’ one will open, letting the rest of the monitor mix through.
To use this system in a session, simply build your monitor mix using sends from your audio tracks to the Monitor Submix track. Your monitor mix will then be gated according to the key input, so your talkback mic is heard when it needs to be.
 In this screen, you can see our talkback rig sitting on top of a project.
Variations
Let’s round things off with a few tips and tricks for refining this system.
Smoothing it out: The transition between the ‘mix’ state and ‘talkback’ state is quite abrupt by default. You can smooth this out by adjusting the Attack and Release sliders in each ReaGate instance. For example, setting both of them to 500ms will create a much smoother half‑second crossfade between the foldback mix and the talkback mic, which can be much more pleasant on the recording talent’s ears!
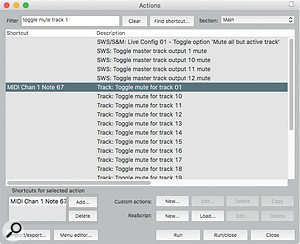
 Assigning track 01 mute toggle to a MIDI event.Dim Or Mute? If you’d like the monitor mix to dim behind the talkback rather than cut out completely, here’s a little workaround. Create a new send from ‘Monitor Submix’ to ‘Talkback Mic’ and set the send level to whatever you’d like the ‘dimmed’ mix to play at. Your submix will be ‘leaked’ behind the talkback mic signal at whatever level you set, so it’ll still be audible to some extent behind your talkback.
Control Via Action: What we have here works pretty well, but you have to manually click with the mouse to mute and unmute the key track. Instead, why not map to a keyboard shortcut or a MIDI controller to engage talkback? A nice, simple way to do this is to ensure that your Talkback Key track is always track 1, and then assign a keyboard shortcut to the action ‘Track: Toggle mute for track 01’. As long as nothing replaces that key track as Track 01, you should be able to press your shortcut key to toggle between the normal monitor mix and your talkback mic. As usual with Reaper’s custom actions, you can also assign them to MIDI controllers or toolbar buttons — whatever suits.


