 Pro Tools now supports a huge variety of metering standards, and master faders can use a different setting from other tracks.
We continue our look at further ways to tailor Pro Tools to your tastes.
In September 2019's Pro Tools techniques column, I covered six of my favourite preferences that I always make a point of changing from the default state after installing Pro Tools. In this column I'm going to continue this exploration of the Pro Tools preferences as this is an area of the program that doesn't receive as much attention as perhaps it should. As I've previously said, preferences are exactly that, and what suits me may well not suit everyone. However as Pro Tools is less configurable than many digital audio workstations, the limited amount of configurability we do have should be explored before we complain too loudly about how inflexible Pro Tools is!
Meter Choices
The first of these preferences is the ability to set different meter types for tracks and for master tracks. Metering is an area in which Pro Tools is far more advanced than some of its competitors, especially since PPM, VU and K-System metering were added. It's a pity that at the moment there is no loudness metering available in the mixer, but even so, the metering is infinitely better than it used to be in Pro Tools 10 days. While it isn't possible to have different meter types showing on a per-track basis, it is possible to set up a different meter type on master faders compared to the rest of the Pro Tools mixer.
Typically I'll use the Pro Tools Classic as my global setting for all track types apart from master faders; I'll set master faders to Linear as this gives the best feedback for monitoring headroom and the risk of clipping. To set your preferred meter type, go to the Metering tab of the Preferences — and while you are there, investigate the colour break and decay settings, which can also be assigned custom values.
Copy Cat
If you are one of those people who can't sleep knowing that there is a folder called 'stuff' on your desktop, or if you can honestly say you've never had a clip called 'Audio _01' in your clip list, this one probably isn't going to help you much. If, however, you're one of those people with a more relaxed attitude to file management, I recommend enabling the Automatically Copy Files On Import preference. The significance of this becomes apparent when you are archiving or moving Pro Tools sessions between drives or computers. If a file being imported matches the settings of the current session, Pro Tools' default behaviour is to 'add' that file, which means leaving the file in its original location and creating clips which reference that location. For an imported file, this location is most likely going to be outside the folder containing the rest of the session.
This 'referenced files' approach is useful when sharing assets between sessions or users is relevant, but if you want an easy life when it comes to backing up, enabling Automatically Copy Files On Import will guarantee that everything you've imported exists as a file in your session's parent folder. This preference is found in the Processing tab.
See What You Hear
Real-time MIDI properties are the alternative to 'baked in' changes that alter MIDI data on the timeline permanently. They are ideal for non-destructively quantising or transposing MIDI and given that real-time MIDI properties can be applied to entire tracks or to individual clips, the potential for commitment-free experimentation is very appealing. However, real-time MIDI properties can get very confusing if you're looking at the original part but hearing it, for example, transposed to a new pitch. The option to 'Display events as modified by real-time properties' is thus a bit of a must-have, particularly if you are using clip properties, as the transposition can vary from clip to clip. If you apply track-based real-time MIDI properties you'll see this is indicated by a 'T' symbol in the clip, while clip-based MIDI properties are indicated by an 'R' (for 'region', which is what clips were called before Pro Tools 10).
5, 4, 3, 2, 1
By default the 1-5 number keys on the QWERTY keyboard invoke the zoom presets which zoom the Edit window in progressively further. These can be set to custom values by holding Command (or Ctrl on a Windows PC) and clicking the 1-5 buttons below the zoom controls in the toolbar until they flash blue, but even so, I've never really used the zoom presets, I prefer 'R' and 'T' when the Command Focus is active, or Alt+F to zoom in horizontally on an edit selection.
 Pro Tools Ultimate users can reassign the 1-5 keys to access clip effect presets rather than zoom presets.
A much more useful role for the 1-5 keys is to apply clip effect presets. Clip effects are only available to Pro Tools Ultimate users — though Pro Tools Standard users can play back clip effects already in sessions they have received from Ultimate users, they can't edit the settings or create their own. Ultimate users can access the clip effects pane by clicking the disclosure arrow at the top left of the Edit window or by hitting Alt+Num 6. This pane contains a set of five preset buttons, which look very similar to the zoom preset buttons, and a preference to have the 1-5 keys control these presets rather than the zoom presets is available in the Editing tab of the Pro Tools Preferences.
Marking Time
Markers — memory locations that reference a point on the Markers ruler on the timeline — can be created at the playback cursor by hitting the small '+' symbol to the left of the Markers ruler or, much more conveniently, by hitting the Enter key on the numeric keypad. (For Apple laptop users who lack a numeric keypad, the Return key doubles as an enter key if you combine it with Fn.) By default, hitting the Enter key opens the New Memory Locations window and hitting it a second time drops the marker. Naming the marker and adjusting settings would usually happen between these two keystrokes. However, if you go into the Editing tab of the Preferences you can set the markers up so that a single keystroke automatically names and creates the marker, which is useful when timing is the priority.
Safety First
The last of the preferences I'll single out for special attention is the auto backup setting. While, mercifully, this is enabled by default, it is also set by default to backup every five minutes. The number of backups to be stored and the frequency at which this happens can be changed, and while the time between backups is a case of personal preference, I'd always advise someone setting this to ask themselves "how much work am I prepared to lose in the event of a crash?" The answer to this would of course depend on which particular five minutes you are referring to, and that is the reason why I prefer a setting of one minute. Most of the time, losing five minutes' work wouldn't be a big deal — but luck and computers being what they are, that terminal lock-up is bound to happen when five minutes is a bona fide catastrophe! Of course if you back up too frequently your backups won't extend back in time as far, but hopefully you practise incremental saves and don't just keep saving over the same version over and over again
Putting The HEAT On
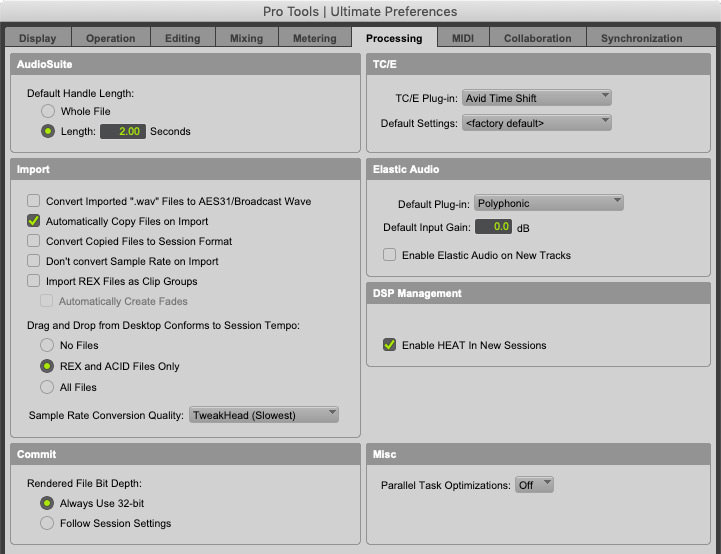
For a long time, HEAT used to be an HD-only feature, but it's now available to all Pro Tools users, offering analogue-style warmth within the Pro Tools mixer without any need to add plug-ins. While there will always be a variety of opinions about whether HEAT sounds as good as X, Y or Z third-party plug-in, something which is unique to HEAT is that because the effect is instantiated on every audio track (HEAT isn't available on instrument or auxiliary tracks) the cumulative effect that is so important to effects like these is guaranteed. When using third-party mixer channel strips or tape-modelling plug-ins, the temptation always exists to only use them on some tracks. Another advantage is that the effect can be controlled globally, allowing experimentation with the timbre and amount of HEAT being applied.
The issue I face is that I often forget to use HEAT at all. Processes like this are (or should be) subtle and, like a bus compressor, are best used from the beginning of a mix. If like me you forget to set it up at the beginning of a mix then the option to automatically instantiate HEAT in new sessions, found in the Processing tab of Preferences, is the solution.


