 Organising plug-ins by manufacturer can help you find what you want more quickly.
The Pro Tools Preferences offer a surprising number of ways to configure operation to your tastes.
Pro Tools is often criticised for not being as customisable as other DAWs. Personally, I've always seen its fixed set of keyboard shortcuts as an advantage, providing a consistent set of keystrokes which are the same on every Pro Tools system, but it's not the only area in which the Pro Tools user has less control than is available in other DAWs. Another common complaint, for instance, is that Pro Tools doesn't allow you to customise its plug-in menus. This has recently been addressed in the new search features introduced in Pro Tools 2018, and it got me thinking about customising your Pro Tools experience and the options available in the Pro Tools Preferences. If you do want to tailor the program to your tastes, here are some tweaks you might consider trying.
Category Or Manufacturer?
There is no user-definable control over how plug-ins get displayed in the list that pops up when you click on an insert slot. This list is populated according to category (EQ, Dynamics, Reverb and so on) and manufacturer. The default sorting is by category, but if you have a reasonable number of third-party plug-ins it is definitely worthwhile switching on the option to display by category and manufacturer. For many years, the only way to instantiate a plug-in was to select it from this list, and finding a particular plug-in can be much quicker when you navigate by manufacturer rather than by type.
The search facility was introduced in Pro Tools 2018: click on an insert slot, start typing and a list of matching plug-ins or plug-in presets appears. Rather than making the plug-in list redundant, for me the search facility has just changed what the plug-in list is for. Searching for a plug-in is fine if you know what you are looking for, but browsing the list often turns up options you hadn't considered, and displaying by manufacturer is a great way of keeping on top of what you have installed and reminding you to remove expired demos and unused plug-ins.
Another time-saving option is the preference to select EQ and dynamics plug-ins, which is also found in the Display tab of the Preferences. These will occupy the top of the list once specified.
Zoom Toggle
Something which can confuse newcomers to Pro Tools is the lack of a dedicated sample editor. Pro Tools doesn't have a sample editor because the Edit window is the sample editor. The quickest way to get a detailed view of the audio you are editing is to use the Zoom Toggle function, and when this is set up correctly in the Preferences, editing can be a full-screen experience.
Zoom Toggle temporarily zooms in on the selected area of the Edit window. The Zoom Toggle button, just to the left of the Zoom Tool in the toolbar, gives a visual indication of whether or not you are currently zoomed in. You can click this button with the mouse, but hitting 'E' when in Command Focus is far more efficient. As the word 'toggle' implies, to exit Zoom Toggle you just hit 'E' again. A little-known extension to Zoom Toggle is to hold down Alt while clicking on the button or pressing 'E', which exits Zoom Toggle without changing your current level of zoom.
Zoom Toggle always zooms horizontally to fill the window, but there are several vertical zoom options. The default setting for track height isn't the most useful, and I'd always change it to 'fit to window' so the vertical zoom matches the horizontal zoom. To access this setting, go the the Editing tab of Pro Tools' Preferences.
 The default Clip Gain Nudge Value is rather low, but this can be changed in the Preferences.
Allow Sends To Persist During Low Latency Monitoring
If you're an HDX user then you are in the lucky position of not having to consider latency while tracking very much at all. The usual workaround to avoid latency while tracking with native DAWs, including standard Pro Tools, is to route audio directly from the open microphone to headphones, either using a mix control on the audio interface or, more usually, some form of mix control software to control routing within the interface. This arrangement works well but does involve some compromises.
Pro Tools 2018 introduced some enhancements to Low Latency mode, which can be found in the Options menu. As well as automatically muting the output of input-monitored and record-enabled tracks, it introduced a preference called Allow Sends To Persist During Low Latency Monitoring, which allows sends on these muted record-enabled tracks to pass audio. This is particularly useful for setting up 'confidence reverb' while tracking: the performer will only hear the direct signal through the low-latency path, but will also hear reverb generated from the aux send on the recorded track.
Clip Gain Nudge Value
Clip Gain is a relatively recent addition to Pro Tools and it's one of those features that makes you wonder how you ever got by without it. (If you've never used a pre-Clip Gain version of Pro Tools, we got by without it by using the AudioSuite Gain plug-in, or if we were really lazy, putting in a one-band EQ and adjusting the gain using the input control.) Clip Gain is much easier to use than anything that went before, especially if you control it using keyboard shortcuts.
To nudge the Clip Gain value up or down from the keyboard use Ctrl+Shift+up/down on a Mac or Start+Shift+up/down on a PC. This can be done with a clip or an edit selection and across multiple track selections, even if the selection is across non-contiguous tracks. The drawback with the default settings for Clip Gain nudging is that the default is set to a rather modest setting. For me it is a little too fine, so I adjust this in the Clip Gain Nudge Value in the Editing tab of the Pro Tools Preferences to a much coarser 3dB. I find this suits my purposes much better and I no longer find myself hitting the down arrow nine times in a row to bring a loud breath noise down in a vocal.
It is particularly important that the send panning follows the main pan control if the send is feeding a bus, especially one being used for parallel processing.
Follow That Pan!
Found in the Mixing tab of the Preferences, the Send Pans Default To Follow Main Pan setting does exactly what you would expect. The FMP (Follow Main Pan) button found in floating send windows greys out the pan controls in send windows, though only in the floating window. If you have a send slot in the Mix window expanded to show the mini fader and pan controls, these don't show the status of this button, or indeed show the FMP button at all.
I prefer the FMP button to be engaged on sends because, most of the time, if I have a specific pan position dialled in on the channel's main pan, I'll usually want that reflected on a send too. For example, if the send is feeding headphones, unless there are issues with player/audience perspective, I'll usually want pan positions to reflect what I'm hearing on the main mix. If the send is feeding an effects bus and the effect is true stereo then I'd want the panning preserved; if it isn't true stereo the panning of the send won't make any difference to the stereo position anyway. It is particularly important that the send panning follows the main pan control if the send is feeding a bus, especially one being used for parallel processing.
Interestingly, engaging this preference doesn't apply retrospectively to existing sends in the session, so if you already have a send on a track created without Send Pans Default To Follow Main Pan enabled and you switch the preference on and create a new send, only the one created since the preference was enabled will have FMP enabled.
Preferences Are Personal
It is implied by the name that preferences are precisely that: preferences. What suits me might not suit you — but, tucked away as they are out of the main Pro Tools UI, I suspect many of us don't explore the Pro Tools Preferences as thoroughly as we might. Maybe it's time to have a good look around a part of Pro Tools most of us only visit when something isn't right.
Always Display Marker Colours
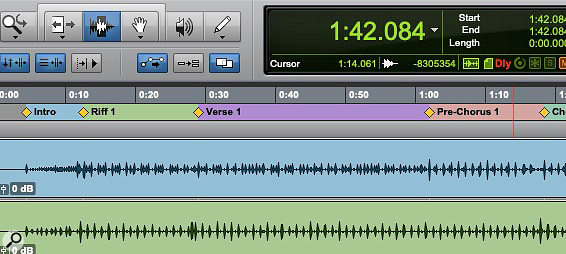
 It's easier to take in a song structure at a glance with the Always Display Marker Colours option enabled.
Markers are a subset of Memory Locations, the difference being that while all Markers are Memory Locations, not all Memory Locations are Markers. Markers locate specific points on the timeline, and in a music context, can be used to mark out sections of a song. They can be created during tracking to mark mistakes or points of interest.
The Markers ruler shows each Marker as a yellow diamond or shield symbol, depending on whether it references a relative (tick-based) or absolute timebase. By enabling Always Display Marker Colours in the Display tab of the Pro Tools Preferences, the areas of the Markers ruler between the markers becomes coloured with randomly alternating colours, helping to delineate song sections and so on. It's a small thing but I can't run a session without it.


