Many of today's most interesting and popular audio-processing techniques are achieved with plug-ins. This month, we look at how you'd go about recreating some of them in Digital Performer, and continue our coverage of more unusual plug-in features.
Last month, I explained that many bundled and third-party plug-ins for Digital Performer have 'hidden' or less obvious features that can be used for creative audio treatments. Some effects, though, are best achieved in specific ways, sometimes using a combination of plug-ins and other DP features, and it's these that we'll be looking at this month, with step-by-step descriptions of how they're set up.
'Pumping' Compression
A compressor controls the dynamic range of your audio, making it easier to mix, creating a more full-blooded effect, or causing it to take on a different character. While some compressors are designed to be transparent, doing an important job without drawing attention to themselves, others are all about attitude and creating rather more obvious effects. One of these effects is 'pumping', where the dynamic gain-changes the compressor is responsible for cause decay portions of piano, bass and cymbals to apparently bulge and surge, while sustained parts, and even whole mixes, can take on a pulsing rhythmic energy independent of the underlying musical content. Two obvious examples are the drums in Radiohead's 'Idioteque' (from the album Kid A) and Portishead's track 'Pedestal' (from Dummy) — although an altogether less clever kind of compressor pumping is increasingly being heard on various mainstream dance tracks.
 Aggressive, pumpy compression is fairly easy to achieve on individual tracks, and is largely down to appropriate release times and using the right compressor for the job. Here Dynamics is shown processing a bass sound.There are many ways to experiment with pumping in Digital Performer. Firstly, compressors can be set up on individual tracks (such as bass guitar, for example) to provide very obvious compression that becomes an integral part of the sound of the instrument. Second, for instruments (or submixes) that occupy a wider frequency range, such as drums or piano, a compressor can be set up so that its action is controlled (or 'keyed') by only one part of the instrument's frequency range. Some great effects can be produced in this way. Finally, you can apply compression to an instrument, or a whole mix, and have the pumping effect keyed by a separate audio track, which may or may not be audible in your mix. We'll look at all three techniques, as each one is useful in its own right.
Compressing Individual Tracks
Treating individual tracks with obvious 'pumping' compression is relatively straightforward, but the outcome depends almost as much on the actual compressor you're using as on the settings you dial in. The pumping effect is dependent on rather large gain changes being applied by the compressor, so to begin with you need to set Threshold somewhat low (so that compression kicks in 'early'), Ratio rather high (so that there's plenty of gain reduction), and Make-up or Output Gain high (so that you can actually hear your track again!). To achieve the full pumping effect, appropriate Attack and particularly Release times are also crucial, and you'll often want your input signal to be 'dancing around' your Threshold level, so that the compressor's Attack and Release phases are continually being made to work. What this means is that 'peak'-type compressors are almost always best for this job, rather than the generally more self-effacing 'RMS' (Root Mean Square) type, which almost always lack Attack and Release controls.
Compression is very signal-dependent, so it's a little misleading to give 'example' settings (and, for the same reason, I find compressor plug-in presets fairly worthless), but the screen above (MOTU's Dynamics plug-in working on a bass track) shows settings that have worked for me in the past. The Dynamics plug-in is OK for this role, but you might also try Preamp1 's compressor, turning off all the other tone-processing sections. If you're using a third-party compressor, one with a 'hard-knee' setting will produce more obvious compressor action.
Band-limited Keying
If you've heard the Radiohead or Portishead tracks I mentioned earlier, you'll realise that there's something funny going on with the drum compression. It's not the overall level peaks that are triggering the gain reduction, but only the peaks associated with one individual drum — the bass or kick drum. When the kick isn't playing, the volume of the other drums surges, but as soon as it plays, the other drums are pegged right back.
What's happening here might be described as 'band-limited keying' (or, perhaps, frequency-conscious compression): the whole drum mix is being treated with one compressor, but its action is being triggered, or 'keyed', only by the presence of the low frequencies supplied by the kick. It's a useful technique, especially for drums, and can supply anything from a gentle rhythmic pulsing to absolute sonic carnage, depending on how much compression is being applied.
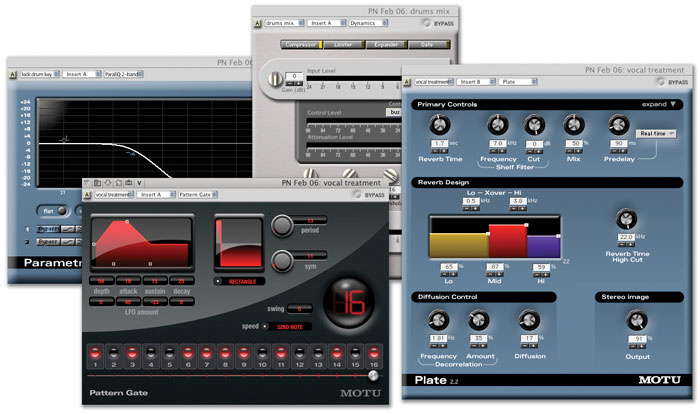
 In this setup, the 'drum loop' track is being fed to two Aux tracks, via its main outputs and one of its sends. The 'kick drum key' track is then filtered by the Parametric EQ and the resulting signal is fed into the Dynamics plug-in side-chain. It's a slightly convoluted routing that can achieve some really great results.There aren't many compressors that can do band-limited keying all by themselves — only Wave Arts' Trackplug 5 and Waves' Renaissance Channel spring to mind — but you can set up a routing in DP that works similarly if you don't have one of those two:
1. First, create a new Aux track and place on it a compressor that has a side-chain input (such as MOTU's Dynamics). Set the Aux track's output as your main hardware output.
2. Send to this Aux track the audio (such as a commercial drum loop) you want to compress, using a buss pair. For example, choose buss 1-2 as the input to your Aux track, then buss 1-2 as the output of the drum-loop track. You need this extra Aux track, or, when you've completed more steps in this procedure, DP will complain that you've formed a feedback loop. You haven't really — DP is just being picky!
3. Now we need to derive our band-limited keying signal. But rather than actually copying audio, we'll split off another duplicate of the drum-loop signal in real time and work on that. The key signal only needs to be mono, as we'll never hear it directly, so we'll do it using a send. Create another new Aux track and make its input a mono buss you haven't used elsewhere in your project — perhaps buss 3. Make its output another mono buss, such as buss 5. In case you're wondering why I didn't suggest buss 4, it's because DP 's buss architecture is intrinsically 'paired' in odd-even pairs, and you're not allowed to mix an odd-numbered input and an even-numbered output from the same pair on the same track. You might want to name the track 'kick drum key', or similar.
4. Now go to the Mixing Board and the send section of your original drum-loop track. In one of the send slots, choose the buss you used for the track input in step two. Turn up the send level control to its 0dB position so that there's a healthy send level.
5. On your 'kick drum key' track, instantiate an EQ plug-in, such as Parametric EQ, and dial in a whopping low-pass filter (see the screen below for a typical setting).
6. Now, switching back to your compressor plug-in, set the side-chain (key) input as the buss you chose for output in step two.
7. Dial in some appropriate compression settings to take advantage of your new kick-only key signal.
It might have occurred to some of you that a very similar approach can be taken to build a DIY de-esser. The only difference would be that you'd place your compressor on a vocal track, and then in step five you'd set up a narrow band-pass filter (around 5-7kHz) to isolate troublesome sibilant frequencies, which would then be used to 'key' the compressor.
Other Goodies
There are some interesting features hidden amongst DP 's bundled plug-ins that you might not have thought of using.
 Because of its automatable envelope generator and on-board LFO, the Pattern Gate plug-in can do a lot more than 'stuttering' effects. One of those is the Decorrelation section in the Plate reverb. To get at this, click the Expand triangle in the plug-in window, to see the 'full monty' view, and then look in the bottom left under the Diffusion Control section. Decorrelation basically refers to the pitch integrity of the reverb tail, with increased Decorrelation leading to an 'out of tune' reverb tail, just as occurs in some natural acoustics. Here, though, Decorrelation is controlled by a low-frequency oscillator, so you get a Frequency parameter (which controls the speed of the pitch wobble) and an Amount parameter (which controls the depth). Any number of settings produce beautiful results, with frequencies of around 2-3 Hz sounding obviously weird, but faster (and shallower) wobbles producing wonderful shimmering effects. Adding a little Decorrelation to almost any Plate reverb tail seems to improve it, lending a sort of chaotic, organic quality that's impossible to produce with many other reverbs.
Another technique to try involves the new Pattern Gate plug-in. This does a lot more than abrupt 'stutter' effects, because each of the 16 possible gate triggers is subject to the settings of the on-board envelope generator. That not only means that the length (sustain) and abruptness (decay) of each gate trigger can be tightly controlled, but also its onset, courtesy of the Attack parameter. Rhythmically aligned with and applied to a drum mix, for example, tweaking sustain and decay settings can lead to very dynamic and aggressive gating effects, but increasing the attack time can make your hits sound 'rubbery', or almost 'bowed'. What's more, these parameters can be automated so that the effect can be brought in gradually, or you can use the built-in envelope generator to effectively 'automate' the parameters internally. Just turn up the LFO amount for any of the envelope stages to explore this effect. Incidentally, the Period parameter for the LFO relates to number of steps for the step sequencer, so if you're using 16 steps but you make the LFO Period, say, 17 steps, you instantly set up an interesting out-of-phase polyrhythmic effect. Far from being a one-trick pony, Pattern Gate is worthy of serious experimentation.
Side-chain Keying
Band-limited keying is all very well, but for the ultimate in flexibility, especially to maximise your compression 'pump' factor, you should try keying your compressor from an independent external signal. You can then trigger the pumping effect regardless of what the kick drum (or any other instrument) is doing. With a bit of experimentation, some very sophisticated effects are possible: try triggering the compression of one rhythmic loop with the snare hits from another, or trigger compression repeatedly during a sustained portion of a vocal or synth note, for example.
Selective Delays
The addition of echoes to individual words on vocal tracks, often at the ends of phrases, is a subtle and distinctive effect. As well as allowing you to draw attention to single, perhaps important, words, it can also make mixing easier, since you get a strong echo effect without having to have a delay constantly enabled on the track.
This type of 'selective delay' effect is not quite as straightforward to set up as you might think, however. Just placing a delay on your vocal track and then automating its Bypass parameter doesn't really work properly, because often the onset of echoes is too brutal and sudden. You have a problem, too, if you want the echoes to overlap with subsequent non-echoed words, as these also start to be delayed and chaos ensues.
 A lot can be achieved by combining DP's plug-ins with some of its other features. Here, for example, by combining a delay plug-in hosted on an Aux track with an automated send on a vocal track, it's possible to have individual words 'echoed' without affecting the rest of the track.What's needed, then, is a different approach, and the one that works best is to have your delay plug-in running on an Aux track, and to send to it the words (or other audio) you want to treat, using an automated send on the vocal track. To try out this technique, first open a Project which has a suitable vocal track, or perhaps record 30 seconds or so of speech into an audio track.
1. Create an Aux track and put a suitable delay effect on it — perhaps MOTU's Echo plug-in. Set the wet/dry mix to 100 percent wet. Make the track's input a single buss (perhaps buss 1), and the output your main audio-hardware output pair.
2. In the Mixing Board, go to the sends section of the vocal track to which you want to add the selective delays. In an empty send slot, choose the same buss you configured in step one.
3. Place DP 's playback wiper to the left of the section where you want the delays to occur. Hit Play and raise the send level quite high, to allow you to hear what sort of delay you have set up on your Aux track. If necessary, switch back to the plug-in window and dial in more appropriate settings. Finally, go back to the Mixing Board and return the Send level control to its -[INFINITY]dB setting.
4. Re-position the playback wiper, and, in the Mixing Board, hit the Automation record button on your vocal track. Play your sequence, and every time you reach a word you want to add delays to, raise the vocal track's send level with your mouse, returning it to -[INFINITY]dB immediately afterwards.
5. When you're done, click the track's Automation record button once more, making sure that Automation play remains selected. Replaying the section you just worked on should result in proper selective delays being produced.
Obviously, dragging the send-level control in real time isn't the only way of entering the appropriate automation data. If you're familiar with DP 's automation, it might be even better to enter the send level data graphically in the Sequence Editor, as there you can see precisely where individual words occur by looking at their waveform in soundbites.
This technique works really well because the Aux track and its delay plug-in run totally independently of the vocal track, and by just feeding it with the audio you want to effect, you keep the dry and wet signals entirely separate. As well as delays, this technique also works well with reverbs (which can also sound great on individual words, or drums, or chords...) and other 'send friendly' effects such as chorus, harmonisers, and even granular synthesizers.
Digital Performer News
It has been an unusually quiet month for DP-related news, but MOTU's release of a USB2-compatible 828 MkII audio interface provided some interest. It seems very likely that this new product has come about because of the relatively poor support for Firewire offered by some PC workstations and laptops. For Mac (and DP) users, the Firewire 828 MkII is still probably the right choice, despite the recent rumours on the internet — almost certainly inaccurate — that Apple are dropping Firewire support from some of their laptops. Even if this somehow proves to be true, it's more likely to mark a move towards the newer FW800 standard, which is backwards-compatible with the familiar FW400 used in MOTU's audio interfaces.
Reverse Reverb
It's immediately recognisable and arguably over-used, but genuine 'predictive' reverse reverb, where the reverb tail builds up and culminates in the sound that 'caused' it, remains an arresting and often very beautiful effect that works well in all sorts of applications. The key to achieving it in DP is the use of 'off-line' rather than real-time plug-ins, accessed from the audio menu. It's no coincidence that it's only here that you'll find DP 's Reverse plug-in.
1. In the Sequence Editor window, isolate the section of audio you want to treat with the reverse reverb effect. For various reasons, it's easier if this is contained in one soundbite, so if it currently consists of several it's a good idea to select them and use the Audio menu's 'Merge Soundbites' command first. If the section is contained within a longer soundbite, use the I-Beam cursor to select the section, then hit Apple-Y to split it into its own soundbite. Now select the soundbite you want to treat.
 Perhaps because of the fact that it's so unnatural, true reverse reverb is a striking effect, and one which can be created in DP by combining soundbite editing with reverbs and the Reverse plug-in used 'off-line'. 2. Go to the Audio menu and find Reverse in the Audio Plug-Ins sub-menu. Select it, and if necessary click Apply in the window that appears. This will cause your soundbite to reverse, after a short processing time.
3. Now, with the soundbite still selected, go back to the Audio menu, and this time choose a reverb plug-in such as eVerb or Plate. If you're using more recent versions of DP, you can click Preview in the window that appears and adjust parameters while your audio plays, to achieve the desired effect. A certain amount of trial and error is necessary, especially regarding reverb times and dry/wet mix ratios, so just stick with any promising setting for now.
4. If the audio you selected in step one has only a short lead-in time (ie. the first sound starts only shortly after the soundbite begins), you need to use some 'post-roll', so that the reverb tail you're about to apply to the reversed soundbite doesn't get cut off too soon. Type in a value, in milliseconds, in the 'Post Roll' field at the bottom of the plug-in window. This should at least match the length of the reverb tail you're using.
5. Hit Apply, wait for the reverb to be 'printed' to your soundbite, and then choose Reverse again from the Audio menu, as you did in step two. If you didn't have to use post-roll in step four, you're done! If you did, read on...
6. Reversing a soundbite with an additional post-roll section causes it to lose its original alignment with the other elements of your sequence. It's easy to fix, however. Use Alt-Apple-N to bring up the Nudge amount dialogue box. Choose Milliseconds in the pop-up menu and type in the same value as you chose for post-roll amount in step four. Hit Enter and then, back in the Sequence Editor, with your misaligned soundbite selected, hit the left arrow key. This 'nudges' the soundbite back by the chosen amount of time, restoring correct alignment and timing.
The best choice of reverb for the reverse reverb effect depends on what you're trying to achieve, and you'll need to experiment. Don't be afraid of trying out different pre-delay values, which will tend to detach the reverb build-ups from the dry audio that follows them. Consider, too, substituting the reverb for a delay plug-in, or use a mix of both, by first applying the backwards delays and then repeating the whole process to add backwards reverb to the whole shebang.


