
Do you find that your MIDI tracks lack the magic of real performances? Simon Millward looks at the inner workings of one of James Brown's most famous songs and shows you how the musicians' techniques can be used to improve the feel of your own sequences.
Most of us are aware of the 1966 James Brown classic 'I Got You (I Feel Good)', and few would disagree that James Brown sounds like he does indeed feel good when he sings it. And judging by the song's considerable success — people the world over instantly recognise the infectious vocal catch phrase — it would probably be fair to say that it has made a lot of listeners feel good too, and want to join in the party. Many people tap their feet, dance, and sing along when the song comes onto the radio. What gives this track such a feel‑good quality?
Obviously, the meaning of the words and the contour of the melody will be important. However, it's not really what James Brown sings, but how he sings it, which has such a profound impact. This 'how' is referred to as the 'groove' or 'feel' of the vocal line, and it is essential to the feel‑good factor of this song (which I will refer to from now on simply as 'I Feel Good').
To grasp the essence of what we mean by the word 'groove', try the following. Go stand in the middle of the room and simply say the phrase "I feel good" in a mundane, everyday kind of way. This kind of delivery isn't likely to do much to make you feel good, is it? Now try singing the phrase à la James Brown, or listen to the performance of the man himself, if you happen to have the record to hand. Much of the immediately apparent difference between the two renditions is down to the extra groove imparted by Brown in his performance. This shows how groove can transform a potentially uninspiring vocal phrase into a killer hook, yet this is usually achieved through comparatively small inflections in the timing and accentuation of the basic rhythm and melody line.
But the groove of 'I Feel Good' doesn't solely inhabit the vocal line. The overall groove of the song also results from the grooves of the other parts woven together into the arrangement. If you took away the groove of the instrumental parts of 'I Feel Good', it would actually feel rather average. And this is not just the case with this track, but also with most other styles of music — whether soul, rock, dance, jazz, or classical — even though the groove of each will be very different. Groove is the very essence of great musical performances, and playing with groove is something that great musicians do naturally.
The problem for home recordists is that they often cannot afford to get real performers to help them record their own music. For these composers, the only other option is to use a sequencer and a set of MIDI sound sources to create something akin to a real performance. However, even if the MIDI sound sources can fool the ear into thinking that real instruments are playing, many programmed MIDI parts lack the groove of real performance, and so the result still sounds mechanical and unmusical.
The good news, though, is that many sequencers, both hardware and computer‑based, now include groove‑manipulation features, usually in the form of a number of 'groove quantise' functions which can make numerous small changes to a performance in order to inject a live feel into it. However, before we delve more deeply into the wonders of groove quantisation we must first take a look at what quantising itself is.
What Is Quantising...
 Figure 1. The white notes in each case show an original unquantised 16th‑note MIDI part in a piano roll‑style editor. The blue notes show the effects of hard quantisation, while the green notes show the effects of the more subtle iterative quantisation technique.
Quantising is concerned with sorting out performance timing inaccuracies by shifting MIDI notes closer to the main beats of the bar or their divisions. You might use it for shifting all the hi‑hats in a MIDI recording onto exact 16th‑note divisions, for example — a process often referred to as 'over' or 'hard' quantising. Alternatively, you might only shift your recorded hi‑hat notes toward the 16th‑note divisions by a certain percentage of the distance they are away, a process which is often called 'iterative quantise' because it can be carried out repeatedly until the required timing tightness is achieved.
Figure 1 shows these two different quantisation processes in action. The white bars show the original note events as they might be viewed in a sequencer's piano roll editor, with the vertical lines showing the positions of the exact beat divisions to which this performance is to be quantised. The blue bars show the results of hard quantising, with every note moved exactly onto the nearest division, while the green bars show the effects of an iterative quantise where notes are moved 50 percent of the way towards the divisions. In the latter case, the performance is tightened up while still retaining some of the feel of the original performance.
... And How Is Groove Quantising Different?

Groove quantising differs from corrective quantising in a number of ways, the first of which is that the grid lines to which a groove quantise function is set need not be exactly on any division of the beat. This means that groove quantising actively seeks out timing irregularities which other kinds of quantising attempt to eradicate with their strictly regular quantising grids. By defining a new set of grid lines, often over the space of several bars, it is possible to recreate some of the feel of a real musical performance, where the notes don't fall exactly on the beat. Real musicians almost never play in a rigidly quantised manner, so groove quantise provides us with a means of capturing a natural rhythmic feel and imposing it upon our own musical material.
However, groove quantising doesn't restrict itself merely to altering the rhythm of the target MIDI recording. As I mentioned above, groove isn't just about timing variations, but is also to do with variations in dynamics and note lengths as well. Some of the more flexible groove quantising functions not only allow you to define 'groove templates' with quantising grid lines at any required position in the bar, but also allow you to set individual velocity‑scaling and/or duration‑scaling values for each grid line. Any note quantised to a given grid line will then also have its velocity and duration altered accordingly, to provide more convincing results. The most advanced groove quantising facilities can even extract a groove template from an exisiting MIDI or audio part allowing the feel of any performed parts thus to be imposed upon the programmed parts which accompany them.
Simple Ways Of Adding Groove To Your Timing
![]() Figure 2. The effects of 16th‑note shuffle on a regular pattern of MIDI 16th notes, such as a hi‑hat part.
Figure 2. The effects of 16th‑note shuffle on a regular pattern of MIDI 16th notes, such as a hi‑hat part.
In spite of the complexity of the most flexible groove quantising systems, even simple sequencers offer ways in which to get your MIDI parts sounding less mechanical. For a start, even the most basic of sequencers will usually allow you to place individual elements of the arrangement on different tracks, and to shift these in time against each other.
One easy and surprisingly effective trick is to put all your hi‑hat programming onto a separate track and then to shift this with relation to the rest of the sequence. If you shift hi‑hats early, it usually increases the sense of urgency within the part, whereas delaying them can help give a more laid‑back feel. This trick can also work well with other elements of the drum kit, such as the snare or kick parts, though the trick tends to work at its best if the delayed tracks can be contrasted against other tighter parts. Another great way to use this technique is to apply it to any rhythmic punctuations in the arrangement, such as cymbal crashes and drum rolls — moving them early can increase the sense of excitement, while moving them late induces expectation in the listener.
The most simple of the dedicated groove manipulation facilities is the ability to add 'shuffle' or 'swing', where every other division of the beat is delayed by a user‑definable amount. The charts are full of songs with this distinctive feel, and it is particularly characteristic of a lot of hip‑hop music — the Akai MPC60's swing function was very influential in the creation of the hip‑hop and rap swing grooves of the '80s and '90s. If you don't have access to this function, you can sometimes get the same effect by putting all the off‑beat notes of a pattern onto a different track, which you then delay.
Figure 2 shows a set of hard‑quantised 16th notes (the white bars) which have had a classic 16th‑note shuffle groove applied to them. In this case it is a pronounced shuffle, with every other 16th note being moved about a fifth of the way towards the following one — this equates to about 23mS at a tempo of 120bpm, which is a significant delay. However, most systems which allow you to impose a shuffle groove will allow you to vary this delay for a more or less subtle effect. What's more, some more advanced implementations also allow you to decrease the velocity or duration of notes occurring on the delayed beats, which can help to lighten these notes in a natural way.
Understanding Basic Groove Templates
![]()
More complex grooves than the simple shuffle are most easily accessed using the groove templates which are available to more advanced sequencers. However, the effects which such templates produce can be recreated manually using more simple equipment, once you understand how they work.
To start with, let's take a look at the effects of the simple templates shown in Figure 3. The first of these is designed to bring earlier, or 'push', all notes which fall on the first and third beats of a four/four bar (highlighted in red). As I've already mentioned, the pushing of individual parts against the rest of the arrangement can help to create a sense of urgency, but a similar lively feel can be achieved by pushing individual beats within the bar. In this case, any notes on either of the pushed beats are moved early by about a seventh of a 16th note, which is around 18mS at 120 bpm, and yet this comparatively small timing change can have a great impact on the feel of a programmed drum kit. The fact that the pushed beats are the first and third is particularly well suited to popular styles where there is usually a bass drum hit on the first beat of the bar.
The second of the two templates, by way of contrast, is designed to delay all notes which fall on the second and fourth beats of the bar (again highlighted in red), and this might be used to create a lazy or 'laid‑back' feel. Both of the delayed beats have been moved about an eighth of a 16th note late, which is around 15ms at 120 bpm.
There are two things which it is also worth noticing with both of these templates. Firstly, the beat divisions around those being pushed or delayed have been placed strategically, in order to provide a natural timing progression with an authentic feel. And, secondly, none of the other beat divisions are exactly metronomic, these minute short‑term fluctuations in timing being vital for creating the impression of a real live feel.
Groove Timing In Practice
![]() Figure 3. The effects of two groove templates from the DNA Grooves collection on regular 16th‑note MIDI parts. The upper shows pushed first and third beats, while the lower shows late second and fourth beats.
Figure 3. The effects of two groove templates from the DNA Grooves collection on regular 16th‑note MIDI parts. The upper shows pushed first and third beats, while the lower shows late second and fourth beats.
Given the number of currently available tools for improving the groove of your MIDI timing, combining them effectively can be a bit of a balancing act. Even if you have one of the commercially available collections of pre‑programmed groove templates within your sequencer (see the 'Ernest Cholakis' DNA Grooves' box for one example), that doesn't mean that getting a good groove will suddenly be a one‑step process.
To start with, the nature of your song's musical arrangement will greatly determine how effective any given groove template will be. Many sequencer‑based musicians fall into the trap of programming extremely busy drum parts, for example, which make it very difficult to inject any life, even with sophisticated groove templates. Your arrangement will usually need room to breathe if you're going to generate a convincing groove.
Applying groove‑manipulation tools selectively to individual rhythm parts is well worth the effort since it allows you to match the kind of feel which is achieved by accomplished drummers much more accurately. A real drummer, for example, would rarely play the bass drum and snare at precisely the same moment, even when supposedly playing them together, and this effect would be difficult to achieve using a single groove template for an entire MIDI drum performance.
One way around this is provided on the more advanced sequencers, where MIDI notes can be pulled only part of the way towards a groove template's timing grid, in a similar way to when using iterative quantise. In this case, you could try applying the same template with different strengths to each of the parts of your track in order to get a more natural feel.
However, some styles of music rely on specific relationships between the different rhythm instruments, which a single template might be unable to reproduce. For example, many shuffle grooves rely on a bass drum and snare which are quantised tightly to the beat while the hi‑hat alone is quantised to the shuffle groove. The only way to deal with this would be to mix and match different groove templates. One particularly good combination is to apply the first groove template in Figure 3 to your bass drum part and the second groove in Figure 3 to your snare drum part, creating a dynamic 'push‑pull' groove which can be really lively and effective.
It should also be remembered that the timing of each instrument in a live performance constantly changes from section to section, so a fixed one‑ or two‑bar groove template will only ever provide a certain amount of live feel. Using a selection of grooves for different sections of a single part, on the other hand, will be likely to humanise and enliven your material much further. I've found that hi‑hats in particular benefit from slight variations in groove, as these help maintain the interest of the listener. For similar reasons, some of the commercially available groove collections offer variations on their basic templates, providing subtly different related templates which alter the groove throughout the track and cater for specific musical features such as drum fills and solos.
But try not to get carried away with the advanced groove quantise functions in isolation from other simpler techniques at your disposal, such as altering relative timing between parts, using normal hard and iterative quantise functions, and applying simple shuffle processing. Also bear in mind that tempo manipulation can also be employed to create the right feel. For example, a classic tempo manipulation might involve slowing the tempo for the verses and speeding it up for the choruses. You can make slowing down the tempo sound more natural if you delay one of the elements of your drum pattern during the tempo transition — this can work really well with the snare, in particular. Likewise, pushing an individual rhythmic element can help make increases in overall tempo sound more convincing.
As you can see, there are a lot of ways in which you can manipulate the groove in your MIDI timing. However, learning to use these various techniques to your advantage takes time, so don't necessarily expect to get a killer groove on your first try. However, with a little practice you may be surprised at how dull some of your original parts quickly seem in comparison with their groove‑enhanced versions.
Feeling Groovy
 Yamaha's QY700 hardware sequencer offers a real‑time groove template function which can affect note timing, duration and velocity.
This month we've looked at how timing can affect groove, and how to use this understanding to your advantage when working on your own music. However, timing is by no means the only relevant factor in the creation of convincing grooves, and next month I'll be delving deeper into the role of accents and note durations. In addition, I'll show you a number of techniques for extracting your favourite grooves from audio recordings.
Groovy Hardware

Even though there is a wide range of software applications which include sophisticated groove functions, the options for groove manipulation using dedicated hardware units are more limited. The most common such facility provided is a shuffle or swing control. The most basic hardware sequencers, such as those in the Boss DR660 and Alesis SR16 drum machines, have only off‑line swing functions with a limited number of strength levels, whereas more advanced units, such as the Roland MC505, offer a range of preset groove templates (including swing) which can operate in real time and with variable strength.
Even though the facility to design your own groove templates was available as far back as 1989 in the sequencer for Roland's R8 Drum Machine, Yamaha's RM1X and QY700 sequencers provide the most advanced implemetation of this in a current hardware product, allowing you to tweak the timing, velocity and duration of each beat division while your sequence plays back. Roland's MC80 is also worth a mention here, though, as it not only includes sophisticated grid and swing quantising, but also the ability to derive groove templates from your favourite MIDI performances — though the exact nuances of these templates cannot be tweaked manually on the fly. Mike Senior
Ernest Cholakis' DNA Grooves
 These two graphs show the timing of every eighth note of the main groove in the second verse of 'I Feel Good', relative to a totally regular timing grid. These timing variations are measured as an offset in ticks, and there are 480 ticks per eighth note here. In both graphs, all the eighth notes have been joined with a black trace. In the upper graph, a blue line joins kick drum beats and a red line joins snare beats. In the lower graph, the blue line shows the saxophone line, while the red line shows the bass part's answering phrase.
It can help when learning about groove manipulation to explore any preset groove templates provided with your chosen sequencer. If you happen to use a software MIDI + Audio sequencer, then you may well already have access to one particularly good set of such presets in the form of the DNA grooves. These are the brainchild of Ernest Cholakis of WC Music Research and Numerical Sound, and were first developed in 1992 as a means for injecting more of a human feel into MIDI sequences. They have since been licensed for use within all the major sequencers, so you may already have them without realising it!
Cholakis analysed how the world's greatest drummers put their rhythms together and found that the rhythmic blueprint of each drummer was very distinctive, involving an extremely complex set of constantly changing performance parameters. No two bars were ever rhythmically exactly the same and all the acoustic performances analysed involved an enormous amount of subtle timing detail. However, Cholakis realised that it would be possible to mimic the nuances of such drummers by extracting a number of different two‑bar groove templates from a single performance, and then using different ones to subtly change the groove over time.
The DNA templates are the result of this analysis, and are so well designed that they are worth exploring in detail if you can. Depending on the collection which is available on your own sequencer, you may be the owner of up to twelve folders worth of DNA grooves, each containing up to sixteen individual templates extracted from the same drumming performance. They are all two bars in length, in four/four time, and their resolution is set mainly to 16th notes. If you mix and alternate different templates within the same group, you can produce coherent groove variations within your tracks and ensure that, as in a real acoustic performance, there are no precise repetitions of timing characteristics.
Arranging A Feel‑good Groove

We can learn a lot about how to improve the groove of our own music by listening to the work of established masters of groove, such as James Brown. Probably more than any other popular singer/performer of recent times James Brown was preoccupied with groove, and throughout his career he has challenged what can be done with it — he was one of the first popular artists to use two drummers on stage, for example.
So lets have a closer look at what makes the groove of 'I Feel Good' work as it does. For a start, the song is remarkable for its comparatively sparse arrangement, in particular the dryness of the drums, and the fact that the main musical interplay occurs between the lead vocal and the carefully woven saxophone lines. Keeping the arrangement uncluttered like this can really give a groove room to breathe, so it's worth bearing this in mind when building up your tracks.
The next thing to notice is that each of the different instruments accents different beats in the bar, to create a number of subtly conflicting grooves — great for providing tension in the arrangement. Take the first main section of the track, for example. The voice and saxophone parts resolve onto alternate first beats. The drum part emphasises the second and fourth beat of each bar where the snare falls, and only provides a bass drum downbeat at the beginning of every two bars. The reverberant guitar stab accentuates the second beat of every second bar, and serves to punctuate the end of the saxophone phrases. All this is glued together by a cyclic bass line which accents the first beat of each bar and also the eighth note just after the guitar stab.
What is important about this is that all of these elements of the arrangement are partly responsible for the groove. Many MIDI musicians seem only to consider groove when programming their drum parts, but that approach is unlikely to yield the best results. What's more, the fact that the different parts of 'I Feel Good' have different grooves shows why it is a good idea to use several different groove templates within a single song for the best results.
Another factor which helps to make the groove of 'I Feel Good' work so well is that the individual parts in the arrangement are constrasted in the mix in order to throw each of their different grooves into relief. For example, the rounded bass and rich saxophone sounds are used to define these parts against the small snare drum and the rhythm guitar. Likewise, the long reverbs on both the lead vocal and the rhythm guitar are set against the dry, tight drums. Using contrast in this way helps each individual feature stand out, allowing their overlapping grooves to combine for more variety and life.
Up Close & Personal
Looking at the timing of the main groove of 'I Feel Good' in a little more detail reveals more about why it works so well. A number of sequencers offer facilities for the extraction of groove timing from audio tracks — a procedure I'll be covering in depth in the next part of this series. Using this facility within Cubase VST, I extracted the timing of the main four‑bar groove of 'I Feel Good'. From the resulting file I generated the black trace on the two graphs in this box. The graphs show the relative timing of each eighth note compared to a strictly regular metric grid — points which occur above the axis are late, while those below are early.
Look at the upper of the two graphs first, where two further traces are superimposed to show the relative timings of the snare drum (red line) and kick drum (blue line) hits. The first thing to notice is that the snare drum always tends to be earlier than the kick, showing a real‑world example of the push‑pull groove which I've already mentioned in the main body of the article. The other eighth notes all tend to be later than the kick and snare beats.
Next, notice that the snare drum is at its latest on the fourth quarter note of the first bar, and accelerates towards its earliest occurrence on the second beat of the fourth bar, whereupon it slows back down to where it started. This pattern of speeding up through the middle bars of the groove helps generate a more exciting feel and also allows the groove to slow down through the beginning of the four‑bar section, lending weight to the beginning of the pattern. A pattern of acceleration and deceleration such as this is characteristic of many great grooves.
But how does the kick drum relate to this? Interestingly, it not only follows the snare drum's acceleration and deceleration, but it also shows another more short‑term trend which recurs twice as frequently. Note the 'V' shape around the second and fourth eighth notes of the second bar, which is then repeated, albeit dragged earlier by the snare drum, toward the same eighth notes of the fourth bar. This 'V'‑shaped pattern works in a similar way to that formed by the snare‑drum beats, lending weight to the downbeats of the groove's first and third bars.
Now have a look at the second graph, where the timings of the saxophone and bass parts are highlighted — the blue lines show the phrase where the saxophones and bass play together, while the red lines show the answering phrase by the bass on its own. To take the blue traces first, each of these phrases shows the distinctive 'M' shape of the part's groove — an even smaller‑scale timing pattern than that exhibited by the kick drum part. The red traces, on the other hand, reinforce the bass drum's two‑bar groove. However, all these lines show the influence of the overall speed variations of the snare drum.
This micro‑level view of 'I Feel Good' shows how a complete groove is built from a number of different large‑scale and small‑scale grooves occurring within individual parts. However, it also shows that these individual grooves interact in great real‑life grooves such as that within 'I Feel Good'.
Tempo In 'I Feel Good'
The groove of 'I Feel Good' depends not only on the micro‑level timing variations of individual beats, but also on the tempo variations through individual sections of the song. The most consistent example of this in 'I Feel Good' is that the hook sections (with lyrics such as "So good, so good, I got you") all tend to accelerate, increasing the momentum into the sections that follow. However, most of the other sections of the song don't offer any such clear tempo trend or pattern, which provides another indication of how much the groove can vary even between repetitions of the same section. It's this constant reinterpretation of recurring musical sections, reflecting and complementing the inflections of the vocal delivery, which sets real performances of songs apart from programmed equivalents.
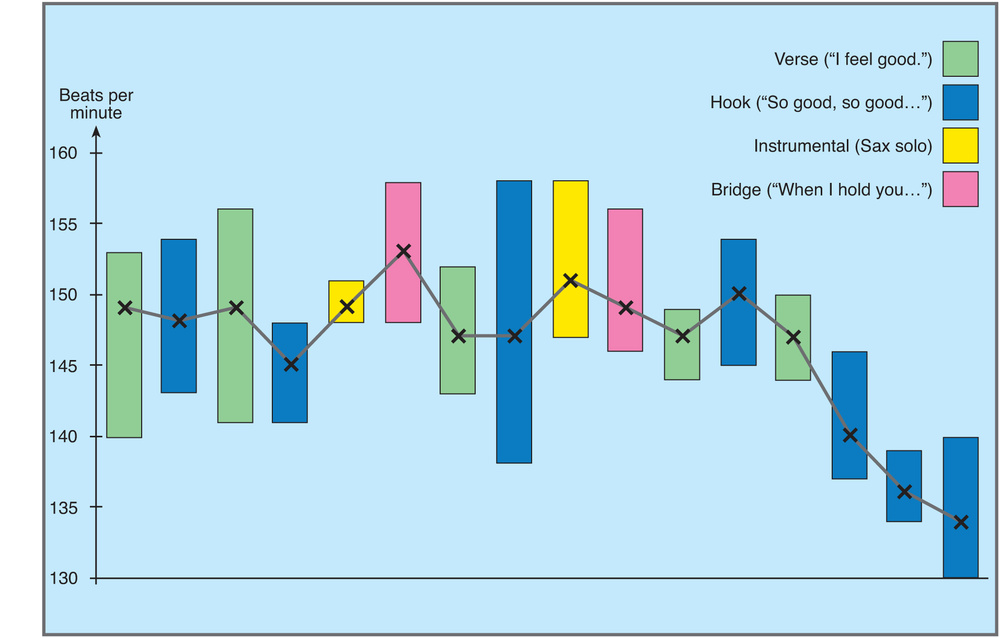
While there are few evident short‑term tempo trends, there are some more long‑term ones which can be seen by looking at the graph within this box. The vertical bars of the graph show the range of tempos within each major section of the track, while the average tempos of the sections have been indicated with crosses. The most obvious thing which can be seen is that there is a considerable overall deceleration towards the end of the song and, moreover, that this deceleration begins from the very first of the final hook sections, rather than just happening at the very end of the song. This slowing down helps lend an air of finality to these particular occurrences of the hook, even though you've already heard the hook four times before this point in the song.
The next thing that's worth pointing out on the graph is that the average tempo increases for the instrumental and bridge sections, which helps add extra excitement to the track where the arrangement reaches its most sparse and where the vocal is at its most impassioned. Because a tempo hike can help up the excitement, many producers increase the speed of their sequences for the choruses of their songs. However, there are other places within the structure of the track where an increase in tempo might be more natural, as we can see in 'I Feel Good'.
The final trend that can be seen from the tempo graph is that the range of tempos within the last two verses is significantly less than that within the first two verses. This gives the impression that the musicians are settling into the main groove the more times they play it, making it more fluid in the later renditions. You can create a similar effect within your own songs by applying a progressively stronger iterative quantisation to each repetition of the musical sections in your music — though be careful not to overdo this, as you don't want your track to start sounding mechanical during the fade‑out.