 Screen 1: Four views from the Radio Garden web site let you hear live broadcasts from radio stations worldwide as well as recorded historical clips, jingles and stories.
We show you how to find, capture and process found sounds in Ableton Live.
From radio to YouTube to your neighbours’ shouting, there’s a lot of fodder out there for you to turn into music. This month we’re going to look at where to find and how to capture some of those sounds, as well as how to make them your own.
One of my favourite sources for its breadth and simplicity is the web site Radio Garden (radio.garden), designed by Jonathan Puckey and the Netherlands Institute For Sound & Vision. Radio Garden presents the Earth as a globe resembling Google Earth that is populated with thousands of green dots marking locations where local radio stations have signed on to the project (see Screen 1). Spinning the globe is analogous to spinning the dial on your radio. Landing on one of the green dots shows the location and local time at the bottom-left of the screen and presents a multi-page list of available stations from that location at the bottom-right. The currently playing station is highlighted, and the Radio Garden URL changes to reflect that location and station so that you can bookmark or otherwise save it. A direct link to the station’s web site also appears in the upper-right corner. In addition to real-time listening (called ‘Live’), the upper-left corner of Radio Garden offers History, Jingles and Stories tabs. Those present globes populated respectively with red, blue and orange dots indicating recorded broadcasts, and they are not to be missed.
Grab It
There are several ways to capture audio from online sources such as Radio Garden. One is to play the source on an external device such as a tablet, smartphone or laptop and cable its output into your computer’s audio interface. (The iOS app MusicIO offers the alternative of transferring audio to your Mac or PC via USB.) When you want to record audio from another app running on your PC, the free, open-source audio editor Audacity (audacityteam.org) is one solution and LoopBeAudio (nerds.de $19.90) is another. On a Mac, a couple of apps from Rogue Amoeba (rogueamoeba.com) provide an elegant solution. Audio Hijack ($49) will capture audio from any app running on your Mac and record it in your choice of audio-file formats.
 Screen 2: The Loopback setup (middle) has a single Pass-Thru Audio device with Google Chrome set as its input. That establishes a port in the Mac’s Audio/MIDI setup that is used for Live’s input on the Radio Garden track.My preferred solution is Loopback ($99), which creates a virtual OS X audio port and will then route audio to it from any running application. You can even create multiple Loopback ports if needed. To capture the incoming audio in Live, you simply set Loopback as the Audio Input Device in Live’s Audio Preferences (see Screen 2).
Once you have Radio Garden audio streaming into Live, you can start recording a clip in either Session or Arrangement view and then spin the globe. I prefer to use Session view and trigger recording in separate clip slots as I find material I like. Of course, once you find something you like, it’s too late to start recording. The trick is to start a clip recording, spin the globe capturing whatever comes up, and once you have captured something you like, start a new recording before you move on. That way, you’re not stuck with one horrendously long clip that you have to search for your favourite titbits — each of your recorded clips ends with a favourite.
At the bottom-right of Screen 2 you’ll notice that the recording is in mono because the track’s Input Selector is set to channel 1. This cuts the clip size in half and is all you need when you’re capturing mono sources, which is often the case with radio broadcasts.
Make It Your Own
Short speech fragments are excellent starting points for drums and percussion. With a little tweaking, you can use a single vowel or sibilant for a tom, snare, cymbal or other kit piece. Start by inserting a Drum Rack on an empty MIDI track and then repeat the three steps below for each drum sound you want to add to the Rack:
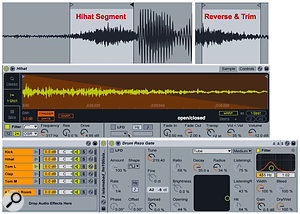
1. Turn off Warping for the source clip, find the fragment you want to use and set the clip’s Start and End markers to enclose it, leaving a little extra room at each end. The Rev(erse) button in Clip view’s Sample Box is often useful for getting the best attack/decay transients.
2. Crop the clip and then drag it to a Drum Rack pad. By default, you’ll get a Simpler in 1-Shot, Trigger mode with Warp and Snap turned off. If you’ve added your own default in the Dropping Samples/On Drum Rack folder of your User Library, you might want to temporarily remove it.
 Screen 3: The five kit pieces in the Drum Rack (bottom) use Simplers to play small fragments from speech clips. A sibilant is reversed and trimmed for the hi-hat sound (top) and Simpler’s Fade Out knob allows for closed and open hi-hat sounds.3. Play the drum pad and fiddle with Simpler’s settings to refine the sound. For the hi-hat sound in Screen 3, I’ve added high-pass filtering with a little drive and transposed the pitch up a bit. I’ve left the tail a little long and mapped a MIDI foot pedal to Simpler’s Fade Out knob to move between open and closed hi-hat sounds.
In Screen 3, I’ve enhanced the Drum Rack in two ways. I’ve added Reverb as a send effect to compensate for the clipped tails on cropped speech clips. I’ve inserted Live’s Corpus effect after each of the Toms to add resonance. The Corpus presets are the same except for slight variations in the Tune and Filter settings.
Creating a realistic drum kit from speech samples is an interesting exercise, but it’s a lot more fun to take things a bit further out. For example, you can create nonstandard kit pieces to use in your drum loops or to layer with more-typical drum sounds. Check out the April 2016 and October 2015 Live columns for details on layering and creating Drum Racks with additional FX kit pieces.
Find & Vocode
One of my favourite ways to process found sounds is with a vocoder. To do this in one of your songs, create a new audio track to play the found sounds and insert Live’s Vocoder on that track. The clips on the track feed Vocoder’s modulator (typically used for voice), and you select the carrier source (the sounds being modulated by the voice) on Vocoder’s control panel. For this, create a new Return track in Live, set its input to Pre mode and then select the new Return track for the Vocoder’s carrier input using Vocoder’s Audio From drop-down menu. You can now use the Return track’s Send knob on any track in your arrangement to supply the carrier, and you can use the track’s volume to independently set the level of unprocessed audio.
When you want to play the modulator and carrier sounds live, you can use a Simpler followed by Vocoder for the modulator and then use any instrument of your choosing for the carrier. One option is to place these on separate tracks and play the Simpler on one and the carrier instrument on the other. That works well with MIDI clips but is a little clumsy for real-time playing.
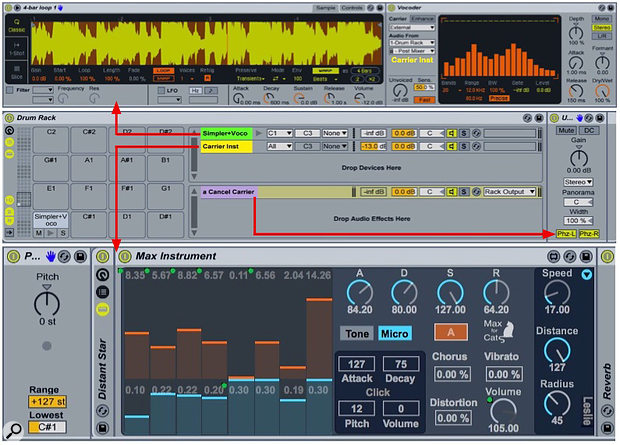
 Screen 4: In this Drum Rack, a long speech clip played from Simpler triggered by C1 provides the modulator for Vocoder (top). A Max instrument played by notes above C1 provides the carrier.
A second option is to use the same configuration on separate chains of a Drum Rack as shown in Screen 4. The reason to use a Drum Rack is that it provides for Return effects, and that is how you control the amount of carrier in the output. To do this create a Drum Rack Return effect holding a Utility device and turn both of Utility’s Phase buttons on. The send amount to Utility inversely controls the level of the carrier in the mix: 0dB cancels the carrier, whereas lower send levels increase the carrier volume. You’ll want the carrier chain’s MIDI Note In set to ALL so all notes trigger the carrier instrument. You’ll probably want to place the Simpler on a single pad and map that pad’s out-note to C3, which plays the Simpler sample at its natural rate. In Screen 4 I use the C1 pad for that and then use a Pitch MIDI effect to restrict the carrier instrument’s input to notes C#1 and above.


