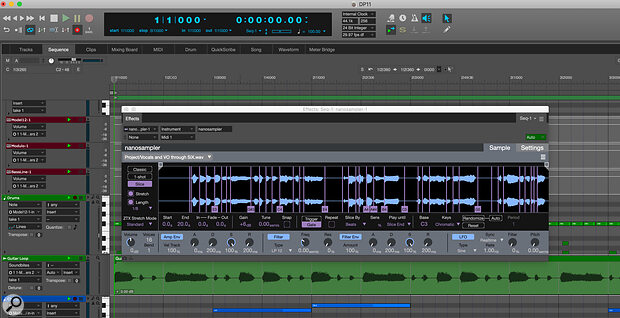
 Nanosampler 2 adds features like sample slicing and integrated ZTX time‑ and pitch‑shifting.
With its significant overhaul, the new Nanosampler 2 offers a wealth of creative sample playback options.
Among the many new features MOTU unveiled in DP11 is Nanosampler 2.0, a significant overhaul of its bundled sample‑playback instrument. While the original Nanosampler had one playback mode, now there are three, including one that slices up your sample. The new version also integrates DP’s powerful ZTX time‑stretching and pitch‑shifting technology, giving you more control over how the samples play back.
Shape Shifter
When you first open Nanosampler 2, you can tell from its GUI that it’s significantly different from its predecessor. It’s long and rectangular rather than square, which allows for a much larger waveform display. Its design and colour scheme are darker and more contemporary.
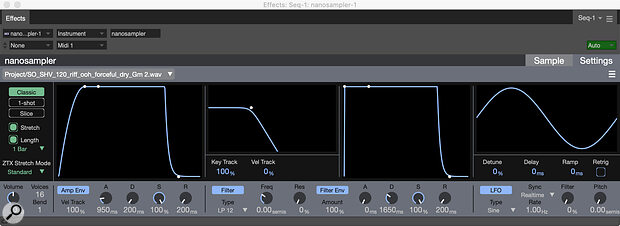
MOTU also replaced the knobs for Sample Start and End, Loop Start and End and Fade with sliders directly above the waveform display, making those controls more visually connected. The bottom row contains the synth settings: the amplitude envelope, filter, filter envelope and LFO. The available parameters for those remain essentially the same as before, albeit with a different layout. But what is new is graphic editing. If you click on the Settings Tab, Nanosampler switches to an alternate screen that features graphic editors for all the synth parameters.
 Clicking on the Settings tab brings up this graphic editing screen for the synth parameters.
Time To Stretch
To fully understand the capabilities of the new playback modes, it’s helpful to first look at a couple of powerful new features in Nanosampler 2. One, called Stretch, uses ZTX time‑stretching algorithms and is available in all three playback modes. It allows you to control the length of samples as they play back, keeping them sounding natural when transposed from their original pitch.
Unlike in the previous Nanosampler, where every time you transposed a note up, it played faster, and down it played slower, Stretch makes them all play at the same length. When you click on the Stretch button, you get a couple of additional options. One is to choose one of two ZTX Stretch Modes: Standard or Formant‑Corrected.
 Once you turn on Stretch, you can choose which ZTX algorithm to use.Either will even out the length of the sample at any MIDI note. Choosing ZTX Formant‑Corrected makes the pitch transpositions more seamless, especially for vocal tracks, avoiding the dreaded ‘Mickey Mouse’ and ‘Monster’ effects.
When Stretch is on, you can also access a setting called Length. It lets you constrain the sample duration by a selectable rhythmic value. According to MOTU, it’s especially beneficial on drums and percussion. For example, if you’ve loaded a two‑bar loop, you can set the duration to two bars to quickly conform the loop to your project timeline and tempo.
Triggering The Gate
The other significant new feature available in Classic and Slice modes is the choice of Trigger or Gate, which govern playback behaviour. In Trigger mode, when you play a note, it lasts for the entire length of the sample (subject to your start and end point settings). You can shorten playback by choosing a small duration with the Length parameter of Stretch mode.
In Gate mode, the sample is cut off as soon as you release the note on your keyboard. But you also get a couple of features, Repeat and Loop, which are not available in Trigger mode.
With the Loop button pressed, a green slider appears above the Waveform display and lets you set the boundaries of the loop, overriding the settings of the Sample Start and End sliders. You also get a movable arrow to set a crossfade for the loop.
 The green slider above the waveform lets you set loop in and out points, fade‑ins and fade‑outs.
If you turn on the Repeat function, the sample will retrigger automatically when it gets to the end for as long as you hold the key down. If Loop is on, Repeat is also subject to the Loop setting.
Modus Operandi
The three new playback modes are Classic, 1‑Shot and Slice, and they take Nanosampler into new territory, in particular with the Slice mode. Classic mode operates similarly to the original Nanosampler or any basic sampler. When you load a sample, it’s mapped to the MIDI keyboard so that each note triggers a different pitch. It’s useful for creating instruments from single notes, or in any situation where you want to transpose the pitch of a sample.
With the Stretch feature turned on and ZTX set to Formant‑Corrected, Classic lets you turn a single sample into an instrument while maintaining consistency in the sound on different pitches.
 In 1‑Shot mode, playback is monophonic and samples play in their entirety.
The second playback mode is 1‑Shot. It’s similar to Classic, except it only works in Trigger mode, and the polyphony is constrained to one voice. When you play a note on your keyboard, the sample will play until its end unless you trigger another note. While not as flexible as Classic mode, its monophonic operation and unique playback behaviour give you additional choices.
Slice, the third playback mode, is what really differentiates this version of Nanosampler from its predecessor. It slices your sample into pieces and maps each one to its own MIDI note. You have several choices for how to slice the sample. The default is Beats, which cuts based on the transients it detects. You can adjust the Sensitivity of that detection to control how many slices get created.
MOTU included several other slicing options. The Mensural setting lets you specify equal‑length increments based on rhythmic values like eighth notes, 16th notes and so forth. If you choose Division, you can select how many equal‑length slices you want Nanosampler to create. And the final mode, Manual, lets you alter the slices created in any of the other modes by dragging their dividers.
Whenever you’re in Slice mode you can audition any slice by clicking on the square at the bottom where you see the note name. If you’re feeling adventurous you can turn on the Auto Randomize feature, which will randomly change all the MIDI note assignments for the slices.
 You can audition a slice by clicking on the arrow under its note name.
By The Numbers
Whichever mode you’re in, the area directly below the waveform display offers numerical control over quite a few key parameters, including Gain, Tune, Root Note, and more. The parameter choices vary somewhat by mode. You can also adjust the Start and End and Loop Fade settings numerically from here. Most of the fields let you click‑drag them up or down, or type in a value.
Next to the Tune parameter is a button called Snap. If you activate it, Nanosampler tweaks your start and end points to keep them from creating clicks.
With all its new capabilities, Nanosampler 2 is a flexible instrument with surprising power...
Do It Yourself
With all its new capabilities, Nanosampler is a flexible instrument with surprising power for a sampler that holds only one sample at a time. You can use it for everything from dance music and hip‑hop production to sound design and experimental music. The following are just some examples of what you can do with it:
Make a tonal sampled instrument: Turn on Classic mode and drag and drop a tonal sample into Nanosampler’s waveform display. If the sample you imported has more than one note, or a note with more than one pitch, use the Start and End sliders to limit it to only one pitch.
- You can try both Trigger and Gate mode, but for tonal instruments, you’ll probably prefer Gate, because its behaviour when you release a note is more like a synth or other virtual instrument.
- Press the Stretch Mode button and set the ZTX Sample mode to Standard or Formant‑Corrected, depending on which gives you the sound you’re looking for. If you want to make the sample last for a particular duration, turn on and set the Length parameter.
Make a drum or percussion instrument: With the addition of Slice mode, you can now take your favourite drum or percussion loop and map its sounds on your MIDI keyboard.
- Find a loop you like, import it into Nanosampler 2 and turn on Slice mode. Use the Beats option to create slices from the transients. You’ll probably want to use Trigger mode so that the samples ring out rather than getting cut off.
- If you’re slicing up a drum loop, you’ll have to hunt around a bit to find the MIDI notes corresponding to the kit parts you want to trigger. If you’re using a loop of a single percussion instrument, such as congas, you’ll find usable notes almost everywhere.
Create vocal chops: You can make vocal chops (short vocal samples) in a couple of different ways. One is to take a vocal phrase with at least a few notes in it and drop it into Nanosampler. Turn on Slice mode, and it will create a variety of notes and syllables or words (depending on the length). You may have to adjust the boundaries of some slices to get the sounds you want. Start in Gate mode and try turning on Stretch and the Format‑Corrected algorithm for ZTX.
- Alternatively, you could use Classic mode to make a vocal chop instrument. Set the Start and End points to select one note of a vocal sample. Use the Loop feature if you need to smooth it out. You might want to adjust the Root parameter so that the notes you’re playing match the pitches of the MIDI keyboard.
- You can fortify your vocal chops or almost any samples you’re triggering in Nanosampler 2 by inserting effects after Nanosampler 2 in its mixer channel. Compression, reverb, delay, overdrive, it all depends on the sound you’re going for. Because Nanosampler doesn’t have built‑in effects, adding additional plug‑ins can make a massive difference in how your samples sound when triggered.
 Adding effects after Nanosampler can add additional energy and interest to your samples.
Without question, Nanosampler 2 is significantly more powerful than its predecessor and opens up a huge range of creative possibilities. It’s one of many good reasons to upgrade to DP11.


