FabFilter have reinvented their Pro‑L limiter for the new world of loudness normalisation.
It's a sign of the times that reviews of software mastering limiters just four or five years ago would mainly have judged them on how well they made things loud, and yet today I am reviewing a limiter which I rate highly partly because of how well it allows excellent masters to be made quieter. I would be very wary of saying that the loudness wars are really, truly over and gone — there may well be pockets of resistance in far-flung places of the musical universe — but over the past few years there has been a definite general trend towards moderation, helped enormously by the resurgence of vinyl and by the loudness normalisation enforced by streaming services.
In my own mastering facility we are seeing an increasing number of projects where the final delivery format is for streaming and vinyl only, with CD replication not the front-runner that it used to be. This means that the kind of demands made on a modern mastering limiter are no longer such that the loudest wins the day: the criteria and the market have become much more varied. My own short list of limiter desiderata would include: pristine sound, an intelligent ergonomical interface, tweakability when needed, and — combining all three — a set of basic limiting profiles from which to build personal preferences.
Limiting is one of the aspects of mastering that I look forward to the least. Having spent hours listening carefully on a superb monitoring system, adjusting EQ and compression for absolute sonic optimisation, perhaps using state-of-the-art analogue and digital equipment, the mastering engineer then has to sit down with a relatively inexpensive plug-in, and in the service of mere loudness, try not to undo any of the previous good work. Of course that's an exaggeration, and there are some kinds of music that seem more fully alive with the right kind of pumping and others than benefit from some mild limiter-induced tightness or excitement.
When I first started mastering, the go-to 'pro' limiter — a digital outboard unit — was better at helping the first kind than the second. This was a shame, as my bread and butter work in those days was almost entirely classical, jazz and acoustic music, and I was surprised and delighted when around seven or eight years ago I discovered a limiter that could add the right sort of liveliness there, too. This was the original FabFilter Pro‑L, which had preset a profile called 'Jazzy, Spacious, Dynamic and Loud' and which, with a bit of tweaking and just moderate levels of limiting, could actually give a positive lilt to the kind of the projects I was then working on. I didn't use it exclusively, and over the past couple of years, more recent offerings have outgunned it in terms of flexibility and raw power — but then a few months ago, Pro‑L 2 landed in my DAW.
There are a number of differences between Pro‑L and Pro‑L 2 which I will not be able to cover in this review for reasons of space, including features such as support for up to 7.1 surround formats, and external side-chain limiting. But what I will go through in use cases are all of those which the FabFilter Pro‑L 2 manual describes as improvements "added to enhance the workflow" and the sonic benefits that follow from these improvements. These include new display modes, new algorithms, loudness metering, unity gain and audition limiting, true-peak limiting, higher oversampling and DC offset filtering. And I'll bring them in, roughly in that order.
On Screen
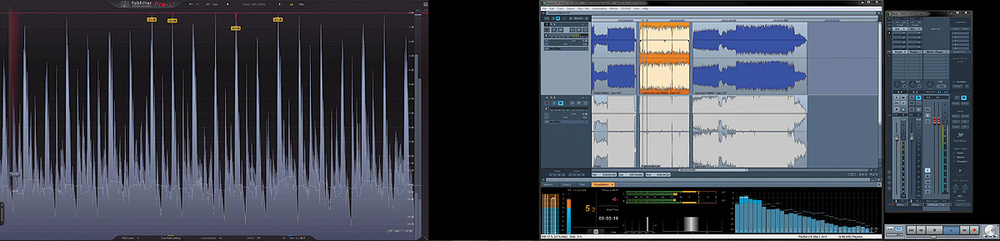
FabFilter have a well deserved reputation for creating user interfaces that are highly informative and bling-free, and in Pro‑L 2, almost everything needed to complete the job is contained in a single clear presentation, with the relative proportion of screen real estate indicating the importance FabFilter apportion to the ergonomic need. Thus the real-time action of the limiter in both graphic and metered form takes up the most space, with the limiter parameters on a sliding tray, easily available for adjustment when needed and slid off-screen when not. The one-time choices appear in the upper and lower toolbars or, as the only hidden items, in a small row of tray-boxes at the bottom right of the main display. The rotary controls for parameter adjustment work very smoothly — either vertically or in rotation with the mouse, with precision level adjusted by speed or distance of the drag — with the mouse wheel, and by text entry, which is my own default. There is also a nicely flexible option to resize the whole window. New in Pro‑L 2 are useful options to adjust the speed and scope of the the scrolling screen, but the most important new visual elements are the orange 'peak labels', which shout out the more significant peak reduction levels, and, above all else, the new loudness meter.
 Advanced parameters are available in 'tray-boxes' that open out when needed.
Pro‑L 2 still offers 'normal' metering scales as well as those for the K-System protocol, but it is clear that the new loudness metering is now the main focus, and in the real world this is how it should be. The other scales, whatever their perceived benefits, were nonetheless optional: keeping your levels in the red zone of the K‑scales went against recommended practice, and made using them a bit pointless, but that didn't have serious consequences further down the line, and very loud CDs still got made, bought, played and enjoyed. But streaming has changed all of that. ITU-R BS.1770-4 and EBU R128, which is based on it, are standards in the real sense: when they are in operation they are not optional and have to be adhered to, and failing to do so can have serious consequences, from really doinking up your streamed sound to having your masters rejected by production or broadcast companies. The Pro‑L 2 manual is generally excellent, and on this topic it is superb: if you need a very brief introduction to these standards, or a quick refresher, have a look at pages 18-19.
For the purposes of the review, and in my real-life mastering work, I used Pro‑L 2 in a five-stage process that put all of these new features through their paces:
- Establish a basic starting point: set gain and output level, choose meter time scale, engage Lockoutput, switch between presets and listen.
- Refining what I hear through unity gain and audition limiting.
- Refining what I want to hear by adjusting the Lookahead, Attack and Release times, and Channel Linking (transients and release) parameters.
- Ensure compatibility with streaming services by metering and controlling true peak values.
- Check for and eliminate DC offset and set up dithering.
Because the loudness standard requirements can be important, for streaming masters I think it's useful to start by setting the target level (for instance, -14 LUFS for Spotify and iTunes) first. CD levels are still ultimately a matter of taste and opinion, and the FabFilter manual suggests -9 LUFS, which would have been regarded as fairly conservative a few years ago — but it's entirely optional and any level can be chosen. The manual helpfully suggests a similar approach, except that FabFilter recommend choosing a preset first; however, as the target level will affect how the presets react to the music, I prefer to make this choice once the target level is established.
 Key to level management for streaming services is the new loudness metering.The Output Level setting specifies the maximum final output of the limiter, or 'ceiling' as it's sometimes known, so adding gain to a signal that hits this ceiling will increase the amount of limiting. Depending on the gain structuring during the mastering of the material to be limited, it could be that the streaming level of -14 LUFS will not require much additional gain. My own mastering chain is mainly analogue, but at the end of it, after the conversion back to digital, the final gain stage before capture is the brickwall limiter in a TC System 6000, which is set to an output threshold of 0dB, with only enough gain to control the occasional peaks. For most of the masters I used for this review, it then only took a single dB or so — very light limiting — to reach -14 LUFS. That being the case, it then required roughly 5dB of further gain to reach FabFilter's suggested CD level. This provides a graphic presentation of the differences between mastering for CD and mastering for vinyl, which can only be lightly limited, if at all — and probably explains why vinyl sounds better even when cut from a digital master.
Measuring LUFS gives a different number depending on what loudness time scale is chosen: the Momentary scale shows the current loudness level, but this is not generally as useful to know as the Short Term level, which has a wider time window, and the Integrated, which gives a reading for the entire track. Short Term is what I use for mastering.
Having established a LUFS target, a level of gain which starts to get me roughly in that area, and a loudness time scale, the next step is to audition some presets. Presets in Pro‑L 2 are, in essence, different permutations of the Advanced Settings, of which more in a moment; a preset thus comprises one of the basic 'style' algorithms plus different settings of the Lookahead, Attack, Release and Channel Linking parameters. Before comparing them, clicking on the Lock Output button locks all of the limiter settings except these permutations and so enables a more level playing field for the listening comparisons.
Pro-L2 Presets & Styles
The v1 presets are still available in Pro‑L 2 (and for some reason it is still the original list that is described and illustrated in the manual) but the new version includes a lot more. The v1 presets were categorised according to music style, but the L 2 presets are arranged somewhat differently. A Basic category includes all the available limiting 'styles', while genre-specific and other presets are categorised as Loud, Moderate or Safe. It is worth noting that the preset titles are not prescriptive. I got some very nice results for a country dance band single using an only very slightly tweaked EDM preset!
Having a rough gain level and a preset, the result can be optimised by further tweaking. Pro‑L 2 provides two features to help with making decisions on this. The first is Unity Gain, a setting enabled by clicking the 1:1 button in the Output tray. This works automatically to keep the listening level constant by reducing the output level as limiter gain is added, allowing the sonic effect of the settings to be more easily heard (this is actually a refinement of a feature from v1, which did the same but required extra keystrokes). The Audition Limiting setting goes one further, subtracting the original signal from the output to allow you to listen only to what the limiter is doing. This is really very useful; it was something I first heard in the original Tokyo Dawn compressors, but is now found in DMG's Essence and others.
Each preset comes with its own particular setting of the main limiter parameters, but unless you choose the Safe style, these are completely user-adjustable, and if you don't like what you hear using either of the two above listening features, this is where you make things better. My experience suggests that if you've chosen a preset in the right ballpark, then adjustments here are likely to be minimal — they really are very well thought-out.
Like most modern mastering limiters, Pro‑L has two stages of operation. The first, controlled by the Lookahead setting, acts on signal transients and is what keeps them from exceeding the ceiling. Shorter time constants in this stage generally give better results in terms of transient preservation, but setting them too short can create distortion and inter-sample peaks. Longer times are safer in terms of distortion and ISPs, but can smooth things over a little too much. Listening with Audition Limiting on can be a great help in the decision process here.
The second operation works more on the general dynamical profile of the material and on the release stage of the processing: a short attack time here means that the release from the reduction of stage one sets in earlier, and the longer the release time, the more effect the reduction has. In this stage, longer attack times make for more clarity, but the down side is again the possibility of introducing distortion.
The final limiter controls allow you to specify the independence of the two channels in terms of transient and release behaviours. Setting the transient link to a little less than 100 percent can yield increased loudness and clarity at the expense of possible shifts in the stereo image; I usually find that settings of 75 or 80 percent improve things a bit with no ill-effects. The release link I always left at 100 percent: I'm sure there are creative uses of this control, but none that occurred to me during the review period.
Practise Safe Streaming
Aggressive or heavy limiting, especially with very short lookahead times, can create inter-sample peaks — that is, the reconstructed signal can exceed the ceiling even though no individual sample does so. Again, the Pro‑L 2 manual has a very good account of what this means. These ISPs can create problems during subsequent D-A conversion, but also in format conversion to MP3 and the like. Because of this, loudness standards specify a maximum true peak value.
Pro‑L 2 deals with this problem, first by including a true peak meter to identify when such peaking occurs, and then by offering true peak limiting to eliminate it (even if those peaks were already present in the material prior to limiting). True peak limiting as implemented in L 2 is very effective, as is easily shown by turning on the TP meter, adding larger-than-life levels of gain, and then watching the TP count drastically reduce and disappear when the TP limiter is turned on. Unfortunately, though, asking the true peak limiter to do too much increases latency and at higher levels comes, to my ears, at a sonic cost.
The better way is to adjust the main limiter settings so that you are not generating high levels of inter-sample peaks in the first place, and there are two ways of doing this. One is to make the Lookahead time slightly longer, while the second is to use the Oversampling option. Pro‑L version 1 offered up to four times oversampling, but Pro‑L 2 supports settings up to 16 times — at the cost, inevitably, of increased latency and higher CPU load. There can also be a sonic cost: the filters used on the upsampled signal can introduce a softness and slight smearing of the sound. Oversampling is not uniformly implemented in digital processing, and some developers do it much better than others. I don't like the sound of upsampling in general and, where possible, turn it off in mastering (even in my monitor D-A converter, which offers upsampling even from 44.1kHz to DSD). However, the four-times option in Pro‑L 2 seems to be one of the better implementations, and I found it both sonically invisible and sufficient to deal with almost all inter-sample peak issues.
To The Limit
Using the workflow described in this review, I put Pro‑L 2 to work for a couple of months working with a very wide range of material. It performed extremely well on everything I threw at it, and as I got used to working with it I found it to be one of the most efficient limiters in my small limiting arsenal in terms of time spent setting up, adjusting and using it. Only for the very demanding situations where the split-band offerings of a competitor were necessary did I find it in any way lacking. I had fallen out of the habit of using the original v1, but Pro‑L 2 has now come back to take a central place in my work practice. The changes from v1 to v2 make it a thoroughly modern limiter: each of the improvements I've mentioned individually adds something to help the limiting process, and together, they make for a very effective and ergonomic workflow which means that the mastering engineer can spend less time limiting and more time on the music.
Alternatives
DMG Audio's Limitless also sounds great and is endlessly tweakable and flexible, but by the same token, some might find it a bit daunting!
The Pro-L2 Manual
I don't normally discuss user manuals as part of a review, but bad experience recently with pretty insipid examples means I'm happy to shout out for credit where it's due.
The FabFilter Pro‑L2 manual is definitely a Good Thing. It's written to enable the user to operate the advanced controls "using good sense" and it does. It is also very informative about all of the options, with just enough detail to carry the gist of the theory and why best practice is best practice, without becoming a treatise, and at the end it includes a nice Myths and Facts section, which slays a few Internet-spread misinformation beasts.
Pros
- Great sound.
- Excellent user interface.
- New features make adhering to loudness standards a doddle.
- Better than average manual.
Cons
- None.
Summary
Redesigned with the new landscape of loudness normalisation in mind, FabFilter's Pro‑L 2 is a pleasure to use and to listen to.