FabFilter go back to their roots with a brand‑new version of their Twin soft synth.
FabFilter plug‑ins have become something of an industry standard among mix engineers. It’s a rare Inside Track column in this magazine that doesn’t feature their Pro‑Q equaliser, Pro‑MB multiband dynamics or Pro‑C compressor, and for good reason. These plug‑ins sound great, but what really sets them apart from the herd is their innovative user interfaces. With stylish, minimalist graphic design coupled with intuitive click‑and‑drag operation, they’re the polar opposite of painstaking vintage hardware recreations, and enable users to get results fast.
So ubiquitous are they, it’s easy to forget that FabFilter didn’t start out making mixing plug‑ins. Nor did they hit their stride in user interface design straight away. The very first FabFilter plug‑in was in fact a very plain subtractive synth called FabFilter One. This was later joined by the more ambitious Twin — which, along with the other ‘creative’ plug‑ins in FabFilter’s catalogue, received a comprehensive overhaul back in 2009 (www.soundonsound.com/reviews/fabfilter-twin-2-timeless-2-volcano-2). And now it’s reached version 3.
New Look
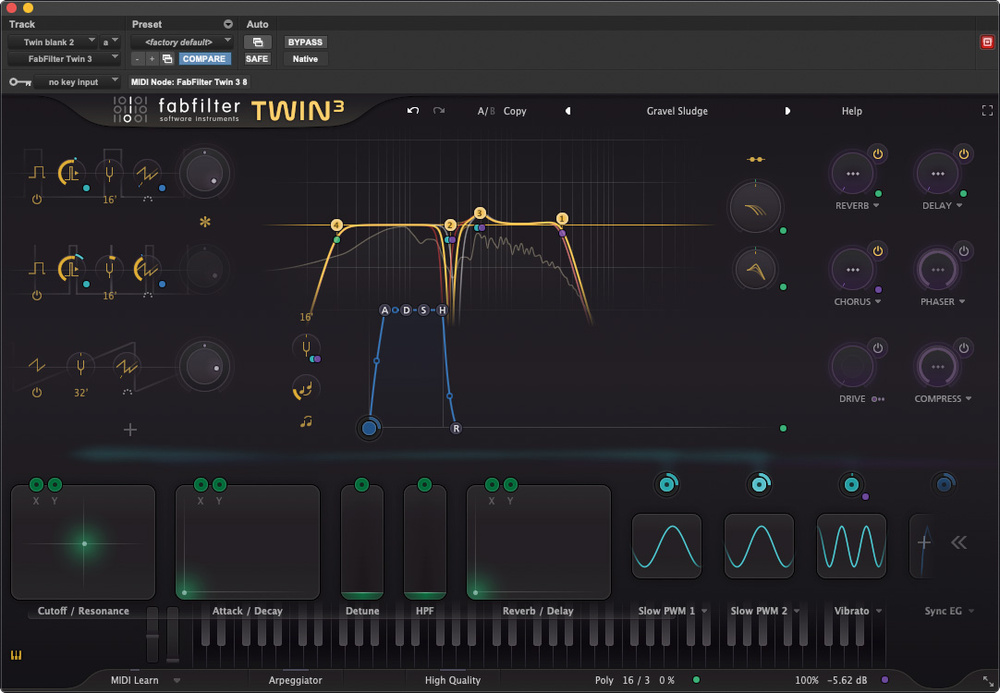
There are many functional improvements to report, but the most obvious change is a wholesale visual reinvention. This brings Twin 3 much more in line with FabFilter’s mixing plug‑ins from a user interface point of view, which is a good thing. For example, Twin 2 was visually a bit overwhelming because all the oscillators, filters and so on were always visible even if they weren’t being used. Twin 3 presents a more Zen landscape that you populate with oscillators, filters and modulation sources according to your whim.
Filters are now represented graphically using a version of the spectral display from the Pro‑Q equaliser, which makes perfect sense — after all, a filter is an equaliser. Shadow animations are used throughout, not only to visualise the response of the filters but also the wave shapes that are being generated by the oscillators. Modulation is applied using a simple drag‑and‑drop approach, with pop‑up windows used to set the degree of modulation to be applied, and controls being animated when modulated. It’s all extremely classy and makes patching around a pleasure, though there were still occasions when I struggled to figure out exactly why something in a preset was doing what it was doing.
All Fours
Feature‑wise, there’s now more of everything. A Twin 3 patch can contain up to four oscillators, each with its own pan control, and four filters, and if there’s an upper limit on the number of modulators, I never found it! Twin 2’s delay effect is now joined by reverb, chorus, phaser, overdrive and compression in v3, and there’s a straightforward but effective arpeggiator. The oscillators now offer ’square pure’ and ‘triangle pure’ waveforms in addition to Twin 2’s sine, triangle, square (actually pulse), sawtooth and noise options and, as before, they all offer great‑sounding sync controls. You still can’t use the audio oscillators as modulation sources, but there’s a button that enables ring modulation between adjacent oscillators, and the LFOs that are available as modulation sources are highly configurable, with rates up to 500Hz.
Unusually, there is no VCA, in the sense of a post‑filter, pre‑effects gain control that can be modulated. Instead, an ADSHR envelope is hard‑wired to control the level of all the oscillators simultaneously; this can also be sent to other destinations, and additional envelopes can be created if you want individual oscillators to respond differently. There’s also a utilitarian global, post‑effects volume control hiding in the lower right of the Twin 3 window, which turns out to be a valid modulation destination. (Talking of volume, heavy‑handed chordal playing with some presets can produce audible distortion. You’ll see a clip light in the host DAW when this happens, but there’s no overload indicator within Twin 3 itself.)
 Setting up a new modulation routing is as simple as clicking on the source and dragging.
As on Twin 2, modulation isn’t just confined to envelopes and LFOs. You also have all the usual control inputs from your keyboard, as well as envelope followers, sliders and X/Y controllers. Modulators are destinations as well as sources, so if you want to set up tremolo with a delayed onset, or assign an LFO to control the extent to which an envelope affects the amount of keyboard tracking, you can knock yourself out.
The pop‑up sliders that are used to set modulation amounts are scaled from 0 to 1 in increments of a thousandth. This is fine for most things, but feels a bit odd with pitch‑related modulation, where you expect to be able to specify the behaviour of things like the pitch‑bend wheel in semitones and cents. Cunningly, though, if you Option‑click on any of these sliders, it gets set to the default value of 0.160, which corresponds to two semitones when applied to pitch‑bend.
Here Comes The Offsetter
When it comes to sound design, my favourite new feature in Twin 3 is the pair of controls labelled Filter Freq Offset and Filter Peak Offset. Setting up separate modulation assignments for four different filters can be time‑consuming, so these act as a sort of aggregator, modulating the cutoff or resonance of all four filters simultaneously. And although that might sound like a boring piece of housekeeping, it actually opens the door to lots of new and interesting sounds. At a click of the mouse, you can suddenly have all of your filters doing strange dances together, and when you have four of them in play, this can be a shortcut to all sorts of sonic possibilities — especially if you also have separate modulations applied to one or more individual filters. So, for example, although the individual filters don’t offer formant or comb modes, you can create some lovely vocal‑type sounds by setting a couple of them to narrow resonant peaks and manipulating the Freq Offset control.
The new effects are also surprisingly welcome. I’m not generally a huge fan of built‑in effects in synths, but these actually feel like they belong to the synth rather than being slapped on afterwards in an attempt to tart up something a bit underwhelming. The chorus and phaser are rich, the compressor is punchy and even the reverb can become one with the sound in a way that doesn’t always happen. It would arguably be more in keeping with FabFilter’s approach to user interface design if the effects were added to patches only as needed, though, rather than being visible all the time.
Twin 3 doesn’t doff its cap to wavetable synthesis, sampling or FM in any way, but what it does, it does very well.
Preset design has always been a strength of FabFilter plug‑ins, and Twin 3 is no exception. There’s a wide but not overwhelming array of patches organised into themed folders, including one that contains all of Twin 2’s presets. They do an excellent job of showcasing a synth that consciously stays in its virtual analogue lane: Twin 3 doesn’t doff its cap to wavetable synthesis, sampling or FM in any way, but what it does, it does very well. The sound is rich, warm and punchy, with nary a hint of aliasing. If you want clicky instant attacks and brutal drill bass sounds, you can have them, but there’s also plenty on offer for lovers of delicate pads, chimes, synth organs, vaguely piano‑esque tinkles and vintage synth favourites. I was also very impressed by the Drums presets, which include many genuinely excellent kick, snare and hat sounds. If you want a versatile synth that’s immediately usable but also offers plenty of depth and makes sound design fun, Twin 3 comes highly recommended.
Summary
In its new v3 incarnation, Twin is a versatile subtractive synth with a beautifully thought‑out minimalist user interface.