Get an even vocal level in Sonar without resorting to compression.
Vocals are vitally important, so we want them to come through front and centre. As a result, limiting and compression have become almost ‘default’ processors for voice, because they tame the peaks while bringing up the lower-level sections. Having a relatively uniform vocal level makes any vocal easier to mix, easier to automate, more intimate, and more likely to grab the listener’s attention.
However, the flip side is that heavy dynamic processing can impart an artificial quality, and pumping, breathing, and other compression artifacts reduce clarity. Fortunately there are alternate, and potentially more natural-sounding, methods to make vocal levels more uniform. They take a little more effort than just slapping on a compressor, but the results can be worth it.
 The top track is the original vocal, with AudioSnap transient markers in place. The next track down shows the clip after being split, with each clip’s Gain Automation envelope. The next track shows the gain adjustments, and the bottom track shows the levelled vocal.We’ll cover four main ways of treating vocal levels, along with a few other tricks. In each case, there are two main tasks: isolate the individual phrases or words you want to adjust, and then use some kind of gain adjustment process to match their levels.
However, note that you don’t want to take this too far. Vocals need to breathe, so always let your ears — not your eyes or a set of numbers — be the judge.
Clip Gain Automation
This conventional approach may be the easiest if you need to make only a few adjustments. Although you can split a clip manually, another way to split a vocal phrase into its component words is to use the AudioSnap palette to split the clip automatically at individual words or phrases.
To do this, select the clip, then type A to open the AudioSnap palette. Click on Edit Clip Map. Adjust the Threshold slider so that there’s a transient market at the start of each word or phrase; if necessary, adjust the transient marker placement to catch individual words more accurately. To do this, hover the cursor over the transient marker’s diamond until the cursor turns into a four-way arrow, then drag right or left. (Note that you don’t want to click and drag the transient marker itself, as that will stretch the audio.)
Setting an optimum threshold level is always a trade-off between having too few or too many markers, but if markers end up in unintended places (such as the middle of a word), you can right-click on a marker and choose Disable if you don’t want a split added there.
Next, click on the Split Beats into Clips button (the one that looks like a pair of scissors). Change the Edit Filter from Audio Transients to Gain (which you’ll find in the Clip Automation menu), and you’ll see the individual clips with their gain envelopes. Use the Move tool (F7) to adjust the gain envelopes as needed, then bounce the clip to itself to render the gain changes and re-assemble all the pieces into a single clip.
Just remember that you don’t want everything to be at the same level — especially plosives, sibilants, breath noises, fricatives, and the like. Listen to verify that the sound is what you want; if needed, undo and make additional adjustments.
Sonar DSP
I find this next method faster and simpler, particularly for speech or narration, where you generally want all the word/phrase levels matched very closely. Let’s assume the goal is to normalise most words or phrases to -1dB.
Click within the waveform and drag across a word or phrase, then choose Process / Apply Effect / Normalize. Click on OK. Continue clicking and drag-selecting words or phrases until all segments are processed as needed, and the job is done.
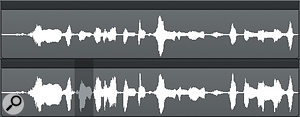
 The top track shows the original waveform. Below it, individual words have been normalised to -1dB — including the word that’s currently selected.Note that, unlike Clip Gain, which doesn’t redraw waveforms to indicate how the envelope affects the waveform, using DSP does redraw it, to reflect the changes. Another difference is that using DSP is a destructive edit (although, of course, you can always undo up to a certain point). Clip envelope gains can be changed at any time. (If you do want to make Clip Gain changes permanent, you can simply bounce the clip to itself.)
To speed up the task of applying gain via DSP, you can use a keyboard shortcut. Choose Edit / Preferences / Keyboard Shortcuts, and type Normalize in the search box, and bind a shortcut to ‘Process / Apply Effect / Normalize’. I use this function enough that I assign the ‘\’ key, because it’s right next to Enter. If you wanted to reduce this to a single keystroke, check out the free program AutoHotKey, which lets you script macros for Windows. It’s open source for commercial as well as personal use, and is downloadable from www.autohotkey.com.
You can also combine this DSP method with the previous one. Instead of dragging across a region and then normalising it, use AudioSnap to split the clip into individual clips. Click on each clip and then normalise it. You can save even more time if you Ctrl-click clips with similar levels, as you can normalise them all at the same time. However, note that if you select multiple clips, Sonar will only apply as much gain as the highest-level clip will allow. This is true even if you trim the clips first.
Come Melodyne With Me
The Essential (single-track) version of Melodyne bundled with Sonar doesn’t have the volume-adjust tool, but the Assistant, Editor, and Studio versions do. Given how many Sonar users have taken advantage of various Melodyne upgrade offers, and how useful this technique is, it merits a mention.
 With Melodyne in its Percussive mode, all the blobs are arranged linearly, regardless of pitch. The Amplitude tool changes levels without transposing pitch.Right-click on the clip you want to automate and select Region FX / Melodyne / Create Region FX. This will open the Melodyne editor. Then choose the Amplitude tool, and click on a ‘blob’ — conveniently, Melodyne will have already split the clip in pretty much all the strategic places you want it split. Drag up to increase volume, or drag down to decrease. You’ll also be able to hear an abstract representation of the blob you’re modifying, which will help you identify plosives and other vocal artifacts.
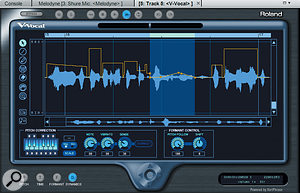
 Despite its current status as a zombie plug-in, V-Vocal remains an effective option for tweaking levels of individual words and phrases.
V-Vocal Exercises
For those of you with pre-X3 versions of Sonar, or who have retained V-Vocal from a previous version when you upgraded to X3, there’s yet another option. V-Vocal includes a Dynamics page where you can use the pencil and rubber-band envelope tools to alter levels. While it may seem that this is just another way of doing clip automation — especially because you can create slopes as well as linear changes — a major difference is that V-Vocal will redraw the waveform to reflect any changes you make to the envelope. Also, because you’re adjusting only amplitude and not pitch, you’re not in danger of experiencing the occasional ‘phasey’ sound you can sometimes get with V-Vocal.
Although it is almost a decade old (and a DirectX plug-in), V-Vocal still functions in Sonar X3 (although it does tend to pout sometimes).
Sing Theory
By levelling vocals in this manner, rather than leaving it all to compression, you’ll be starting your mix with a more consistent signal. As a result, any compression or limiting you do add won’t have to work as hard. You also won’t find yourself having to doing tortuous automation curves to try and apply gain changes to individual words.
When doing this kind of levelling, I recommend not taking everything to 0dB. I typically adjust to -2dB, partly so that there’s a little headroom, but also so that, once you’re done changing the levels of individual words and phrases, you can use clip-gain automation to raise or lower entire sections. Compared to adjusting levels on a micro-editing basis, this broad-brush approach is really what clip-gain automation was intended to do in the first place.


