Another selection of tips and tricks to help you get the best from this flexible studio package.
 In the second half of this two-part series, we pass on tips that make sequencer use easier, explain device layering, and add some hints for the new devices added to Reason in the v2 update.
Automatic Sequencer Tracks: You can prevent Reason making a sequencer track for every new device you create by holding down Option (Mac) or Alt (PC) when you create the device. Do this if you know you won't need a sequencer track for the device — perhaps it's a pattern-based device and you plan to use its own pattern-recording facilities. Sequencer tracks are not automatically created for mixers and effects, but you can get an automatic track for these devices if you hold down Option/Alt when creating the device. In effect, Option/Alt reverses the usual relationship between devices and automatic sequencer tracks.
Editing Note Lengths: Holding down Shift while Snap To Grid is enabled allows you to alter the length of a note (drag with the Selection tool) while still having its start point snapped neatly to a grid position.
Use Locators For Quick Navigation: If you keep needing to jump to a particular location in a Song, use the Left and Right locators (usually used to define a recording or playback loop) flexibly — turn the Loop button in the Transport bar off and set the Left marker, say, to the middle eight and the Right marker to the last chorus. Use the Go To marker shortcuts (the '1' and '2' keys on the numeric keypad) to jump to these locations instantly.
Find Out The Length Of Your Song: There's no option to change Reason's ruler to display Song location in time instead of bars and beats. If you want to know quickly how long a Song is, make sure the End marker is at the end of the Song, close the Song (save first!), then start the process of opening it again from the Song Browser. Select the Song in the Browser list, and on the right-hand side under Information you'll see the length, tempo and time signature.
 Editing the velocity of selected notes by Shift-dragging with the Pencil tool in the velocity lane.Editing Velocity In Multiple Note Clusters: In a busy track, especially a polyphonic performance with many notes falling on the same beats, it can be hard to change the velocity of a specific note without changing that of notes that occur on the same beat. In this situation, display the velocity lane under the lane where the notes for the track are displayed (the Key or any other note-based lane); in the note lane, select the note or notes whose velocity you want to change, using the Selection tool; swap to the Pencil tool; hold down Shift and alter the length of the corresponding velocity bar in the velocity lane. Although several velocity bars may be sharing the same space, only the velocity data specific to the selected note or notes will be changed.
Note Auditioning In The Lanes: In all three lanes where note information is displayed — the Key, REX and Drum lanes — there is a vertical strip to the left that represents a musical keyboard, or lists REX slices or drum sample names. It's useful to remember that if you move your mouse pointer over one of the entries in any of these lists, the pointer turns into a speaker icon: click on a key, slice or drum sample name and you trigger it. This is a great way to audition sounds when you're editing notes or inserting them manually.
Selective Velocity Editing: There may be occasions when you need to adjust the velocity of several notes in a MIDI part that aren't contiguous — for example, all the snare hits in a Redrum track. This is easy if you select all the snare 'notes' by drawing a selection rectangle around them with the Selection tool (or Shift-clicking individual notes if there aren't many to change), then Shift-dragging with the Line or Pencil tool across the velocity lane, at the desired velocity level. This changes only the velocity for the selected notes, leaving all others unchanged.
Some More Shortcuts: Get to know and use the sequencer's keyboard and numeric keypad shortcuts. This makes sequencer operation much faster and smoother, and can save wear and tear on your mouse arm. The shortcuts you will probably use most are a handful of sequencer ones:
- Apple/Control+2 toggles rack and maximised sequencer views.
- Apple/Control+1 toggles rack view and no sequencer window at all.
- Shift+Tab toggles sequencer Arrange and Edit views.
- Apple/Alt toggles Selection/Pencil tool.
- Tab toggles the back and front of the rack.
- Apple/Control+K quantises selected notes.
- Apple/Control+G Groups parts for easy moving and editing.
- Option/Control-dragging is the most convenient way of copying parts. Have Snap To Grid enabled and the part will snap neatly into place.
- The computer keyboard cursor keys can be used quite extensively for some jobs that would otherwise require the mouse. In the Track List, the up and down arrows step through entries; in the Arrange view the left and right arrows step sequentially through Groups in a track; in the Edit view the left and right arrows step sequentially through notes. Holding Shift steps through Groups or notes, selecting them as you go.
Malström Safety Zone
Something we noticed almost as soon as we began playing with the Malström synth was that it's capable of generating resonances that can be quite hard on the speakers (and ears). Simply keeping a compressor patched in line with Malström's output makes a huge difference. We have it set with about a 3:1 ratio. The synth still sounds great and powerful, but you won't unexpectedly get that 'leaning back from the speakers' effect if the filter happens to do something piercing.
Big Subtractor Patches
 To layer four Subtractor Patches, first set up four MIDI busses for layering and route them to the four synths using the Hardware Interface. Now, load four Patches and balance them from the Mixer.Occasionally, we hear people complaining that they can't make Subtractor sound as 'big' as they would like. The following technique can not only simulate a synth with more oscillators than Subtractor, but also caters for those who like to set up 'layers' on their synth, for thick, complex, moving textures. The secret lies in the four MIDI busses of the Hardware Interface. In the following example, we use four factory Subtractor Patches to create an ethereal piano/pad/bell layer, but you can, obviously, use the same steps with any Patches you like.
 First, set up the MIDI busses. Starting with an empty rack, create a Mixer and four Subtractors. Under the Edit menu, select Preferences, and go to the Advanced MIDI page in the dialogue. Under the External Control heading, choose your master keyboard as the MIDI input for each of Bus A to Bus D. Close the window and then go to the rack's Hardware Interface. Next to the Bus Select label at the top, click on 'A' (Bus A). Go to Channel 1 on the Interface and click on the arrow next to the label. From the pop-up menu, select Synth 1. By the same method, assign the other three busses to the other three synths. When you play your keyboard, all four Subtractors will play at the same time (playing the Init Patch, at the moment). If you see a MIDI icon anywhere in the sequencer track list, click on it to get rid of it.
![]() Now load the Patches for the layer. For this example, load the following Patches into the Subtractors in order: Zaire from the Pads folder in the Subtractor Patches folder; Wurlitzer Piano from the Polysynths folder; Zaire again, as in the first step; and Joshua Pad from the Pads folder. Make a couple of modifications to the Amp Envelope of the final Patch, as follows: A=0, D=127, S=60, R=72.
Now load the Patches for the layer. For this example, load the following Patches into the Subtractors in order: Zaire from the Pads folder in the Subtractor Patches folder; Wurlitzer Piano from the Polysynths folder; Zaire again, as in the first step; and Joshua Pad from the Pads folder. Make a couple of modifications to the Amp Envelope of the final Patch, as follows: A=0, D=127, S=60, R=72.
 The next step is to balance and pan the components of the layer. From the Mixer, pan Synth 1 hard left and set the fader level to 86. Set the fader for Synth 2 to 110. Pan Synth 3 hard right and set fader to 86. Finally, set Synth 4's channel fader to 68. While you're at the Mixer, create a delay and a reverb and add just a bit of each to every channel of the layer. This layer sounds pretty good without effects, but you know what a bit of delay and reverb does!
Play some laid-back chords on your MIDI keyboard. Not bad! But how are we going to use that in a Song when there's no way to record a sequencer part for more than one device at a time? Here's how you do it. Select anyone of the four Subtractor tracks in the sequencer by clicking the In column to make the MIDI plug icon turn up. Engage record mode and play the desired part. It will only be recorded to one track, so you now need to select the whole part in the sequencer window (draw a box around it with the selection tool) and use Apple/Control+G to Group the notes.
Click the newly created Group to select it and Option/Control-drag downwards to the next track. This copies the whole performance. Do the same thing for the remaining two tracks of the layer. Enable Snap To Grid in the toolbar, with resolution set to Bar, so that the copies can easily be dragged to the same start point. When you play back the Song, all four layers will be there as you played them.
Don't forget you can also layer sampler devices and Malströms, or mixtures of different devices, in the same way. If you use this technique during Song creation, rather than as a real-time performance tool, you'll need to go to the Hardware Interface and disconnect the routing you've created between your master keyboard and the four synths in the layer, when you no longer need it for playing or recording. (Click the arrow next to the Channel label and choose Disconnect from the pop-up menu.) Otherwise, you'll carry on playing the layer even when you want to play or record a device that's linked to a sequencer track.
Preserving CV Curves In Converted Matrix Pattern Tracks
When a Matrix Pattern chain is converted to notes in the sequencer, using Convert Pattern Track To Notes from the Edit menu, any controller CV curve that you had set up in the Matrix, to modulate a parameter on the attached synth while the Matrix also plays the notes of a Pattern, does not convert with the notes. The controller curve might be a large part of the effect you need for the Matrix Pattern, so you may well want to preserve it. The best way to do this is first to duplicate the sequencer track that contains the Matrix Pattern chain. Convert one of the two identical Matrix tracks as usual, and assign its output to the device that was originally triggered by the Matrix. Then go to the Matrix device, Tab around to the back panel, and disconnect the cables attached to the Note and Gate CV sockets. The Matrix will now only be generating the controller curve, while the Pattern notes come from the converted sequencer track. This method also allows the CV curve to be preserved in a Matrix Pattern that is copied to the main sequencer using the Copy Pattern To Track function.
The Malström Modulators
The new Malström synth device uses some different terminology to the more usual analogue synth models. For example, what we would usually call LFOs (Low Frequency Oscillators) are Modulators within Malström. To go with the new name are some unusual modulating waveforms that you wouldn't find in an analogue synth, and they make the Malström Modulators rather more versatile than normal LFOs using standard waveforms such as sine, square and sawtooth.
The Curve selector window in each Modulator gives access to the waveforms, which are numbered (if you have Tool Tips enabled), but not named. The graphic in the display usually gives a visual indication of what the Curve will do as a Modulator. The non-standard Curves fall into roughly three categories.
- Regular pattern: Curves 21-27 can be used to create arpeggio-like patterns when oscillator pitch is the Modulator's destination, and they create similar effects when routed to parameters such as Filter Frequency and oscillator Shift. How 'in-tune' the pattern is depends on how far left or right the target knob is turned. For example, if Mod A Pitch is turned fully right for Curve 23, the pattern rises in octave steps for three octaves and comes back down again. Likewise, Curve 24 rises roughly in intervals of a fourth over a three octave range and comes down again. With the Pitch knob turned fully right, the patterns go down for three octaves, and up again.
- Pseudo-random pattern: The Curve display graphics for Curves 6, 7, and 28 appear to be random, but in practice the Curves are not — they produce a repeating pattern, albeit quite a long one.
- Envelope-like pattern: These include blips, forward and reverse swoops, and so on. They can be used, very effectively, for unusual envelope effects, especially when routed to pitch, since there is no pitch envelope on Malström. Check out numbers 9-12 and 18-20.
Engaging the One-shot button in the Modulator section causes the selected Curve to play through once only, rather than loop continuously. This is the preferred option for the envelope-like and special effect Curves, and is excellent for creating an interesting attack portion for a sound with the minimum of hassle. Choosing Curve 15 or 18, for example, adds a very defined attack 'blip', a bit like a pizzicato string pluck with the right sound. The attacks of some Malström factory sounds are created by the more unusual Modulator Curves, and this gives you a quick editing clue. If a factory sound you're editing has an attack that you can't seem to modify sufficiently by the usual methods (of adjusting the envelopes), look at the current Modulator Curve, see if the attack is coming from there, and change the Curve if necessary. Engaging One-shot mode also means that you can hear exactly what a given Curve does as a modulator — choose a Curve, hold down a note, and you'll hear one instance of the Curve's action.
Jungle Drum Effects With DDL1
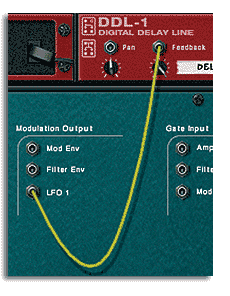 Like most of the devices in the Reason rack, the effects have CV inputs to allow parameters to be externally controlled via Reason's CV system. The DDL1, for example, allows pan and feedback to be put under CV control, and there's a neat way of using this for jungly drum effects.
- Start with a Mixer. Create a DDL1 with the Mixer selected, so the delay will be linked into one of the Mixer's send/return loops.
- Add a Subtractor, and connect its LFO1 Modulation Output to the DDL1's Feedback input jack; turn the trim pot fully right. Make sure the LFO is outputting a random waveform (one of the bottom two in the list of LFO waveforms on the Subtractor's front panel).
- Return to the front of the rack, set the DDL1's feedback control to the 12 o'clock position, and input a delay time of between 40ms and 60ms (this will vary depending on your pattern and the effect you prefer, but the key is to keep delay time fairly low).
- Create a Redrum, connected as normal to a Mixer. Load a Kit and create a drum pattern.
- On selected drum voice channels, turn up the send control that corresponds to the DDL1 send/return loop on the Mixer. For example, if a snare is on channel two of the Redrum and the DDL1 is patched into send/return loop one on the Mixer, you would turn up the second drum channel's 'S1' knob. A value of about 80 or 90 should produce a good result. You could process just a couple of drum voices in this way — snare and hi-hat, for example — but it also works very well with larger numbers of voices.
- You'll hear random fast, blurred, pseudo-rolls of varying lengths for all drum voices that are being processed by the DDL1, with different rolls triggered on different beats. Quite jungly, especially at faster tempos. If the idea produces a more extreme result than you would want throughout an entire track, copy the drum pattern to another Redrum pattern slot, edit the copy to have all effect sends at zero and switch between it and the delayed pattern as required.
Using The Stepped Modulator Waveforms
![]() The obvious use for the stepped Modulator waveforms within Malström is to create an instant arpeggiator. This works because the stepped waveforms modulate the pitch of the oscillator, when routed to pitch, in a way that echoes their own shape. Start by choosing any waveform (grain table) you like in Oscillator A — one of the less abstract varieties would be a good first choice. Then select Curve 23 or 24 for Mod A and turn the Mod A Pitch knob hard left. Enable Mod A's Sync button and choose a rate of 1/4, 1/8 or 1/16. Finally, play a note on your keyboard for an instant arpeggio!
The obvious use for the stepped Modulator waveforms within Malström is to create an instant arpeggiator. This works because the stepped waveforms modulate the pitch of the oscillator, when routed to pitch, in a way that echoes their own shape. Start by choosing any waveform (grain table) you like in Oscillator A — one of the less abstract varieties would be a good first choice. Then select Curve 23 or 24 for Mod A and turn the Mod A Pitch knob hard left. Enable Mod A's Sync button and choose a rate of 1/4, 1/8 or 1/16. Finally, play a note on your keyboard for an instant arpeggio!
![]() Also try Shift as a destination, or Filter Frequency on Mod B. It's possible to play chords, though obviously the whole chord will be arpeggiated en masse rather than broken up — this isn't a real arpeggiator after all. Interesting effects can be created if you play broken chords, since each note will generate its own pattern. Malström's audio input and stepped Modulator waveforms also provide an opportunity for applying arpeggio-like effects to other sound-making devices. Simply connect the audio output of the other device to a Malström audio input and route Mod B to Filter.
Also try Shift as a destination, or Filter Frequency on Mod B. It's possible to play chords, though obviously the whole chord will be arpeggiated en masse rather than broken up — this isn't a real arpeggiator after all. Interesting effects can be created if you play broken chords, since each note will generate its own pattern. Malström's audio input and stepped Modulator waveforms also provide an opportunity for applying arpeggio-like effects to other sound-making devices. Simply connect the audio output of the other device to a Malström audio input and route Mod B to Filter.
![]() There are a number of issues to bear in mind. First, it's best if the external sampler or Subtractor Patch is quite rich and sustaining — Melstrings, from NN19's Synth And Keyboard folder in the factory Refill, works well, for example. Also, you need quite a high resonance value on the Malström filter, which should have a mid-range frequency value. Mod B's Filter target knob is best at about +40 or -40; try out Modulator Curves 21-26; and, as in the first example above, engage the Sync button. Be prepared for the source patch to lose some of its character, as the resonant Malström filter provides most of the interest, and play around with various settings — it can be a very satisfying effect.
There are a number of issues to bear in mind. First, it's best if the external sampler or Subtractor Patch is quite rich and sustaining — Melstrings, from NN19's Synth And Keyboard folder in the factory Refill, works well, for example. Also, you need quite a high resonance value on the Malström filter, which should have a mid-range frequency value. Mod B's Filter target knob is best at about +40 or -40; try out Modulator Curves 21-26; and, as in the first example above, engage the Sync button. Be prepared for the source patch to lose some of its character, as the resonant Malström filter provides most of the interest, and play around with various settings — it can be a very satisfying effect.
Another little trick using the stepped waveforms is really good for lead lines — if prog rock ever has a serious revival, this'll be useful! It's most effective when applied to synth waveform grain tables, such as the three Sawtooth varieties. In Modulator A, choose Modulation Curve 23 (try 24, too, which produces a different result). Set the modulation rate to around 30 or 40. Don't sync to Song tempo. Turn the Mod A Shift Target knob hard right. Select Wave:Sawtooth or Wave:Sawtooth*4 in Osc A and create an amplitude envelope with Attack at about 35 and Release at about 60. Engage the Legato button.
Now, if you play a legato lead line (not taking your fingers off the keys between notes), you'll find that what you're playing shifts in register as you play, as if it were an octave higher; keep playing legato and at some point it'll shift another octave. Play non-legato, and the sound is back in its normal range; it'll only shift if you hold a note or play legato. This sounds very reminiscent of an effect prog-rock keyboard players used to create with pitch-bend or oscillator sync, and is especially effective if you play fast.
Malström As Signal Processor
Because Malström has an audio input, you can connect other devices to it to add Malström's filtering (and Shaper noise option) to their audio. The external input is processed by Malström's 'secondary' filter(s) and mixed with the main Malström audio, if any is present. (Of course, there may not be any if you are using the synth only as a signal processor for another device.)
The small problem with this idea is that the Malström Filter Envelope (in common with all envelopes) won't work without being triggered. If you simply patch the output from a Subtractor, for example, to a Malström audio input, the filter will basically be working as a sort of resonant tone control — fine, if that's all you want. Filter frequency movement can be added courtesy of Malström's Modulators, but if you want the particular sweeping effect of an envelope, you'll need to find some way of triggering it.
 If the device you'd like to process has a gate output, triggering the Malström Filter Envelope is easy. Imagine you want to process a single Redrum voice: patch the audio output of the Redrum channel to a Malström audio input, and the Gate Out of the Redrum channel to the Malström's Filter Envelope Gate In. Now, when Redrum is running, the Redrum voice gate output triggers the Malström Filter Envelope and the drum voice can be processed with the full force of Malström's versatile filter (as well as gaining access to the Shaper if you've plugged into the Shaper/Filter A input). Something similar can be achieved for REX loops with the Dr:rex Slice Gate Output.
Where the device has no gate output, the situation is different, but you can still get a result. You can't trigger Malström's own envelope without a gate pulse, but you can send a CV from an external envelope, to sweep Malström's filter frequency just as its own envelope would sweep it. Imagine you want to process a Subtractor via Malström: Patch the audio output from Subtractor to one of Malström's audio inputs. Click on Subtractor's Mod Env Modulation Output and drag a cable to Malström's Filter Modulation Input; turn the trim pot fully right.
 Processing a Subtractor sound with Malström's filter. Setting up the required envelope shape using Subtractor's Mod Envelope and then connecting its Mod Envelope Modulation Output to Malström's Filter Modulation Input means you can use Malström's filter without having to figure out a way of triggering its Filter Envelope.On the Subtractor front panel, create a Mod Envelope curve that will make the filter sweep you want in Malström. Playing notes on Subtractor will trigger Subtractor's Mod Envelope, sending CV values from the Mod Env Modulation Output that will create a sweep with Malström's filter. To get a similar effect with NN19 or Dr:rex, you'd have to use their Amp or Filter Env Modulation Outputs.
NNXT Pitch-bend Layer Trick
When NNXT was added to Reason in v2, users of the program gained the ability to use velocity switched and crossfaded layers in their sample Patches. Every layer in an NNXT Patch also has the benefit of independent settings of synthesis parameters, giving enormous scope for sound design. This includes different pitch-bend ranges (up to 24 semitones) for each layer, which facilitates a nice little performance trick. Because the action of the wheel affects a whole Patch, different pitch-bend effects can be created for each layer in a Patch with one movement of the pitch-bend wheel.
Imagine a Patch containing three layered samples of a synth sound or waveform. Set the pitch-bend range of the first layer to 12 semitones, the second to seven and the third to three. Now when you play a note (say a 'C') on the keyboard (necessarily playing the three layers at the same time) and move the pitch-bend wheel upwards to the full extent of its travel, the three samples move smoothly up to end on a three-note chord, as the tops of their pitch-bend ranges are different. (In the case of the 'C', we get a C-minor chord, first inversion.) This sounds very neat and takes very little trouble. Note that if you turn the pitch-bend wheel fully in the opposite direction as you hold down the note you get a major chord. Starting on the same 'C' note produces an F-major chord.
Create A Quick Layered NNXT Patch
A time-honoured quick way of making a layered Patch is to take keygrouped sets of samples from existing Patches and layer them to create a new Patch. This is one of the easiest ways of creating complex, rich and interesting Patches with NNXT. You must have two NNXTs open here — one with which to compile your composite Patch and the other in which to load the Patches (one at a time, obviously) whose layers you'd like to borrow.
 Part of the piano/strings layer. The striped fill in the keyzone bars shows that these samples have had a velocity range other than 1-127 set for them.Here's an example. Create two NNXTs and load the Grand Piano Patch from the NNXT Sample Patches folder in the factory Refill into the first NNXT. Load the VNS+VCS+BSS (Violins/Cellos/Basses) Patch from the String Combinations folder into the second NNXT. Unfold the Remote Editor, and press Apple/Control+A on your computer keyboard to select all the samples in that Patch, and Apple/Control+C to copy them. There are three layers to this Patch, each already conveniently Grouped. Return to the first NNXT, and use Apple/Control+V to paste the layers just copied. That's it! Play the first NNXT and you have a rather fine layer of piano and massed strings (the latter in silky 24-bit quality).
To refine the Patch further, you may want to velocity crossfade the layers: select the three layers that make up the strings part of the Patch, by Shift-clicking in the Groups column next to the sample names. Change the Low Velocity parameter to 60 and the Fade In parameter to 90 (both are accessed via knobs under the main sample display). Now playing softly will produce just the piano, but playing louder will cause the strings to begin fading in once your velocity is over 60. The strings will reach their full volume as the incoming velocity passes 90.
More Effective Layered Patches
NNXT is ideal for creating strange, ethereal, evolving pad Patches of the type you'll find on popular sample CDs. Set up multiple sample Groups as layers, bearing in mind that you can mix sounds derived from electronic sources, such as synths, with samples of traditional instruments. Selected layers could also be treated with effects by sending them from an NNXT audio output to a mixer channel (to use effects loops), or via an insert effect or chain of insert effects, such as distortion or flange.
Since each Group can have its own LFO setting, try routing LFO1 to Level and setting a different (slow) rate for each layer, to create the impression of different layers coming to the fore in turn; add a long delay setting for LFO1 and the modulation will fade in slowly. Set a long, slow attack on the amplitude envelope for one or more layers, to bring it/them in later than the others. One or more layers might also benefit from a slow filter sweep controlled by the Mod Envelope. Also consider routing LFO2 to pan for selected layers, to add a moving, spatial dimension to the pad.
Other ideas include using LFO1 to slowly modulate the filter frequency on one or more layers, creating a pulsing effect; setting a long delay for LFO1 would make the pulsing fade in gradually. Also try adding textural or rhythmic samples as a layer, but at a really low, almost subliminal level; set pitch keyboard tracking for any rhythmic layer to zero, so that the texture or rhythm doesn't change pitch as you play the Patch.
If you've created a big, multi-layered texture of a Patch (as might result from the ideas given above), and you know you'll only need a few notes of a given length at a couple of pitches, export those notes to your hard drive, using the Export Loop As Audio File option from the File menu. For each note that you need, set up a loop, record an event to trigger the note, set the loop points so that the note has enough time to play, and then use the Export Loop option. Reload the audio files into another NNXT, create a simple keymap, and trigger the notes in your song. This could save RAM and CPU overhead if the Patch is very complex and sample-heavy.
Derek Johnson & Debbie Poyser are the authors of The Fast Guide to Propellerhead Reason.


