If you never venture into Sonar 's off-line DSP section, now could be the time to check it out, following Cakewalk's v5 revamp of these useful functions.
Amongst the Sonar 5 updates were significant improvements to the program's off-line DSP options, some of which provide functions that can't be obtained in any other way inside Sonar. These are destructive processes that change the actual file (although, of course, you can undo up to a certain point if desired), but most of them perform operations that you would typically not want to reverse anyway, as opposed to creating special effects. Let's take a closer look.
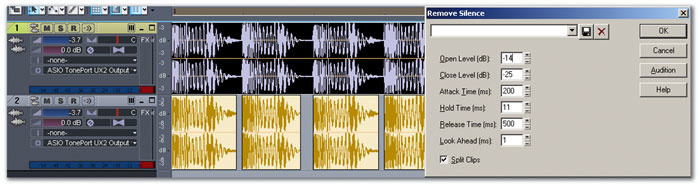
Remove Silence
At first glance, this might just seem to be a noise gate, and noise gating is one thing Remove Silence can do, but it can also save space on your hard drive. This is because Sonar won't store periods of silence within a track as audio if you tell it what you mean by 'silence'. The Remove Silence function can also physically remove the parts of a clip that contain silence, leaving a series of isolated clips. Here's how to use it:
 These settings weight the stereo image from centre to right rather than left to right. 1. Go Process / Audio / Remove Silence.
2. Adjust the Open Level parameter (signals above this level are not considered silence) and Close Level parameter (signals below this level are considered silence) as desired. Note that you can set fairly high open and close levels to create effects like abruptly-gated drum decays.
3. Edit the Attack, Hold, and Decay parameters. Attack sets how fast the gate will open after being told to open — at least, in theory; no matter how I set it, I couldn't get an attack time on a clip. Decay causes the signal to continue for the specified amount of time after the gate closes, while Hold ensures that the gate will stay open for a specific amount of time regardless of signal level. Hold is very handy if the gate 'chatters' when a signal crosses back and forth over the open/close threshold.
4. The Lookahead parameter opens the gate before the signal reaches the Open Level, by the amount of time specified by this parameter. The general procedure is to set this to a fairly low value (a couple of milliseconds) if you want to make sure you don't cut off part of a rising transient.
5. Decide whether you just want to gate the signal with silence, or physically strip out the silent parts to create a series of clips separated by space instead of silence ('Split Clips' — see screen above).
6. Click on OK.
Removing silence can recover quite a bit of space in the case of vocals, where you record a take from the beginning of the song to the end, but there are lots of long, silent spaces during the take. Just be conservative with your settings (low Open and Close values, a couple of hundred milliseconds of Hold time, no Attack, 12ms or so of Lookahead time and about 250ms of Decay), so you don't remove wanted material. And if you do wholesale silence removal on tracks, make sure you're happy with the result before it's too late to Undo.
Extract Timing
This function detects peaks in audio clips, then creates MIDI notes that correspond to these peaks (and whose velocity can track the peak levels). The MIDI data is sent to the clipboard, where it can be pasted into a MIDI sequence. However, note that this process does not work with Groove Clips.
Extract Timing opens up lots of interesting possibilities. You could extract the groove from, for example, a kick-drum track and use it to trigger a bass note. If you'd recorded a snare track with a less-than-exciting snare sound, you could extract the timing and use it to drive a great snare sound from a sampler or other tone generator. Extract timing also allows you to build up 'groove libraries', if you have clips with rhythms you really like and might want to use again. To extract audio from an audio clip:
 Triggers are being detected in a drum track and will be converted to a sequence of MIDI notes, which can then be pasted into a MIDI track or used to alter sequencer tempo. 1. Click on the clip to select it, then go Process / Audio / Extract Timing.
2. The Trigger Level parameter determines the level a signal must exceed to generate a MIDI note. You pretty much set this by trial-and-error and check out whether it's right or not with the Audition function (described later).
3. The Minimum Length parameter specifies the 'hold' time before Sonar will accept another trigger. This is helpful if you want to, for example, ignore flams in a drum part — just set the time longer than the time between strikes in the flam.
4. Tick 'Find a Steady Rhythm' if you want the algorithm to ignore off-beats and syncopations. You'll almost certainly want to tick this when generating timing data for the sequencer to follow, which we'll cover in the next section. This function is also useful if you're extracting kick-drum data from a dance-type drum track, which you can then use to trigger an additional or alternative kick-drum sound.
5. As a safety check, click on 'Audition'. You won't actually hear anything, but you'll see little note markers superimposed on the file; these represent where Sonar found triggers. If there are too many triggers, raise the Trigger Level value. If there are too few, lower this value.
6. If the pulses are where you want them, proceed to the Timing Synthesis parameters (see screen below).
Once you have the timing data, you can apply it in two ways. One option is to use it to insert tempo changes that cause the sequence timing to match that of the audio clip. This is helpful if you've recorded a drum part without regard to the sequencer tempo and you now want to sync the drums to the sequencer. Tick 'Insert Tempo Changes', then specify the Expected Pulse Duration. For example, if you ticked 'Find a Steady Rhythm' and locked into a quarter-note kick-drum part, specify 'Quarter' as the Expected Pulse Duration.
The other option is to convert each pulse to a MIDI note. Tick 'Convert Each Pulse to MIDI Note', then specify the desired note value. You'll get the choice of having velocity track the level of the pulse or remain at a constant value of your choice. I generally select 'Vary with Pulse Level', because I use this function mostly for groove extraction and I want to preserve existing dynamics.
Cakewalk Musikmesse News
The Sonar 5.2 update (for both 32-bit and native x64 versions of Sonar 5 Producer Edition and Sonar 5 Studio Edition) is now available as a free download for registered customers at www.cakewalk.com. V5.2 supports VST 2.4, which provides 64-bit double-precision audio quality through VST effects and instruments, and compatibility with Windows XP Professional x64 Edition. (Note that Sonar 5 's Bit Bridge technology allows pre-VST 2.4 plug-ins to run in Sonar 's x64 environment.)
Other features include reception of MIDI output data from VST Instrument plug-ins (Groove Agent fans take note), the ability to host Waves VST plug-ins as well as Waves Direct X ones, routing of up to 4096 MIDI channels to any Rewire device, and extended control-surface capabilities. In addition, the update addresses issues concerning Universal Audio's UAD1 card, VST automation and the Piano Roll and Inline Piano Roll views.
Cakewalk have also announced the free Rapture 1.1 update, which provides Mac-Intel support (I'm still getting used to writing the words 'Mac support' in an article about Cakewalk products!), as well as support for Power PC-based Macs, and some usability enhancements. Finally, the Dimension Pro 1.2 update also turns it into a Universal application that runs natively on Mac-Intel systems, as well as adding native RTAS/Pro Tools plug-in support, REX file support and a variety of new features.
Gain Changes
Calling this simply a gain function is a bit modest, because it does a lot more than just set gain. You can 'weight' a stereo file more toward the left or right, convert stereo to mono, swap channels, reverse the phase of one channel in a stereo pair, balance channel levels in a stereo file where one side is at a lower value than the other, and more. Probably the best way to explain how it works is with some examples.
Suppose you have a rhythm-guitar part recorded in stereo, and want it to spread not from left to right, but centre to right. Sonar 's pan controls act like balance controls with a stereo signal, so if you try to pan the signal more toward the right, the left channel gets quieter while the right channel stays at its full level. We want the left channel to be as loud as the right channel, but coming from the centre instead of the left. This is very easy to do with the Gain function.
 An S-curve fade, created by moving the nodes as desired and adding a few nodes, has been applied to a portion of the waveform. 1. Go Process / Audio / Gain.
2. As you want the left channel centred, put half of it into the left channel and half in the right channel: in 'New Left Channel', set 'From Left' to 50 percent and in 'New Right Channel' also set 'From Left' to 50 percent.
3. For the right channel, leave 'From Right' in the 'New Right Channel' at 100 percent, and set zero percent for 'New Left Channel' (see screen above).
The Gain function also makes it easy to swap channels. In 'New Left Channel', set 'From Left' to zero percent and 'From Right' to 100 percent, while in 'New Right Channel' set 'From Left' to 100 percent and 'From Right' to zero percent.
Polarity changes are more flexible with the Gain option as well. Using a channel strip you can flip the polarity for the entire track, but with Gain you can flip polarity for the individual channels independently.
DC Offset
Again, this is fairly straightforward but has some cool features. First, you probably want to know whether there actually is any DC offset in your audio: Click on 'Audition' and the Analyse section will show the level of any offset. If it's significant, click on OK to remove it, or at least minimise it. You might as well tick 'Compute DC offset from first five seconds only', as that should be enough. This option needs to be un-ticked only if there's something like a fade-in that could affect the accuracy of the reading.
Fade-In/Fade-Out
The usual way of adding a fade with Sonar is to drag the upper corner of a clip inwards; dragging inwards from the beginning creates a fade-in and from the end a fade-out. There's the choice of a linear fade, an exponential fade or a reverse exponential fade, but that's about it for the 'normal' fade options.
The Fade/Envelope DSP option offers a far more flexible way of creating fades (but note that it works only with standard audio clips, not groove clips). The fade can occur anywhere within a clip, so you first need to choose the area to be faded.
. Note the custom curve, and the fact that the tracks don't have to be numbered consecutively.") Crossfade is about to be applied to two overlapping clips (the overlapping area is outlined in red for clarity). Note the custom curve, and the fact that the tracks don't have to be numbered consecutively. 1. If you want the fade to apply to the entire clip, just click on the clip and skip to step three.
Crossfade is about to be applied to two overlapping clips (the overlapping area is outlined in red for clarity). Note the custom curve, and the fact that the tracks don't have to be numbered consecutively. 1. If you want the fade to apply to the entire clip, just click on the clip and skip to step three.
2. If you want the fade to apply to a portion of the clip, select the track (click on the track header's track number) containing the relevant clip, then click and drag across the timeline to select the part of the clip to be faded. That portion of the clip becomes shaded.
3. Go Process / Audio / Fade/Envelope.
4. If you find the type of fade you want in the Name field's drop-down menu, select it, then skip to step six.
5. If you want to create a custom fade, select the fade curve that's closest to what you want, move the mouse over a node until the cursor turns into a pencil, then move the node. To add a node, move the mouse over the line until the pencil tool appears, then click. To remove a node, drag it on top of an adjacent node. You can also revert to the original curve by clicking on the Reset button.
6. Click on 'OK' to apply the fade.
A useful fade shape that's not in Sonar 's 'normal' fade repertoire is an S-curve (see screen below). I use it with video fade-outs, where the music needs to drop off but then stay constant while there's a credit or copyright notice. Then, when the video fades quickly to black, the audio follows.
Crossfade
This works similarly to fade, except that you select two overlapping clips (actually, you can select more than two, but this may lead to unpredictable crossfade results) and go Process / Audio / Crossfade. The selected clips needn't be on consecutively-numbered tracks; they can be anywhere in the project, as long as they overlap (see bottom screen, left).
As with fade, you can create custom crossfade envelopes. For example, if you're creating a 'dance mix' type of tune and doing a long crossfade between two clips, you can have one track get quieter, then a little louder, then quieter, then a bit louder, and then finally fade out — with the other track mirroring these changes. It's definitely more flexible, although less convenient, than using Sonar 's usual automatic crossfade function.
Reverse
This has no adjustable parameters; just go Process / Audio Reverse and any selected clips are flipped so that the clip plays from end to beginning rather than beginning to end. It's ideal for imitating psychedelic backwards-tape effects, or for creating backwards Satanic messages to drive people who have too much time on their hands crazy!

