We continue our newcomer's guide to Pro Tools with a selection of techniques that every user should know.
Our workshops bring you useful techniques every month, but there are some that are especially applicable if you want to get up and running in the most efficient way. Here's a quick roundup.
- Auto Backup
 Pro Tools saves your chosen number of automatic backups in the Session File Backups folder.

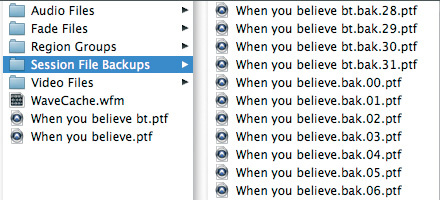
Make sure you're using the Pro Tools Auto Backup feature, as one day soon it will save your bacon! Go to the Operation tab of the Pro Tools Preferences and you'll see a section where you can set up the Auto Backup option. With this active, Pro Tools will save a copy of the Session at the interval you specify. You can also set how many backup copies are kept at any one time. Pro Tools puts these backup copies in a dedicated folder inside the Session folder, called Session Backups. For more on this and other backup strategies, see the Pro Tools workshop article in the July 2007 SOS.
- Template Sessions
It's well worth getting to grips with Template Sessions, which really save setup time at the start of a project. I create a Template Session when I'm working on an album, so that I can very quickly create a new Session for each song. Include in the template whatever you might need: a click track, buses and aux tracks for effects and headphone monitoring, and any plug-ins you use regularly, with the appropriate presets loaded. Whatever you find yourself doing when you start a session, try to have it in your template so you don't end up wasting time doing the same things over and over again. You can also use Template Sessions as a means of saving presets for individual tracks: if you create a bunch of tracks with plug-in combinations you use regularly, the Import Session Data dialogue will allow you to import these tracks individually as needed.
In Pro Tools 8, there is a Quickstart window from which you can choose from one of a suite of factory templates. Alternatively, by using the Save as Template option in the File menu, you can create new Sessions from your templates. Templates are stored in the Digidesign folder on your system drive. For more details on setting up templates,go to the Pro Tools workshop in the April 2008 issue of Sound On Sound.
- Region Groups
Make this feature, which lets you group a set of Regions together so that they become much easier to move around, a good friend. For more on how to use it, turn to the Pro Tools workshop in the October 2006 issue.
- Zooming
The zoom tools in the toolbar are the most obvious way of zooming in and out horizontally (time line) or vertically (waveform detail). However, using the mouse and toolbar every time you want to zoom is a pain, so it's worth getting to grips with the zooming options and shortcuts. We covered this in the Pro Tools workshop in the December 2008 Sound On Sound.
- Playlists
When recording multiple takes, create a separate Playlist for each one, including the first. Pro Tools automatically numbers them, so you'll know that 'Guitar 01' is take one, and so on. The original, empty Playlist can then be used to create a 'comp' track. For more on comping and Playlists, see the workshops in April 2009 and April 2005.
- Plug-ins
If you're forever applying the same preset on a plug-in, you can set it as the default setting for that plug-in, so whenever you choose that plug-in it will have that preset pre-loaded. To do this, first make sure that the plug-in is set to default to the User Settings, which you can do from the Settings menu. Now select your chosen preset, go back into the plug-in Settings menu and select Set as User Default.
When you have lots of plug-ins installed, they can be hard to find, as the list that appears when you click on an insert slot gets very long Struggling to locate your favourite plug-in in a long list? Command or Ctrl-click on it and it'll move to the top!
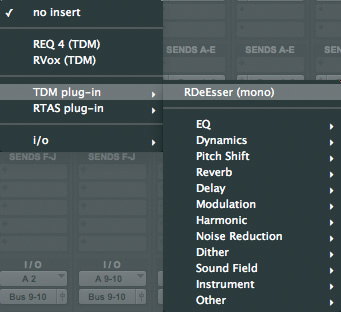 . Here's a neat trick: click on your favourite plug-in in the list while holding down the Command (Mac) or Ctrl (Windows) key. Next time you look, it will be at the top of the list. To remove it, simply repeat the process!
- Strip Silence
 Strip Silence can save a lot of time when you want to clean up your audio Regions.

One of the first things to do when you start mixing is to 'clean up' the tracks. This means deleting sections of audio in which nothing constructive is happening, to cut down on spill and get rid of any 'noises off'. You can do this manually by using the Selector tool, but Pro Tools also has a Strip Silence function, which will automatically eliminate sections of a track with no useful audio on them. For more on Strip Silence, see October 2005's Pro Tools workshop.
- Labels
Use the new grading system that Digidesign introduced in Pro Tools 8. You can rate a Region from 1 to 5 and then choose not to see Regions rated below a chosen score. We covered this in more detail in the vocal comping workshop in the April 2009 issue.
- Mix Groups
The Edit & Mix Groups feature can be a real time-saver. For instance, if you create a group of all your drum tracks, when you hit Solo on the snare track, all the drum tracks will be solo'ed. The same principle can be applied to other groups, such a backing vocals, guitars, strings and so on, and can make managing a mix so much easier: for example, you can mute a section with one click. Once grouped, all the faders in a group will move together, but if you want to move just one fader temporarily, you don't need to turn the group off. Just hold down Ctrl (Mac) or Start (Windows) and move the fader. Once you release the modifier key, the group will work as before. If you find that the Solo buttons don't follow the group, right-click the group name in the Group List in the bottom left-hand corner of the Mix window, select Modify, and in the Modify Group window make sure 'Solos' is checked under Mix Attributes.
- Region List Management
As you record and edit in your Session, the Region List on the right of the Edit window will get bigger and bigger. The size of this list can affect Pro Tools' performance, and if you notice Pro Tools is getting slower, it might be time to prune the Region List. First, save your Session, then do a 'Save Session As' to create a new copy of it. That way, if you want to get back any of the Regions at some point in the future, you have a copy of the Session with them in it.
To remove unnecessary audio files, click on the Regions bar at the top of the Region List (Pro Tools 7) or the arrow on the right‑hand end of the bar (PT8) and a drop‑down menu will appear. Choose Select and Unused, then, in the Region List menu, choose Clear and then Remove. All the unused Regions will be removed from the Session and your Region List will be a little shorter. You may want to choose the 'Unused Except Whole Files' option. This will leave the original files you recorded in the list even if they are no longer used in the Session, which can make finding original content from the unedited Region easier.
- Consolidate Your Session
Once you're happy with the editing in your Session, consider consolidating the edited audio on your tracks into complete Regions. This will achieve two things. First, it will take the load off the computer, because it is no longer having to chase round your hard drive looking for hundreds of bits of audio. Second, it makes transferring the Session to another person with a different system much easier. First, Save your Session, so you still have a copy of the Session with all the separate Regions, then 'Save Session As' before you consolidate anything. To do this, highlight all Regions on each track, along with any space at the start of the track, so you have a selection from the Session start to the last Region on that track. Now choose Consolidate Regions from the Edit menu. Pro Tools will turn all your little Regions into one new single audio file.
You might want to consider extending this principle to plug-ins and effects, by applying AudioSuite versions of plug-ins to 'print' your effects and thus future-proof your Session. You can't guarantee that a particular plug-in will be around in five years' time when you open a Session to re‑work it for a different project.
Article Archive
I have referred to a number of previous articles in this feature. All these articles are available on the Sound On Sound web site, although you will need to have an SOS subscription to view the more recent ones.
Backup and archiving Pro Tools Sessions
/sos/jul07/articles/protools_0707.htm
Templates
/sos/apr08/articles/ptworkshop_0408.htm
Region Groups
/sos/oct06/articles/ptworkshop_1006.htm
Zooming tips and shortcuts
/sos/dec08/articles/ptworkshop.htm
Comping and Playlists
/sos/apr09/articles/pt_0409.htm
/sos/apr05/articles/protoolsnotes.htm
Strip Silence
The Heart Qwikns
 Qwikn is an invaluable aid to remembering those obscure keyboard shortcuts.
Qwikn is a brilliant little application that sits in your menu bar ready for use at any point. But what does it do? Well, have you ever been in a situation when you can't remember the shortcut for a particular task in Pro Tools? Once it is installed on your system, click on the Qwikn icon in the menu bar, type a keyword or two into the search box and up will come a series of possible shortcuts. For example, in the screenshot below I typed in 'Zoom', because I never seem to be able to remember the shortcut for zooming the waveform vertically on just one track. Once you have found the shortcut you were looking for in the list, click on it to highlight it and the shortcut will appear in a box at the bottom of the window. You can also add it to your Qwikies list by clicking on the Add to Qwikies button at the bottom. Now that shortcut will be in a list of your favourites, which you can access by clicking on the Qwikies button to the right of the search box. This is an incredibly useful little application that will become my friend, that's for sure!
$10.


