Studio One v4 makes it easy to transfer material between Songs, and even to or from other DAWs. Let's explore how...
Studio One 4 has all kinds of sexy new goodies, like the pattern generator for drums I discussed last month, and the Chord track lots of people seem to be writing about now. Well, I will write about the Chord track too, once I’ve had a bit more time to dig into it, but this month I’d like to look at a couple of additions that are more utilitarian, but equally important.
One long-standing frustration of working with Studio One has been that there was no way of moving tracks or other data between Studio One Song documents, or to and from a different program. Studio 4 has added ways to accomplish both those tasks and, oh, the things you can do...
Song To Song
 Screen 1: The Import Song Data dialogue is quite straightforward, but there are features of note.The Import Song Data command in the Song menu is probably the most exciting addition. It allows tracks and other relevant data to be imported directly into your song from another Studio One Song document. The dialogue it invokes is clear and easy to understand, if a bit less comprehensive than Pro Tools’ Import Session Data dialogue, and there is nothing particularly exotic about what it allows you to do, but track importing is a potent capability for the very many circumstances in which it can be useful.
Let’s take a moment to note two settings that are important because they provide access to the level of detail you are transporting. The first, and perhaps most interesting, is the Layers tick box. When this is ticked, all of a track’s layers are imported with the track. Whether it should be ticked depends on the context. If, for example, you are importing tracks from other sessions to mix, it is reasonable to assume that the tracks are fully edited and you have no need for alternate takes on other layers, so you can leave it unticked. If, on the other hand, you are doing remote collaboration and are importing tracks from your collaborator’s last contribution, you may want access to every take and punch-in that they recorded in order to edit the material yourself.
The other setting to consider, again, unremarkable but useful, is the ‘Copy files to song folder’ tick box. This is a familiar option when saving a copy of an entire session, but the ability to do so when importing tracks is also very useful in many situations, such as the remote collaboration scenario mentioned above, where a master session from everyone’s contributions can be compiled with all tracks integrated and all of the media local. Keep in mind that copying files to the song folder when the Layers box is ticked can result in a lot more data getting copied.
One more thing to notice here is the track list on the left side of the dialogue. Looking at the icons here shows that folders can be imported. As one would hope, ticking the box for a folder also ticks the boxes for the individual tracks in the folder — a handy shortcut. Mixer channels are imported, as well as tracks, including all plug-ins (assuming they are also all installed on the destination system).
AAF
DAW manufacturers, for the most part, would rather that everyone work in their product and not take their data carousing around to other DAWs. But we, and they, both know the reality is that session interchange is just plain necessary in many situations, and desirable in many more. Those same manufacturers are quite happy to facilitate bringing data from other DAWs into theirs, but people can get annoyed at a one-way policy of import but no export.
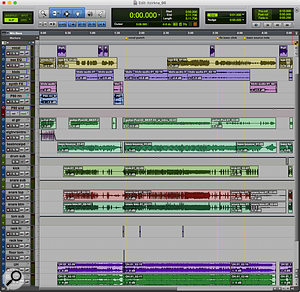
 Screen 2: Here is a song recorded in Pro Tools, which I exported to an AAF file.Several systems for moving audio content and metadata between different media applications have come into common use, and AAF (Advanced Authoring Format) is one of them. Such formats have long documents defining their many capabilities, some selection of which each manufacturer chooses to support. A successful implementation of such a system results in a reasonable level of compatibility between applications, but which data gets transported can vary widely, there are always some cases of incompatible AAF implementations between two applications. In my tests, I used AAF files to move tracks both ways between Studio One 4 and Pro Tools 12, and both ways between Digital Performer 9.5 and Pro Tools 12, but I could only go one way between Digital Performer and Studio One: Studio One imports from a Digital Performer AAF file, but AAF files created by Studio One opened empty in DP. Who knows where the fault lies?
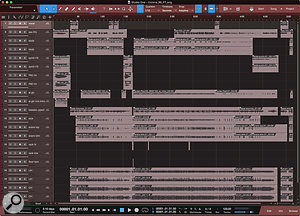
  Screen 3: This is the Studio One 4 Song document after importing the AAF file from the Pro Tools session shown in Screen 2. AAF is effective but not always immaculate. Notice that several tracks are duplicated, which is unfortunate, but it’s easy enough to delete them, and worth the trouble to achieve the file exchange.
Getting file interchange to work usefully can be a bumpy road, and occasionally a dead end, but once you do get it working, it can become very easy and predictable to exchange sessions, as long as you and your workgroup adhere as closely as possible to the system you find to work.
The most common types of information included in an AAF file are clip/event definitions (that is, your edits), volume automation, clip gain, fades, track names and some other basics. Data that is not transported includes MIDI data, layers/playlists, plug-ins and routings used in mixing.
Some applications treat AAF as an import/export operation, where there are options and settings to be chosen. Studio One 4 keeps it simple, treating access to AAF files as simple open/close operations. It should be said that many of AAF’s more detailed and powerful capabilities were designed for audio post-production, and often are not needed in music-only situations.
Pop Shots
There are a few preparatory steps to take before saving your song as an AAF file. You must render any Event FX running in real time or the AAF save will fail. AAF will also fail to save if there are any missing files, so check the pool for anything that needs to be relinked or removed.
One other thing I try as much as possible to do in situations where tracks will be moved is to print a good, old-school two-pop. For those unfamiliar, back in the day, synchronisation of sound and picture for a movie mix was accomplished by putting a short pop or beep at the mark two seconds before picture. You may have noticed that when you see a countdown to picture, you rarely actually see the number two, because the tradition was that the emulsion would get scraped to create a hole on the frame at the two-seconds-until-picture mark, and the sound would get scrubbed until the start of it lined up exactly with the two-second mark in the picture. Hence, the term ‘two-pop’.
When a short pop is printed on every track at the exact same spot, sync is established simply by lining up the pops on all of the tracks. Most of the time, this is only necessary to remedy some problem that came up to throw tracks out of sync, but it remains a crude but very effective means of establishing sync, making it a valuable tactic for facilitating track transfer.
 Screen 4: Crude but effective, two-pops are still a good idea. The arrow points to a very simple and short beep I whomped up using MaiTai and copied to the same location across all tracks. Note that it is set on beat 2. This means that the events may move if the tempo is changed, but they will all move the same amount, therefore remaining in sync.
Saving to an AAF file is as easy as choosing the Save As command and selecting ‘AAF’ from the file format menu at the bottom of the dialogue. No settings are needed. Tracks that are hidden and/or muted are still included in the AAF file, as they are still in the document. If there are tracks you don’t want included, save a new version of your song, delete the tracks you don’t want exported to AAF, execute the Save As command, then restore the version you saved. (You might consider saving a version with the tracks removed, as well, so you can go back and do the same export again later, if needed.) Importing is just as simple: AAF files are loaded with the standard Open command.
This US Library Of Congress page on AAF includes descriptions and links to specification documents, for those wanting the nitty-gritty: www.loc.gov/preservation/digital/formats/fdd/fdd000004.shtml.


