Studio One's Sound Sets are the perfect vehicle for sharing samples and sounds.
PreSonus have created several proprietary file formats to store data in ways that make sense to Studio One. Two such formats are the self-explanatory Musicloops and Audioloops; creating a file in either format requires nothing more than dragging and dropping the appropriate material to the Browser. A third format, used to store collections of data for Studio One, is called Sound Sets. However, many users don't realise they can make their own Sound Sets, so in this month's Studio One workshop we'll look at how this can be done.
A Sound Set is a variant on the ZIP file format (as are Musicloops and Audioloops), and you could store just about any kind of data in one, but unless you're going to write an application to read your Sound Sets, it probably makes the most sense to store data that Studio One will recognise. Sound Sets can contain Musicloops and Audioloops, but also presets for plug-ins and virtual instruments from PreSonus and third-party developers, plus Groove Templates, FX Chains, Drum Maps, impulse responses, and more.
Sound Set Builder
To create your own Sound Sets, the first thing you'll need to do is download and install PreSonus's free Sound Set Builder utility. Go to the Files / Servers tab in the Studio One Browser and double-click where it says 'Exchange' to log onto Studio One Exchange. If you have never logged onto it before, double-clicking will get you started with the registration process. Once logged in, click the triangle next to where it says 'Extensions' and you will see Sound Set Builder for Mac and for Windows in the list. Select the appropriate version for your computer, and click the Install button at the bottom of the browser. Sound Set Builder will install. As you can see in screen 1 that have been uploaded by others, or share yours for others to enjoy.") Screen 1: Once Studio One Exchange is mounted in the Browser, you can install any of the Sound Sets (or other files) that have been uploaded by others, or share yours for others to enjoy., there is also a Sound Sets folder on the Studio One Exchange server where you can upload your custom Sound Sets and download those made by others.
Screen 1: Once Studio One Exchange is mounted in the Browser, you can install any of the Sound Sets (or other files) that have been uploaded by others, or share yours for others to enjoy., there is also a Sound Sets folder on the Studio One Exchange server where you can upload your custom Sound Sets and download those made by others.
Making Simple Sound Sets
Audio files, Audioloops, Musicloops, and virtual instrument or effects presets are easy to pack into Sound Sets. First, click the Files tab in the Browser and navigate to the folder in which you want to work — a reasonable default location might be the Browser's Studio One tab. Right-click where you want to create your Sound Set work area and choose New Folder from the menu that drops down. The name you give the new folder is what will be used as the name of the final Sound Set, so make it fairly short, descriptive and distinctive. You will build the content for your Sound Set in this master folder. If your Sound Set will have a lot of content, creating further subfolders within this folder will help you maintain your sanity later (but no guarantees).
Copy the content you want in the Sound Set into the desired folder. You can drag content from the Mac Finder or Windows Explorer directly to the Browser, drag from the Arrange view in your song to the folder, or drag from another location on the same tab in the Browser. Dragging from a different Browser tab is a little more complicated: you have to drag the content to the Browser tab on which the master folder resides, then, when the Browser switches to that tab, drag on down to the folder itself. Most of the time, the content is copied to the folder, but if you are dragging from the same tab the folder is on, it will move the content, so be sure to read Studio One's message saying what it's about to do. Studio One throws a confirmation dialogue in front of you before it actually copies the content. Be sure all of the files and folders are appropriately named, because "09 Audio Track.wav” will mean nothing to you next year!
After assembling and organising your Sound Set content, you can preview your Sound Set before actually generating the file. Right-click on the master folder and choose 'Mount Folder as Sound Set' Screen 2: A work folder with two subfolders is being mounted here using the Mount Folder command. Note the Refresh command at the bottom; this can be useful if a newly created Sound Set is not showing up as it should.. This will bring up the Sound Set Properties dialogue, which I'll discuss later. After you complete this dialogue and click OK, you will see that the folder now uses the icon you assigned in that dialogue, and you can find your new Sound Set at the bottom of the list on the Sounds tab. When you are satisfied all is correct, go back to the master folder (which will now display a Sound Set icon) in its original location on the Files tab, right-click it, and choose 'Unmount Sound Set Folder' from the menu that drops down.
Right-click the master folder again, but this time choose 'Pack Sound Set from Folder' from the drop-down menu. The Properties dialogue comes up again, and should retain the info you entered before. Click OK when the dialogue is filled out correctly and Studio One will create the new Sound Set and show it to you in the Finder/Explorer.
If you are ever going to move this Sound Set to another machine, keep in mind the destination machine will need to have whatever resources the Sound Set requires. There's no point making a Sound Set of your awesome McDSP FilterBank presets if the other machine doesn't have that plug-in installed. The same applies to something like presets for the Studio One Presence instrument: if the other machine doesn't have the source samples you were using, the Sound Set will be of no use. So, when you go to make a Sound Set, think about whether any samples or third-party resources are required for your presets.
Making Sample Sound Sets
You can make Sound Sets that require samples, but it takes a few extra steps. Once you've made your master folder, as above, create two subfolders inside it. Give one the same name as the master folder; this subfolder will hold the presets themselves. The other subfolder will hold the samples, so give it some logical name such as 'Sample Files'. Since your samples folder will probably hold a lot of content, create a subfolder structure inside it to organise them; you could, for instance, create a named folder for each preset containing all the samples used in that preset. Then copy or move all of the samples you need into the subfolder structure. For the Presence instrument, samples instead are imported as SoundFonts.
Now right-click on the master folder and choose 'Mount Folder as Sound Set'. Fill out the Properties dialogue, click the OK button and find the new Sound Set in the Sounds tab. Make a preset for your instrument, making sure to get the content from the Sound Set in the Sounds tab and not another location. (If you must know, the reason is that this makes Sound Set Builder use a relative path to the content in the Sounds tab, rather than an absolute path to the sample on your disk, which won't be found on another machine.) Now move the preset to the presets folder you created. The easiest way to do this is to drag the instrument from the Instruments panel in the mixing console to the folder in the Browser, as shown in screen 3 Screen 3: The easiest way to save a virtual instrument preset to a Sound Set work area is to drag the instrument to the Browser from the Instruments panel in the mixing console. . Rename the preset as desired. (The Rename Preset command in the Browser doesn't work for me, so I rename in the Finder and then Refresh in the Browser.) Repeat for all presets you want to create, then finally, unmount the file and make the Sound Set as described above.
And In the End…
There are many ways Sound Sets can be used. On Exchange, you'll find presets for commercial sample libraries, beats, loops, drum maps, sound effects — all kinds of cool stuff. As with building sampler banks, building Sound Sets can take a little upfront investment, but you end up with a nice library of great stuff you can access quickly. Give it a try.
The Sound Set Properties Dialogue
Most of the fields in this dialogue are totally straightforward, but the Identifier and Presets fields bear some explanation.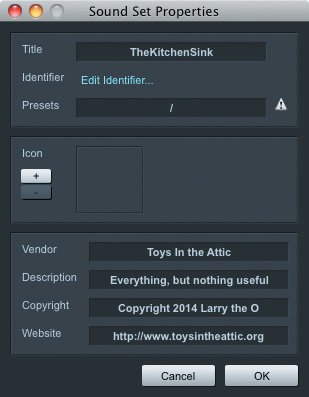 Each Sound Set stores a unique identifier, and when you invoke the Sound Set Properties dialogue, a unique ID is automatically generated. You can create your own identifier by clicking on the Edit Identifier link in the dialogue, but remember that no other Sound Set can have the same ID.
The Presets field stores the path to the presets in the Sound Set. The best thing to do there is enter a forward slash, which stands for 'root directory'. This causes Studio One to start reading from the master folder on down, which will result in your beautiful subfolder structure showing up in the Sounds tab.
The last thing to note is that entering a URL in the Website field will cause a link to that URL to appear in the information area at the bottom of the Browser when the Sound Set is selected.


