, and a ‘peer-array’ setup comprising five separate close mics (blue captions). In addition, a pair of room mics were also recorded to allow more reverberant sound to be added to either setup at mixdown. And, in case you’re wondering, it’s not an acoustic pot plant...") For this session, Mike set up two independent recording rigs: a ‘dominant-array’ setup, comprising a main stereo pair of omnidirectional microphones with supporting spot mics (yellow captions), and a ‘peer-array’ setup comprising five separate close mics (blue captions). In addition, a pair of room mics were also recorded to allow more reverberant sound to be added to either setup at mixdown. And, in case you’re wondering, it’s not an acoustic pot plant...Photo: Mike Senior
For this session, Mike set up two independent recording rigs: a ‘dominant-array’ setup, comprising a main stereo pair of omnidirectional microphones with supporting spot mics (yellow captions), and a ‘peer-array’ setup comprising five separate close mics (blue captions). In addition, a pair of room mics were also recorded to allow more reverberant sound to be added to either setup at mixdown. And, in case you’re wondering, it’s not an acoustic pot plant...Photo: Mike Senior
Zwiepack: Our engineer captured one jazz session using two completely different recording techniques. Which one won the day?
As I see it, there are two fundamental ways of recording a group of musicians in a single room. The first involves using a stereo mic rig (which I like to call the ‘dominant array’) to pick up a representative overall picture, and then supplementing that with closer ‘spot’ mics to allow some refinement of the musical balance at mixdown. The main advantages are that, even on its own, the dominant array will usually give you a fairly natural sound pretty swiftly, even with large ensembles, and the quality and placement of the spot mics isn’t then super-critical, because those signals typically remain quite low in the mix. The second approach is to dispense with the overall stereo pickup and just capture every instrument with its own close-mic rig — or ‘peer array’ as I prefer to call it. The main upside with a peer-array setup is that you get greater creative control over the balance and timbre of each instrument at mixdown, and the heavier reliance on close mics delivers a certain intimacy and presence that appeals to many mainstream listeners.
 Photo: Daniel PlappertAlthough practical considerations frequently militate against one setup or the other, there are times when both are feasible, whereupon choosing between them becomes a more nuanced and subjective decision — not just a question of the naturalness of the dominant-array sound versus the closer detail of the peer-array rigs, but of the tonal character of the specific mics used in each different role. This is why, on a recent recording session, I decided to set both up at once!
Belt & Braces
I’d been asked to record an acoustic trio comprising sax, upright bass and percussion on location in a local town hall. Although rooted firmly in the jazz medium, many of the arrangements incorporated influences from a variety of different styles, including classical, country and R&B, so I was unsure which recording approach would be best suited sonically. With more than two dozen tunes to lay down in little more than one day, there wasn’t going to be time to keep rejigging a single set of mics, neither was I convinced that the on-location monitoring environment would justify any hard-and-fast verdict on the preferred recording method in situ. So I hit upon the idea of setting up both a dominant array (with supplementary spot mics) and separate per-instrument peer arrays so that we’d be able to make a better informed choice between them at mixdown.
Once these general considerations had been settled in my mind, I could begin making more specific plans. On project-studio sessions, I almost always prefer to use omnis for stereo miking wherever I can, on account of their well-extended low end and well-behaved off-axis response. The best omnis I had available were Shure KSM141 small-diaphragm condensers, but fellow engineer Simon Gordeev (http://simgo.de) had kindly agreed to help out on this session, and he was able to bring his own pair of Oktava MK012s as an alternative. I planned to do a shootout between those options on the day.
For the spots, I chose directional mics, to keep spill levels low — the less spill there is, the more scope you have for independent balance adjustment at the mix. I’d had good experiences with Shure’s SM7B on sax and Avantone’s CK1 on bass during a previous session, so gave both of those a second outing here. The SM7B’s comparatively neutral mid-range tone is part of its appeal for me, but the dynamic design does also inherently roll off the high end and round off transients, which helps avoid harshness and excessive mechanical noises when close-miking. The CK1’s mid-range emphasis always seems to help bass come through the mix for me, and I guessed its hypercardioid capsule might also be useful for spill management. As for the percussion, I was content to just reserve a recorder channel in case I needed a close mic, but to leave any further concrete decisions for the session itself. I wasn’t sure I’d actually need a close mic, in fact, as the band claimed to be happy keeping the percussion in a background role.
 To begin with, the main stereo pair was set up around head height, but this exacerbated existing ensemble balance problems, gave the sax an unpleasantly edgy timbre, and captured too much room reverb.Photo: Daniel PlappertIf you jettison the idea of using a dominant array to provide overall realism in the mix, it puts much more pressure on the close mics to deliver a natural sound. For this reason, in my peer-array setup I deliberately stacked the odds in my favour, by selecting the most expensive mics I could get my hands on for the sax and bass: respectively, an AKG C414 B-XLS and a Brauner Valvet I managed to borrow for the occasion. I also chose omnidirectional patterns for these mics, because they catch a more balanced timbre up close, and colour off-axis pickup much less than cardioid-family patterns. But what about spill? Well, although spill between spot mics can undermine their rebalancing power at mixdown, it’s important to realise that spill between peer arrays is frequently desirable. For instance, I was counting on sax spill from the bass mic to give more dimension and believability to the sax’s final mix timbre — and vice versa. For the percussion, I planned on using just a single mic, because the band had told me that the percussion arrangements were pretty minimal. I pencilled in a Superlux R102 ribbon mic as my first choice, figuring it’d give me a smoother sound than a condenser at close-miking distances, and the off-axis response of its figure-of-eight polar pattern would give a relatively untainted spill timbre.
There was one other facet of the sound that I felt might be tricky to evaluate while monitoring on location: the balance of direct to reverberant sound. I decided to play it safe, therefore, by recording all of the main mics a little on the dry side and supplementing those with separate room mics. That way, I reasoned, I could, if necessary, tweak the amount of room sound in the mix after the fact. I figured I’d choose the specific room mics once I’d heard what the rest of the setup sounded like, but did at least resolve that I’d use a stereo pair and that I’d try to make it do double-duty, catering for both the dominant-array and peer-array setups.
In The Room
Needless to say, the acoustics were the first thing I listened for when Simon and I arrived at the venue to set up. The good news was that the general character of the room’s reverb was very nice indeed — but there was also plenty of it! My first thought was to try putting the musicians on a raised stage area to the side of the room, where we could perhaps scotch some of the reflections using the stage curtains, but some quick listening tests with the bassist playing in different locations affirmed that the overall sound felt more open and natural with the players further out in the room, where the ceiling was higher.
 Once a more promising position had been found for the main stereo pair, there was a quick shootout between two sets of mics in that role — and the cheaper ones won out!Photo: Daniel PlappertAs regular readers are aware, I’d feel almost underdressed turning up to record without a few old duvets piled into the back of the car, so once we’d found a nice-sounding place for the musicians to set up, the quilts were draped from stands as impromptu absorbers on either side, reducing the captured reverb a little — more by intercepting sound emanating outwards into the room from the instruments than by shielding the mics from the resultant sonic reflections. I set the sax and bass players up at the front of the group (on the left and right sides, respectively), with the percussionist centred behind them. I usually prefer keeping acoustic players as close together as possible while recording, to maximise the immediacy of musical communication between them, but in such a reverberant space this tactic also helped keep spill between the mics tighter and less roomy.
The Main Stereo Pair
The first mics I concentrated on were the omnis of the dominant array, as these would offer the quickest route to a usable full-ensemble sound in case we ran short of setup time. Normally, the lowest-risk position for a main pair is well up off the floor, away from strong boundary effects or comb-filtering colorations, so I started off with the KSM141s around head height. However, hearing the results in our makeshift control room (an adjoining storage room where we’d hastily arranged our recording and monitoring hardware), I wasn’t thrilled. I knew that the sax was louder than the upright bass in the room, but the directivity of the sax’s upward-facing bell seemed to be exacerbating this inherent acoustic imbalance, and also giving that instrument a nasty, spitty tonal edge. Moreover, the ensemble as a whole was still too roomy for my liking.
 To improve spill rejection, the bass spot mic was fitted with its hypercardioid capsule and moved down directly in front of one of the instrument’s soundholes.Photo: Daniel PlappertRebooting my brain briefly, it occurred to me that a much lower mic placement might work better, putting them directly on the bass’s strongest axis of projection (ie. in line with the soundholes) and well off axis to the sax’s bell. Sure enough, a couple of moments’ repositioning presented us with a more promising sound: although it still clearly indicated the imbalance in the room, the problem felt a lot less severe, and the lower mic positions also sounded drier by virtue of being closer to the instruments. With the dominant array now within three or four feet of the players, however, I had to narrow the mic spacing to around 16 inches, just to keep the stereo width within the bounds of taste. Even then, the sax and bass were spaced further apart in the panorama than I’d ideally have liked, but I felt this was a fair price to pay for an otherwise respectable sound — especially as I tend to be more conservative about stereo width than most other engineers anyway! A final step was to set up the Oktava mics alongside the KSM141s, and choose our favourites by ear. To our surprise, we all felt the cheaper mics won out on this occasion — you never can tell until you listen!
Spot Mics For Bass & Sax
Next, I reached for the bass spot mic, given the weakness of that instrument in the dominant-array balance. Initially I positioned it a foot or so higher than the bridge, a region which normally provides a decent blend of low-end body and mid-range finger/string definition, but the sax spill there proved too strong, such that fading the spot mic up to an appropriate mix level began to drag the sax image unacceptably off-centre. Couldn’t I have just tweaked the level or panning of the dominant-array omnis to compensate for this? While it might appear a good workaround, it would also have prevented me automating the spot mic’s fader at mixdown without the sax wandering around the stereo image. Spot-mic automation can make a huge difference to the musicality of acoustic recordings, so I preferred to move outside my comfort zone with the bass miking to pursue a lower spill level instead.
Taking a cue from on-stage miking, I dropped the mic lower and moved closer in, so that it hovered alongside the bridge about a foot away from the instrument’s farther soundhole with its hypercardioid null (roughly 135-degrees off axis) pointing directly at the sax. This much improved the spill situation, but at the expense of a rather constricted raw timbre and an overabundance of low end, on account of the instrument’s air-cavity resonance and the polar pattern’s strong proximity-effect bass boost. Fortunately, neither of these issues prevented the mic serving its designated purpose in practice. For a start, I could easily tame the low frequencies with a gentle low roll-off (for the proximity effect) and an additional peaking cut in the 60-70 Hz region (for the soundhole boom). Plus, the beauty of the dominant-array approach is that the naturalness of the main pair’s pickup disguises a multitude of sins, so the spot mic’s timbral vices were much less apparent within the context of the full mix. The main trade-off, to my mind, was a loss of higher definition, although it turned out that the bass player actually preferred a rounder mix tone anyway — all’s well that ends well, I suppose!
 Because many of the microphones were placed so close, Mike took precautions to avoid the musicians inadvertently shifting position between takes — for example, by marking the location of the sax player’s feet and the upright bass’s spike.Photo: Daniel PlappertThe bass spot mic’s healthy level in the mix did pull that instrument a touch too far forward compared with the sax, and I decided to compensate for this using the sax close-mic signal. I quickly threw this mic up in a likely-looking position (about a foot away from the centre of the instrument, but off-axis to the bell, where the sound tends to get rather abrasive), and was lucky enough to get a reasonable sound pretty quickly — the SM7B just seems to suit sax very well. I did break my usual habit of leaving the mic’s spectral-tailoring switches ‘flat’, though, engaging the upper mid-range boost to bring out more presence frequencies, given that these are so effective at bringing instruments up front. The merest smidgeon of that signal furnished me with a creditable dominant-array mix, even without a percussion close mic, so in a sense the pressure was now off — I had a usable sound in the bag, and could now focus on the alternative peer-array rig.
The Alternative Rig
The sax peer array (ie. the omni C414 B-XLS) was a cinch to position. I popped it right next to the spot mic and it sounded great straight away. Job done! The bass peer array, on the other hand, proved more problematic. Although spill has a purpose in peer-array setups, its quality and quantity on each mic is crucial. The premium-grade Brauner mic and omni polar pattern saw to it that the tonal character of the spill was commendably smooth and clear, so I had no concerns there. The trouble was the sheer amount of sax spill, both direct and reflected — the former caused the sax to drift across the stereo image, and the latter made the sax’s reverb feel right-heavy once the mics were panned to match the soundstage.
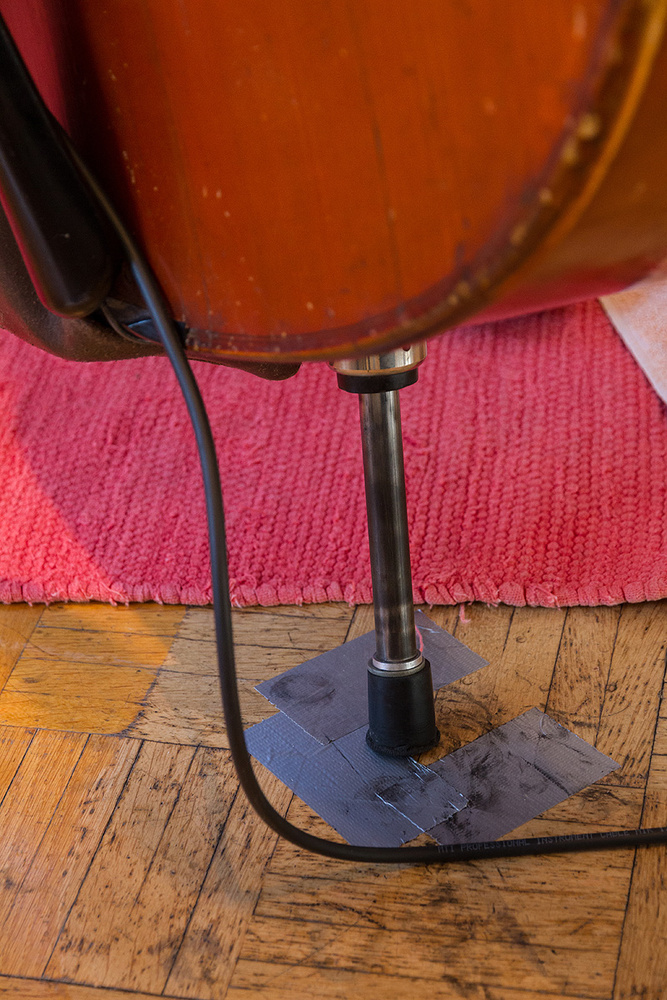 Photo: Daniel PlappertWithout the realism of a dominant array to hide behind, I wasn’t keen on emulating the bass’s spot-mic positioning for its peer array, and positioning the mic any closer than about 18 inches misrepresented the tone by focusing on too small a portion of such a large instrument. As with the spot mic, I eventually struck a compromise — in this case by switching the bass mic to its subcardioid polar pattern and angling it away from the sax. It wasn’t a complete fix, by any means, but enough to bring the sax’s image-drift under control, and I was pretty sure I’d be able to counteract any residual lopsidedness in the room sound with a dab of left-biased artificial reverb at mixdown if necessary. That said, I hedged my bets by taking a DI signal from the bass’s onboard piezo system! (Under other circumstances I’d have considered introducing some kind of gobo between the players, but I ruled that out on this occasion for fear of tampering with the sound of our dominant array.)
Percussion Explosion
You don’t have to do too many sessions before you start developing a kind of sixth sense for impending trouble, and on this session my internal warning lights started flashing the moment the percussionist started setting up cymbal stands. You see, following my pre-session discussions with the band, I’d only been expecting a light smattering of hand percussion, whereas this guy was properly tooled up! Fortunately, he also turned out to be a class act, so I wasn’t too concerned about the ramifications of his percussion battery for the dominant array — because he could balance himself against the other players, he came across just fine through those mics. I’d clearly underspecified his peer-array setup, though, because any of his instruments not properly covered by a close mic would be underrepresented in the mix.
Fortunately, the first number we recorded featured just brushed snare drum, which I could catch just fine by using my pre-planned Superlux ribbon mic as a kind of ‘low overhead’, pointing it downwards towards the drum such that its null plane rejected the loud sax. Simon and I then dealt with additional close-miking requirements for subsequent tunes on the hoof as they arose. The first addition was an SE Electronics Z3300A large-diaphragm condenser mic in figure-of-eight mode to capture the low-end thump of a cajon, and that was later joined by a Shure SM57 close mic for snare and conga. In retrospect, I’d have liked to have replaced the single overhead mic with a stereo pair too, as the cymbals in the peer-array setup felt a bit narrow, but by the time it crossed my mind I’d used all the ribbon mics.
 Mike switched in the presence-boost switch on the sax spot mic so that it would bring the instrument subjectively closer to the listener in the mix.Photo: Daniel PlappertBut mic technique was far from the only tactic we used to balance the percussion in the mix. In most cases the player was happy to adjust his playing if we encountered sonic difficulties. For example, where a tighter snare character suited a couple of the tunes, I suggested he play quieter so we could turn up the close mic in the mix and thereby increase the proportion of direct sound. No sooner said than done, and without moving a single mic! On other occasions he’d change to different sticks, or swap one tambourine for another, solving mix problems far more elegantly than I ever could have done with mix processing. There was one situation, though, where a bell tree behind the bass player really zinged out into the dominant array even when played as quietly as possible, so we addressed that by hanging a thick bathmat from a mic stand to intercept the bell tree’s high frequencies — a surprisingly effective dodge that also gave the percussion instrument a nice ambient flavour.
Showdown At The Mix
A few days after the session, I put together draft balances of each of the two recording setups for one of the tunes, and sent those to the band for their feedback. They ended up preferring the overall character of the dominant-array setup, but with the proviso that the peer-array sax timbre felt a touch clearer. Fortunately, because the sax had been louder than the other instruments in the room, and the AKG peer-array mic comparatively close-placed, its spill level wasn’t much higher than that of the Shure spot mic, so I was able to substitute it without difficulty. Other than that there was very little processing to do at the mix other than automation: primarily just low-pass filtering on the kick and bass mics, a 2dB low-shelf cut on a couple of other channels, and a bit of 10kHz ‘air’ across the whole mix. And there was no need for send effects either, because of our room mics.
 As part of the percussion ‘peer-array’ setup, an sE Electronics Z3300A was set up in figure-of-eight mode to cover the cajon.Photo: Mike SeniorIn this month’s column, my main goal has been to clarify the pros and cons of two different ensemble-recording approaches, but there’s one other thing that bears underlining. Because this group’s natural acoustic balance was weighted against the bass, the placement of both of that instrument’s close mics inevitably involved a degree of compromise, either in terms of the captured tone or the nature of the spill. It’s an example of one of the truisms of recording engineering: the better matched the instruments are in the room, the easier it is to capture a well-balanced recording. That said, real-world recording sessions rarely feature ideal acoustic balances, so learning to chart a sensible course between numerous potential trade-offs remains an indispensable skill for project-studio recordists.
The Figure-of-Eight Room Mic Trick
For the room mics on this session, I chose a pair of Superlux R102 ribbon mics spaced around four feet apart, the aim being to achieve a wide, warm-sounding reverberation to surround the drier signals from my two different miking methods. Unfortunately, the miking position which produced the desired direct/reverberant balance (about 14 feet in front of the musicians) also happened to coincide with some kind of low-frequency room resonance that made the bass sound horribly bloated much of the time. So I pulled a little stunt I often use in smaller rooms: I rotated each of the figure-of-eight mics through 90 degrees so they rejected direct sounds from the ensemble. In that way I was able to achieve a similar degree of reverberance at a much closer miking distance, thereby moving the mics out of the room-mode hotspot.
Music & Movement
 Concerns about the balance and timbre of specific percussion instruments in different arrangements were frequency solved without recourse to miking changes — for example by switching between different drumsticks.Photo: Mike Senior
 and the alternative spot mic (a Shure SM7B) were positioned very close together, the former’s omni polar pattern delivered a significantly more natural sound — albeit at the expense of more spill and room ambience.") Although the sax ‘peer-array’ mic (an AKG C414 B-XLS) and the alternative spot mic (a Shure SM7B) were positioned very close together, the former’s omni polar pattern delivered a significantly more natural sound — albeit at the expense of more spill and room ambience.Photo: Daniel Plappert
Although the sax ‘peer-array’ mic (an AKG C414 B-XLS) and the alternative spot mic (a Shure SM7B) were positioned very close together, the former’s omni polar pattern delivered a significantly more natural sound — albeit at the expense of more spill and room ambience.Photo: Daniel Plappert By gaffering a thick bathmat to a spare mic stand, Mike was able to use it to intercept excessive high frequencies from a bell tree before they reached the main stereo pair, thereby reducing the prominence of this instrument in the recorded ensemble balance.Photo: Mike SeniorAs you can see from the photos in this article, most of the mics I used were pretty close up, which can lead to difficulties if the musicians move around a lot while playing. For example, if the saxophonist twisted round to directly face the bass player, his instrument’s bell fired strongly across the dominant array into the right-hand mic, giving the impression in the control room that he was traversing the stereo panorama. Marking positions for the sax player’s feet and the bass’s spike on the floor with strips of gaffer tape helped head off the worst of this, but I also alerted the performers to the issue, so they could also do their best to minimise these unwanted stereo artifacts. With hindsight, a strategically placed mirror would have made this more comfortable for the saxophonist in particular — as it was, he had to fight the natural urge to turn his upper body towards the bass player when looking for cues, which wasn’t ideal.
Audio Examples Online!
To download a selection of audio demonstrations relating to this month’s article, with detailed descriptions, as well as a selection of final mixes from the project, check out the SOS web site’s accompanying media page.
Featured This Month
The artists featured in this month’s column are the jazz trio Zwiepack, comprising Christian Bolz (sax), Markus Braun (bass), and Christoph Scherer (percussion). You can hear the final recordings on their upcoming CD release Strictly Commercial.