Expand your monitoring options with clever routing in Logic Pro.
When the mixing desk was at the beating heart of the recording studio, it was a trivial task to patch in and control several sets of audio monitors, send audio to external hardware effects units and set up multiple headphone feeds for your musicians. Most DAW users have banished the desk from the studio, relying instead on the computer keyboard and mouse and, perhaps, some kind of MIDI controller. Most project studio owners don't have the space for a mixing desk or won't want to endure the financial outlay and possible sonic degradation by purchasing a dedicated monitor controller. However, as long as you have an audio interface, preferably with multiple outputs, Logic Pro can easily emulate all of these basic monitoring and routing tasks.
Multiple Monitors
It's useful to have more than one type of audio monitor in a studio. While we should all aspire to using a pair of high‑quality nearfields, a pair of 'grot boxes' might be useful for checking how mixes translate to less high‑quality systems. Usually, audio interfaces only have one pair of monitor outputs (normally controllable by a front‑panel level knob), which are selected within Logic Pro via the Stereo Out (outputs 1 and 2). You could, of course, just unplug your main monitors and plug in another pair. But, alongside the inconvenience, there's a possibility of speaker damage if you forget to turn off your amps first. To connect two sets of monitors that can then be controlled directly from within Logic Pro, do the following:
- Plug your first set of monitors (A) into outputs 1 and 2 on your audio interface and the second set (B) into outputs 3 and 4.
- Create an aux from the '+' button in the mixer and rename it 'Mon send'. Set its input as bus 1 and its output as bus 2. This will control the audio feed from your channel strips to both your sets of monitors.
- Route all the tracks that you would usually send directly to the stereo out to bus 1 instead. The audio will then pass through the 'Mon send' aux created above.
- Create two more aux tracks. Name one 'monitor A' and set its input to bus 2 and its output to stereo out (1 and 2). Name the other 'monitor B' and set its input to bus 2 and its output to 3 and 4
- Monitor A and B now control the levels sent to your audio monitors, while the mute button on the channel strip can be used to turn each monitor output on and off.
You can improve the whole monitoring experience by assigning the faders and mute buttons of these auxes to physical controls on a MIDI controller: for example, rotary knobs for the monitor levels and buttons for the mutes. To assign these controllers do the following:
- Click on the parameter you want adjusted via your MIDI controller: for example, the mute button on the Monitor A output aux.
- Open the Learn Assignment window (Command–L by default, or from the Logic Pro Control Surfaces Preferences menu.) You'll see that 'Mute' is already selected.
- Press a button on your controller to assign it to the Mute button, then repeat the procedure to assign the Volume fader to a controller knob.
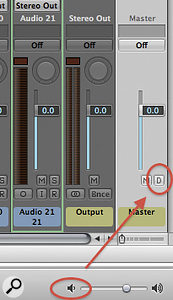
Logic Pro has an unhelpfully unlabelled 'Dim' button on the master volume control at the bottom right of the Transport bar, as in the screen above, which is only visible when set via the Preferences (accessed by right‑clicking on the bar). The speaker icon on the left switches between the level set on the master volume and a lower volume set in the General section of the Audio Preferences window. It's useful to be able to easily swap between preset high and low levels to check mixes at different volumes. There's also a 'D' button on the Master fader that performs the same task. Logic's master fader has a 'Dim' control, shown here as the small 'D' button.
Headphone Mixes
You can use this same routing technique to set up as many unique headphone monitor mixes as you have outputs on your audio interface, though you will, of course, have to have a headphone amplifier connected to each output (I often use spare hi‑fi amps for this purpose). For each headphone output, you need to create an aux, give it a useful name ('Headphone out 1', for example) and assign each aux a separate bus as an input, and a unique physical output (which is, of course, connected to your headphone amp). You could have four — for example, to feed audio to musicians playing bass, drums, guitar and piano. To bleed off signals from your audio tracks, use the sends from the channel strips routed to the required bus(es). What's nice about this setup is that each musician can have their own monitor mix, so the drummer can have more bass, the guitarist more piano and so on, each amount selected by the send knobs in the channel strip. As is the case with the monitor sends, it's easier to work with headphone mixes if you assign the sends to the knobs on a MIDI controller.
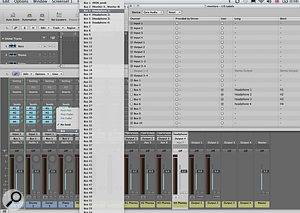
To make it easier to see what bus is sending to which headphone output, give them a useful name. Open the I/O Label window (from the Audio submenu found in the Main Options menu) and type in something memorable next to the buses you are using to send to your headphone output channels. The 'Short' name is especially useful here, as you'll see it reflected in the channel strip's send boxes. If you Shift‑click on several channel strips in the mixer, you can add sends to multiple channels, which is especially useful if you have hundreds of tracks you want to feed to the headphones of your musicians! This screen illustrates routing to headphone outputs via sends and auxes, and labelling buses.
To Infinity...
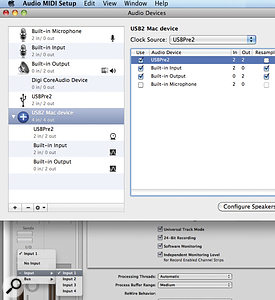
Even if your audio interface is a lowly two‑in/two out affair, you can bolster the number of connections using the Mac's internal audio interface. Though the audio quality probably isn't up to the same level as even the cheapest third‑party device, it's certainly good enough for a headphone monitor feed or two. To get the internal audio working alongside your audio interface, you'll need to use OS X's Core Audio Aggregate Device feature, which is part of the Audio MIDI setup utility, found in the Utilities folder. Clicking on the '+' creates a new Aggregate Device, and you can choose which inputs and outputs to use from the window on the right. Normally, you'd use the external interface as the clock source (which keeps all your digital devices in sync), but you can choose another from the pull‑down menu if you're getting clicking problems. This Aggregate Device is then available in Logic Pro and you can use its inputs and outputs like any other interface. If you need more inputs and outputs than your interface allows, you can use your Mac's internal interface to set up extra connections.
Go Direct
Some audio interfaces have a 'Direct Monitor' feature that allows inputs to be fed directly to the monitor output. This is useful when tracking, as it eliminates the latency generated when monitoring via a DAW. However, unless your interface has its own DSP and plug‑ins, you won't be able to utilise any hardware reverb or echo unit you usually like to use (but not capture) when recording vocals, and a lot of singers like to hear a little ambience when tracking. Using Logic Pro and a multi‑output interface, you can patch one in and keep your singers happy.
- Create a track to be used for recording, but turn the fader fully down: we don't want to hear any audio that's passing through Logic Pro.
- Create a send and make it pre‑fader. The send will turn green and an aux will be created: rename it 'Hardware Reverb'.
- Insert the I/O plug‑in on the aux. Set its inputs and outputs to 3 and 4 and plug your hardware reverb into these ins and outs.
 If you like to be able to hear a little ambience when tracking, you can patch in a hardware reverb that is routed to be audible, but not captured during recording.
Using the send control and the aux fader, you can now blend the hardware reverb with the input you're recording. Latency won't be an issue with an effect like reverb, it just adds a bit of extra pre‑delay. Of course, you can replace the I/O plug‑in on the aux with one of Logic Pro's software reverbs, but if you have a high‑quality reverb unit, it's nice to be able to use that instead.


