
Sampled drums may be quicker and cheaper to use than the real thing, but there is something special about a real drummer hitting real drums. Hugh Robjohns passes on a few ideas and tips on capturing the best possible kit sound.
My usual opening gambit in these recording workshops has been along the lines of the art and challenge of recording being all about capturing a faithful rendition of the instruments without swamping their subtleties in undesirable mechanical noises. Well, exactly the same is true of drum kits, and all the principles discussed in my previous brass, strings and piano workshops apply equally well here.
The most obvious feature of a drum kit — particularly a modern rock kit — is that it is very loud. This may be a useful attribute for the drummer of a pub band, but it also presents a few difficulties in the recording studio. To make a decent recording we need to be able to balance and control one sound against another and, nine times out of 10, the drum kit will have to be screened off from the other instruments in some way to provide a modicum of separation.
The best solution is to install the drums in a specially designed drum booth with a high degree of acoustic isolation, although it helps if the drummer can still see the rest of the band for those all‑important visual cues. Opinions differ on the ideal acoustics of a drum booth: some have bright‑sounding wooden floors and stone walls, while others have lots of carpet and absorbers everywhere to make them dryer than a dehydrated Bedouin in the Sahara! The best acoustic will obviously depend on the musical style to some extent, but I personally prefer something fairly dead as this allows more freedom of mic placement and therefore better control. It also allows various room simulations to be applied at a later stage, making it a lot easier to create suitable acoustics for a wide variety of music without having to relocate the kit or the mics.
If a drum booth is not available, the kit will have to be set up in the same room as everything else, and some level of acoustic screening will be required to reduce the inevitable spill of drums onto other instruments, and vice versa. Purpose‑designed screens could be used to construct a 'booth' around the kit, or the other instruments, but home‑made screens can be just as effective. Sheets of fibreboard (six by four feet is a good size) supported on wooden frames, and designed so that they can stand on either the long or short edges work surprisingly well. Rather than trying to box in the drums, use the screens to create 'sound shadows' by placing them directly behind the microphones which are suffering the worst spill problems — you will be surprised at how much they attenuate spill.
Mic Placement — Simple Is Good
The simplest technique for recording drums, and one which is still very much in fashion, is a basic three‑mic approach: a pair of overheads for the whole kit and a third microphone to add a little definition to the kick drum. Although simple, this works stunningly well and sounds very natural and clean — a breath of fresh air after the over‑processed, gated, compressed, and synthesized sounds we have all been exposed to over the last couple of decades!
This technique forms the basis of more elaborate arrangements too (I'll expand on this point later), and it is always worth remembering that the overheads generally provide the main stereo coverage of the whole drum kit. Any of the usual stereo techniques can be applied to the overhead array, but the most common is probably a pair of spaced mics. Capacitor or electret microphones are usually employed for their ability to capture fast transients, with a mic placed over either side of the kit, towards the outside edges above the cymbals, but positioned such that they can 'see' their half‑share of the cymbals and drums. Good bets are mics like AKG's C414, C3000 or C1000, Neumann U87, U89 or KM184, or Beyerdynamic MCE93 or 83.
Exact positioning depends on many factors, but try a few feet in front or behind the kit if separatiofrom other instruments allows, as this gives a better balance between drums and cymbals. Since drum kits are generally very loud things, it is a good idea to switch in the attenuators or pads on these overhead mics to prevent overloads and possible transient distortion. Dynamic mics can be used if necessary, but will tend to sound rather dull and lacking in 'air' by comparison, and will require extensive equalisation!
Most recording engineers select a cardioid or hypercardioid pattern but, unless there is good reason to suspect unwanted noise coming from directly overhead, I would favour figure‑of‑eight responses when available. When the mics are angled carefully, this pattern not only helps to reduce the spill from the left cymbals into the right mic (and vice versa), but also provides better rejection of other frontal spill.
When the drums are set up in a separate booth, the overheads can be mounted quite high and at a reasonable distance from the kit for a big, open sound — but take care not to capture too much roosound, as it cannot be removed later! If the kit is in the same room as everyone else, you will need to keep the overheads quite low and close. Sound follows an inverse square law, so halving the distance will quadruple the level of wanted sound and quarter the spill — more separation equals better control. If the overheads are too close, though, the cymbals will sound metallic and ring too much, and their balance against the drums will be poor.
An alternative approach, which I favour, is a coincident stereo pair over the centre of the drum kit. This gives a fabulously precise stereo image and, because it is not usually directly over any cymbals, can be used closer than spaced overheads without upsetting the balance. I have obtained particularly pleasing results from a Soundfield mic, but any coincident arrangement with capacitor mics will work well. If the drums are set up in a nice‑sounding room, a good result can often be achieved by simply using a couple of distant spaced mics — six to 12 feet away depending on the room. Pressure Zone mics taped to the side walls, ceiling or floor work very well too.
. 5. Snare (snare head). 6. Hi‑hat. 7. Toms. 8. Alternate toms (inside). 9. PZM for kick drum.") Possible mic drum placements: 1. Coincident pair overheads. 2. Spaced pair overheads. 3. Kick drum. 4. Snare (batter head). 5. Snare (snare head). 6. Hi‑hat. 7. Toms. 8. Alternate toms (inside). 9. PZM for kick drum.
Possible mic drum placements: 1. Coincident pair overheads. 2. Spaced pair overheads. 3. Kick drum. 4. Snare (batter head). 5. Snare (snare head). 6. Hi‑hat. 7. Toms. 8. Alternate toms (inside). 9. PZM for kick drum.
Possible mic drum placements:
1. Coincident pair overheads.
2. Spaced pair overheads.
3. Kick drum.
4. Snare (batter head).
5. Snare (snare head).
6. Hi‑hat.
7. Toms.
8. Alternate toms (inside).
9. PZM for kick drum.
The Kick Drum
, and a PZM on the cushion inside the drum (bottom).") Two approaches to miking the bass drum: a dedicated mic on a stand (top), and a PZM on the cushion inside the drum (bottom).It is hard to go wrong with a decent moving‑coil mic placed up close to or, better still, inside the kick drum. The classic AKG D12 is superb and its modern replacement, the D112 is equally good. The chunky Electrovoice RE20, the Sennheiser MD421, or the Beyerdynamic M88 are also popular but basically any robust, full‑bodied moving‑coil mic will be fine for the job — Shure SM57s and even 58s work well too! Bear in mind that placing a mic just a few inches away from a kick drum head (or a snare drum for that matter) subjects it to enormous sound pressure levels and huge transients, both of which take their toll on the microphone diaphragm. Consequently, it is a good idea to mark one or two mics specifically for this kind of use, or employ a dedicated model like the D112.
Two approaches to miking the bass drum: a dedicated mic on a stand (top), and a PZM on the cushion inside the drum (bottom).It is hard to go wrong with a decent moving‑coil mic placed up close to or, better still, inside the kick drum. The classic AKG D12 is superb and its modern replacement, the D112 is equally good. The chunky Electrovoice RE20, the Sennheiser MD421, or the Beyerdynamic M88 are also popular but basically any robust, full‑bodied moving‑coil mic will be fine for the job — Shure SM57s and even 58s work well too! Bear in mind that placing a mic just a few inches away from a kick drum head (or a snare drum for that matter) subjects it to enormous sound pressure levels and huge transients, both of which take their toll on the microphone diaphragm. Consequently, it is a good idea to mark one or two mics specifically for this kind of use, or employ a dedicated model like the D112.
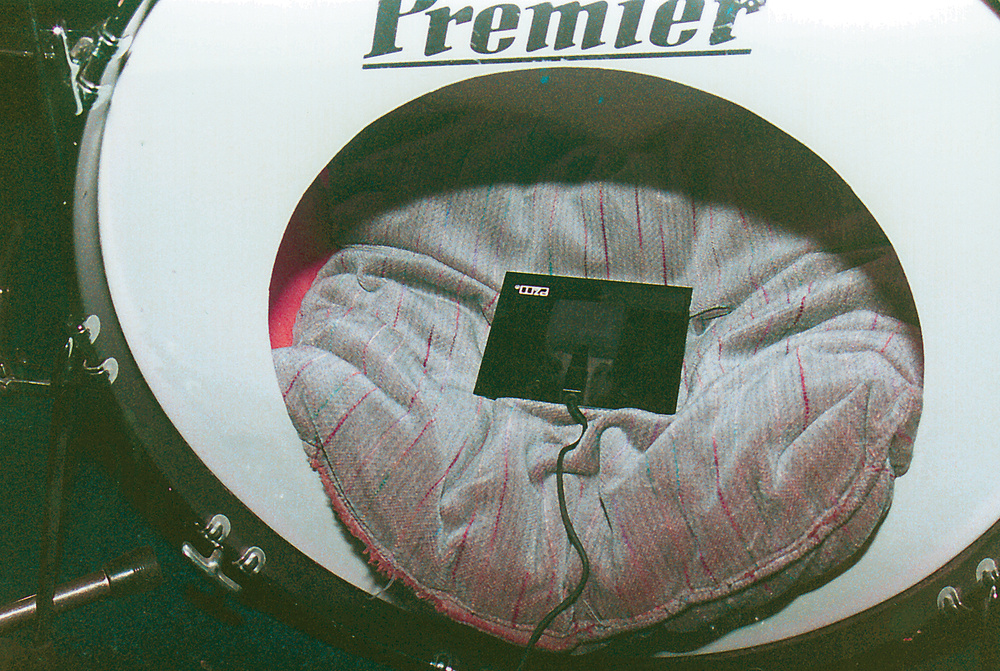 An alternative technique is to use a pressure‑zone mic like the AKG C547 or Crown PCC160 (both have cardioid responses) lying on a cushion inside the kick drum shell, or on the floor just in front of it. In my experience, the former tends to give a rather thin but clicky sound, whereas the latter gives a much fuller sound, albeit with quite a lot of spill from the rest of the kit.
There are two main options for positioning the mic: in front of the front head, or inside the drum in front of the beater head. If you have been following Gordon Reid's series on synthesis you will have seen that drum resonances are extremely complex and so it is impossible to specify a reliable 'best place' for the microphone — trial and error is involved here. However, here are some general principles and starting points:
- Avoid placing the mic in the exact centre of the front drum skin, as this tends to give a rather dead and lifeless sound, albeit with a lot of level.
- Moving the mic out towards an edge usually gives a better balance of resonance and transients.
- If the front skin has a hole in it then poke the mic into the hole to place it within a couple of inches of the back skin (but make sure neither the mic stand nor cable touch the drum skin).
- A position close to the beater captures that clicky, well‑defined sound which works well in the mix.
- Moving out towards the edge will progressively pick up more of the skin resonance, adding weight and body but with plenty of definition and attack.
- A placement near the extreme edge tends to sound boomy and poorly defined.
- If the drum has a cushion inside, this will tend to dampen the sound, and has most effect when it is touching the beater skin.
...you can remove everything above about 5kHz from the kick drum mic to reduce hi‑hat and cymbal spill. Boosting around 80Hz adds to the 'disco thud', and a lift near 2kHz adds to the click of the beater.
Close Miking
The overheads and kick drum mic will provide good coverage and a nice stereo image, but you may want more attack and definition from the snare and/or toms. Perhaps you want the flexibility to process individual drums in different ways through equalisation, compression, effects and so on. Gooseparation and isolation are the keys here, and the solution is to close‑mic individual drums. However, the disadvantage is that once you start down this road, you will need to add a lot of extra mics, desk channels, outboard equipment and (potentially) tape tracks, so be prepared for the workload to increase exponentially!
Taking the snare first, a directional mic is essential — usually a cardioid or hypercardioid (although a figure‑of‑eight can be useful). Since the mic is placed very close to the drum head the proximity effect will be strong, adding a lot of weight to the sound, so it is worth bearing this in mind when tuning the snare (and toms for that matter). a dynamic mic will tend to give a more full‑bodied sound than a capacitor one, because its inertia slows its response to fast transients. Condenser mics will have better attack and sound sharper.
The Shure SM57 and Beyerdynamic M201 are classic mics for the snare, but any robust dynamic mic will produce good results. The M201 has the advantage of a very tight cardioid pattern which aids separation. Suitable condenser mics would include Neumann KM184, Audio Technica AT4041, AKG C460/CK61, the C1000, the Blueline CK91, and the Sennheiser MKH40, but again, most end‑fire general‑purpose capacitor or electret mics will deliver. Whatever you are using, beware transient overloads either in the mic itself, or the mic preamplifiers in the desk, and use the mic's pre‑attenuator, if available.
Sound follows an inverse square law, so halving the distance will quadruple the level of wanted sound and quarter the spill — more separation equals better control.
 of the snare drum as well as the batter head can help to bring out the sound, but you'll need to reverse the phase of one of the mics.") Miking the snare head (underneath) of the snare drum as well as the batter head can help to bring out the sound, but you'll need to reverse the phase of one of the mics.
Miking the snare head (underneath) of the snare drum as well as the batter head can help to bring out the sound, but you'll need to reverse the phase of one of the mics.
The mic has to be placed towards the edge of the batter head, because it will get hit if it's put anywhere else! The main trap to avoid is positioning the snare mic where it receives air blasts ejected from between the hi‑hat cymbals. Adjusting the mic angle to favour the side or centre of the drum skin provides a range of tonal colours, but the more critical aspect of its positioning is to minimise unwanted hi‑hat or rack tom spill by aiming the polar pattern's null point appropriately.
If the drummer is competent, the snare drum will be a good deal louder than the hi‑hat, and the latter may be captured quite effectively through the side of the snare mic, relative positioning defining the initial balance between the two (EQ can be used to fine‑tune the balance). If a figure‑of‑eight mic is used between the snare and hi‑hat, its angle and position will also allow the relative balance of the two to be optimised, theoretically with better sound quality from the hats. If done well, this technique also provides a high degree of separation from the rack tom, thanks to the side nulls of the mic's polar pattern.
For some kinds of music it can also be very useful to add a second mic under the snare. This is usually a capacitor mic, which gives a lot of 'snap' to the wire sound. a combination of a capacitor mic under the snare and a moving‑coil mic above works very well, but it should be remembered that the mics will be acoustically out of phase with each other — see the box later for more details on how to resolve this.
Three Golden Rules For Close‑Miking
- Always position the mic stands so that one of the three legs lies directly under the boom arm to prevent toppling.
- Make sure the mic stands don't touch any of the drum or cymbal stands to avoid mechanical shocks to the mic.
- Don't put the microphones where the drummer might hit them — the mic will probably survive but your speakers might not!
Toms, Mics & Hats
The most common technique for the toms is to position mics over the top of each drum, near the edgand with the polar response nulls aimed up towards the cymbals to reject spill. Hypercardioid mics like the Beyerdynamic M201 work better than cardioids in this regard, as their nulls are placed more conveniently relative to the front axis of the mic.
By the time the mic rig includes a pair of overheads, snare, hi‑hat, kick and three or more tom mics, the drum kit will have disappeared behind a forest of chromed metal. If the space required for all these stands is a problem, or if you just don't have enough stands, a good solution is to use specialist mics like the Sennheiser 504s designed to clip directly onto the side of the relevant drums. These are very discrete, can be positioned accurately and repeatably, and sound pretty good to boot.
 It's often unnecessary to mic up the hi‑hat, as it inevitably bleeds onto other tracks. If you do need to, be careful to position the mic where it won't receive a blast of air every time the cymbals are shut!An alternative miking technique for toms which do not have a bottom skin is to place the mic inside the drum from below — just like miking the kick drum. The advantages include even better separation from the rest of the drum kit, much less cymbal spill and best of all, that the drummer can't hit the mic! However, this approach can also sound rather boxy, lacking in attack, but having greater resonance, so you may find yourself having to use a lot of EQ.
The only element of the kit not dealt with so far is the hi‑hat, which can usually be handled effectively by careful placement of the snare mic. However, if you need to put a separate mic on it, a capacitor or electret mic is generally best. Positionthe mic above the top cymbal on the side away from the snare drum and looking straight down. Never put the mic at the side, pointing between the cymbals, as this is where the air is expelled each time the hats close, and all you will end up with is a strange popping noise! Angling the mic to favour the cymbal's outer edge gives a spitty, hissy sound, whereas pointing it towards the bell gives more of a metallic ring. Don't forget to think about the rejection null in the mic's polar pattern and how to use it to maximise separation against the snare and/or overhead cymbals.
Building The Stereo Image
The kick drum is usually panned dead centre — a convention set back in the days of vinyl records (a loud kick drum panned hard left or right could cause the stylus to jump out of the groove). However, now we have CDs, Minidiscs and cassettes, there is no technical reason why loud or low‑frequency signals should remain in the centre and if there is a good reason to locate the kit towards one side of the stereo image (perhaps there are two drum kits for example, one left and another right), then feel free to pan the kick drum(s) accordingly.
Match the panning of close mics to the image created by the overheads. If you don't, the close‑miked sounds will create conflicting images and the result will be an indistinct mess! To set the panning, listen carefully to the stereo image from the overheads and locate a relevant drum. Then fade up the appropriate close mic and, as it gets louder, hear how the position of the drum starts to wander. Adjust the pan control accordingly, fade down the close mic and start again. After two or three iterations you should find that as the drum is faded up it seems to come closer without wandering across the sound stage. Repeat this with each close mic in turn.
EQ, Reverb And Dynamics
My general rule of thumb that if you need to employ a lot of equalisation, you have used the wrong mics, or put them in the wrong place, does not hold true with drums because of the inherent compromises involved. For example, using directional mics very close to the drum skins will inevitably introduce a lot of proximity effect. Therefore snare mics usually need some bottom‑end rolloff to restore clarity and snap — better to remove bass than boost mid‑range as the problem is excessive proximity effect, not a dull mid‑range! Remember that mics like the SM57 and 58 have diminished LF responses anyway to compensate for close vocal working, and their presence boost at around 5kHz helps the snare to cut through in the mix.
When overhead mics are intended strictly for cymbal coverage rather than the main stereo image, the low end (below about 700Hz) can be filtered off to reduce spill (the same applies to the hi‑hat). At the opposite end of the spectrum, you can remove everything above about 5kHz from the kick drum mic to reduce hi‑hat and cymbal spill. Boosting around 80Hz adds to the 'disco thud', and a lift near 2kHz adds to the click of the beater.
In general, a short, bright reverb pattern works well for drums — short plate or small room programs are usually a good starting point — but don't apply the reverb in isolation. Always wait until the whole mix is up before making any decisions, and don't go overboard: remember you are trying to create the illusion of the drums being in a real room, and using different programs for the snare, kick and overheads (should you be lucky enough to have sufficient equipment) just confuses and muddles the overall sound! a handy rule of thumb is to bring up the reverb until it is obvious and then back it off by 5dB or so.
A little compression or limiting on the snare and kick drum can help to keep the level consistent, but don't overdo it, as every time the compressor releases, the spill increases! Try a compressor at 3:1 or 5:1, with modest gain reduction of about 8dB. Slower attacks allow transients through for a punchier sound, and a fast release enhances the perceived loudness. There is no simple black and white answer though, and slowing the release time to match the decay of the relevant drum often gives a fuller, more resonant sound.
Gates help to reduce spill, but also tend to miss the initial transient. Reducing the gate range to about 15dB helps to minimise damage to transients whilst still providing a useful improvement in spill, and matching the release to the drum decay avoids an overly processed sound. Always gate before compression if you have to use both.
Balancing The Rig
When you have a forest of microphones around the kit, balancing them all takes a bit of work! The first thing to do is listen to each close mic and adjust any dynamics processors (gating or compression) for the desired effect. I would also apply any corrective EQ at this stage to minimise spill where possible. Next, set the panning to match the perspectives created by the overheads as described in the box on page 143. The phasing of each close mic must then be checked against the overheads by bringing each mic up, one at a time, and switching its polarity to find the position which provides the best sound.
A rough balance can then be built up, and there are two common approaches. I like to start off with the overheads and then add the other mics to fill in the sound as necessary, adding just enough of each to provide the required definition and weight. Starting with the kick, I would then add the snare, hi‑hat, and finally the toms — and I usually run through the mic phasing once more with all the mics faded up. The alternative technique is to build up a core sound from the close mics first before adding the overheads for more definition in the cymbals. I am not keen on this approach, as I find it often produces a muddled stereo image — the panning of the close mics can 'fight' with the inherent image generated by the overhead pair.
The next stage is to apply whatever creative equalisation is necessary, but this must be done with the whole mix faded up rather than on individual tracks, as it is all about making individual instruments sound right in the context of everything else. The key to good EQ is to remain critical, adding or subtracting only what is necessary — analyse what is wrong and fix it before moving on to the next problem. Remember the ear is easily fooled and thinks louder and brighter is better, so always compare the equalised sound with the original, compensating for any level differences, and listen carefully to see if you have really improved the sound, changed the mix balance with the EQ knobs, or just made a particular instrument louder and brighter!
If the desk has post‑EQ channel insert points, it may be necessary to readjust the thresholds of any dynamics processors after setting the EQ. a way around this problem, which works during mixdown and when recording with outboard mic preamps, is to patch the dynamics between tape returns (or mic pre's) and the desk itself. Once set, the dynamics will remain completely unaffected by any changes to equalisation.