 When you solo a track in SIP mode, all tracks other than the soloed ones show a dark orange mute button, indicating that they’ve been temporarily silenced.
Is it time you ventured beyond the default solo modes?
It’s easy to take the humble solo button for granted. After all, it is fundamentally a simple thing. ‘Press here to hear just this track’ — how much more to it can there be?
Anyone who has used Pro Tools will know that the solo features can be frustrating in use. The most common reason for this frustration is pressing solo causing unintended muting of other tracks. It doesn’t have to be this way, and if you understand why it’s happening, the most common causes of soloing issues can be avoided. What’s more, some really useful features are available if you look more deeply into the solo options.
The default behaviour of the solo buttons in Pro Tools is Solo In Place (SIP). This mode mutes the output of all tracks which aren’t in solo; it’s the exact opposite of mute. You can see this behaviour in the Pro Tools UI: when you solo a track in SIP mode, the other tracks’ mute buttons turn dark orange, indicating an ‘implied mute’. This mute is implied because it isn’t explicitly invoked by clicking the mute buttons, rather it is a consequence of soloing another track.
Say you have a vocal which uses a post‑fade send to feed a reverb... If you solo that vocal track, you’ll hear the vocal dry with no reverb, because soloing the vocal track has caused an implied mute on the reverb return.
Point Of No Return
This SIP/implied mute logic is simple but sometimes counterproductive. Two examples illustrate these shortcomings. The first is losing the contribution of effects returns. For example, say you have a vocal which uses a post‑fade send to feed a reverb on an aux input in the conventional send‑return fashion. If you solo that vocal track, you’ll hear the vocal dry with no reverb, because soloing the vocal track has caused an implied mute on the reverb return.
The solution to this is to ‘solo safe’ the reverb return by Cmd‑clicking (Ctrl‑click on a PC) the solo button on the reverb return, causing the ‘safe’ channels to be excluded from this implied mute behaviour.
The second example is a submix of related tracks, for example drums, which are routed via a bus through an aux input. If you solo the aux input to hear the submix of drums you hear nothing, because the individual tracks feeding the aux are muted by the SIP solo on the drums aux. You can solo safe the aux so that you can use the individual solo buttons on the source tracks, or you can solo safe the source tracks so you can use the solo button on the aux. Both work but neither is ideal. This situation becomes increasingly hard to manage if you have complex, nested routing in your session.
It is for this reason that the introduction of folder tracks in Pro Tools 2020.3 included an update of the solo logic. Unlike aux inputs, Routing Folders (and Basic Folders) don’t mute their member tracks when soloed, bringing simplicity to this situation.
Unexpected behaviour can be a result of Group attributes, so keep in mind that both solo and mute can be controlled by a Group and be aware that there is a second mute button on instrument tracks. This is an often overlooked MIDI mute in the Instrument section of the track header/mixer channel strip. Because this isn’t shown by default it might be the reason you’re not hearing everything you expect to when using virtual instruments.
On the subject of muting, while there isn’t a ‘solo clip’ function like the Solo Tool in Logic, there is a Mute clip command and this is really useful. Rather than deleting content from the timeline, I’ll usually separate it to a clip using Cmd+E (or just B in Command Focus), and mute it using Cmd+M (Ctrl+M on PC). By doing this you are making it clear to yourself, and anyone else who might use the session, that there is audio available at that point, something which wouldn’t be apparent if you were to delete it.
On Cue
The unintended consequences which sometimes come with hitting solo aren’t the only reason to look more closely at the various options presented by Pro Tools when it comes to soloing, though. Consider for a moment the example of tracking an artist in Pro Tools. You are listening to the control room mix over your monitors, they are listening to a dedicated monitor mix set up using pre‑fade sends feeding a headphone amp via a separate pair of outputs. If you hit solo, does the artist hear the solo too?
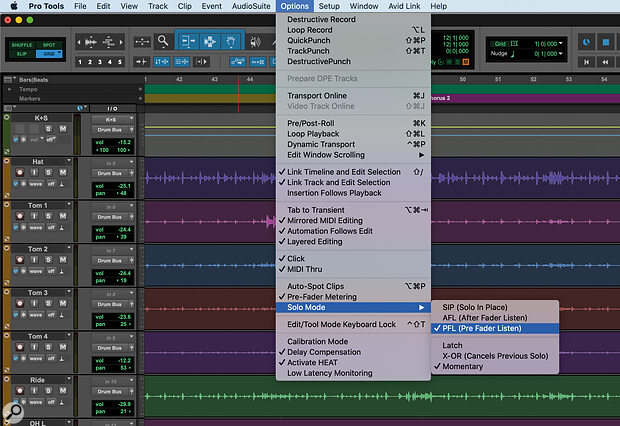
 The three solo modes are available from Pro Tools’ Options menu.
The answer in that case is that they don’t, as you would hope, but to consider why that is, it helps understand the point of the two other solo modes besides SIP available in Pro Tools: AFL and PFL. (All the solo options can be found under the Options menu.)
The reason that the artist in the example above doesn’t have their mix interrupted by the engineer’s solo is because they are listening via a separate output. Or, to put in another way, the reason that the main mix is interrupted is because the solo is sharing an output with the main mix, hence the need for an implied mute across the other tracks in SIP, which combines soloing duties with mix playback via the same route.
Although AFL and PFL modes listen in to the signal from different points in the signal chain (AFL and PFL stand for After Fade Listen and Pre Fade Listen), the biggest reason they are useful is that they route the solo to an alternative output, obviating the need for any implied mutes. To set the output path for AFL/PFL solo, go to the Output tab of the I/O Setup and you’ll find it at the bottom right. If your interface allows, assign your interface’s headphone outputs to the output you selected for the AFL/PFL output and you’ll have a really useful alternative to the default SIP solo system.
When you solo a track in AFL or PFL mode, the track(s) that are in solo play via the AFL/PFL path as well as via the main mix, which continues uninterrupted. If that AFL/PFL path is to some headphones, the engineer can solo elements freely without interrupting the mix playing in the control room, which is useful when playing a mix back to clients. This method is sometimes referred to as ‘broadcast mode’, as it would be disastrous to interrupt a broadcast feed with solos!
Even if you are working alone and interrupting the control room mix isn’t an issue, there are some advantages to using the AFL or PFL solo modes. For example, if you have ever tried to solo an effects return using SIP you’ll know that you might end up having to set your sends to pre‑fade and muting the dry channels to hear the effect 100 percent wet. Not really practical. You can get around this issue elegantly by using AFL or PFL monitoring, as the issues with implied mutes silencing the audio feeding the effect disappear: the sends continue to send their audio, you just monitor the effects from somewhere else.
The difference between AFL and PFL concerns where the signal is tapped from the channel strip. Both AFL and PFL are post‑insert, but AFL is also post‑pan and post‑fader. Which you choose depends on what suits you, but PFL auditions at the level of the clip, which can be loud if you are dealing with normalised audio. If you Cmd‑click on a solo button in AFL or PFL, instead of putting that track in solo safe (solo safe isn’t available in these modes as it’s redundant) it brings up a small fader which controls a global trim setting with different trims available for AFL and PFL.
 The I/O Setup window lets you define which physical output your AFL/PFL soloed channels are sent to.
Button Up
The default behaviour of the buttons ‘latching’ meaning that buttons stay down. The second option is X‑OR, which cancels the previous solo when a new solo is pressed, like the ratio buttons on an 1176! Adding Shift allows you to add further solos in X‑OR without cancelling the previous ones, and I find I use X‑OR most of the time. The third option is Momentary (a Pro Tools Ultimate‑only option), which does what the name suggests. This mode comes into its own when used with a control surface. Additional solos can be added and removed as long as at least one solo is held down and all are cancelled when none are held. I like this because it encourages you to mix in context. We all understand that mixing in solo is a bad idea, don’t we?
The last solo‑related post I’ll mention is the use of Shift+S, which toggles the solo state of any track which has an Edit selection, or the insert point in it. If Track and Edit selections are linked, selected tracks are toggled. What this means is that if you select two tracks and have one in solo and one not, Shift+S will reverse their solo state. You can extend this with additional tracks so combinations of tracks can be toggled, which is really useful for A/B comparisons.


