 The new ‘quantise cluster’ of controls lets you perform most routine quantising jobs directly within the Edit window.
Pro Tools offers some powerful features for quantising both MIDI and audio.
Whether your projects are mostly MIDI or audio‑based, whether you play your parts in in real time, draw in your MIDI with a mouse, or program your beats by dropping samples on the timeline, at some point you’ll want to quantise them. Here’s what you need to know to get things in time in Pro Tools.
‘Quantise’ means to restrict to a limited set of values. We do this when rounding decimal numbers to integers, for example: numbers between 1, 2, 3 and so on are nudged up or down to the closest ‘allowed’ value. This is most commonly applied to music with regard to pitch and to timing. When applied to timing, quantisation forces notes to precise note time values. But there’s more to quantising than 100 percent ‘on the grid’ music. In fact, a lot of quantising involves putting human feel back into the music.
Pro Tools’ quantise features allow much more than moving note starts onto a regular and potentially robotic‑sounding grid.
If, for example, you are a producer who draws in MIDI and drops samples with your DAW’s snap‑to‑grid function enabled (in Pro Tools that would be working in Grid Mode), you might wonder why you would need to quantise at all. After all, your music is already snapped to the grid and ‘in time’. The answer lies in the difference between ‘on grid’ and ‘in time’. I remember hearing a story of a producer explaining to someone that if the snare is late once, that’s out of time. If it’s late by the same amount on every hit, that’s groove.
Pro Tools’ quantise features allow much more than moving note starts onto a regular and potentially robotic‑sounding grid. They make possible the introduction of swing and shuffle; quantising can be used selectively, for example to only move notes falling on downbeats onto the grid; it can just nudge notes closer to the ‘right’ location by a certain amount. Power users can even take the off‑grid ‘feel’ of an audio recording and impose that onto MIDI and audio.
There are a few ways to quantise in Pro Tools. Here’s how to get the results you want with the minimum of fuss.
The Quantise Cluster
Introduced in Pro Tools 2022.9 is a new cluster of quantise controls with which you can select clips or MIDI notes, and quantise them by clicking the big Q button. Simple. This cluster is available in the Edit window, and also in the MIDI editors. It allows easy access to the most commonly called‑upon quantise features. Here you can change the quantise grid resolution, and a great tip is to use the Follow Bars|Beats Grid setting at the top. When displayed on the timeline, the grid lines are a useful visual guide; if you can’t see them click on the word Grid (above Nudge) in the toolbar and the lines will be displayed. Using the Follow setting you can change both your grid setting and your quantise value using a keystroke. On a Mac it is Ctrl+Opt and the plus/minus keys on the numeric keypad.
From the quantise cluster you can dial in Swing, which shifts every other beat or sub‑beat a little later, and the often‑overlooked Strength parameter, which moves selected events closer to, rather than fully onto, the quantised value. These controls address 90 percent of my quantise needs, particularly when I’m using quantise selectively. You don’t have to apply it to all the events in a performance, and often shouldn’t anyway. If you need more control, clicking on the gear icon will take you to the Event Operations window (which is where you’d access quantise functions in earlier versions of Pro Tools).
Event Horizon
 For more detailed control over your quantising, the Event Operations window is the place to go.The Event Operations window can also be accessed from the Event menu, or by using the shortcut Opt+0. Although there are nine pages to this window, it opens on Quantize, which offers all of the features of the quantise cluster with the addition of, amongst other things, a useful Randomize option for ‘de‑quantising’, and a selection of options including ‘Exclude within’ and ‘Include within’ parameters, which can be used to target your quantising only at notes which are either close to, or far away from, the grid. Used with care, these can tidy up a performance without killing the feel.
If you want to check out the other eight pages, rather than clicking the drop‑down menu, use Cmd+up/down to navigate from the keyboard. One to pay particular attention to is Input Quantize, which does exactly as the name suggests. This is a good area in which to try the various options rather than defaulting to a hard quantise. For example, rather than quantising to a 16th‑note grid, try a quarter‑note grid with ‘Include within’ at 20 percent; that way only the downbeats will be quantised, allowing looseness on the notes in between.
MIDI Real Time Properties
There is an alternative to ‘baked in’ quantising. MIDI Real Time Operations are applied on playback. The difference is a little like the difference between printing effects using AudioSuite and applying them on playback using plug‑ins, and to extend the simile, Input Quantize would be recording through hardware effects. The Real Time MIDI Properties menu offers basic quantise with the option of swing; the tools for finessing the quantisation found in the Event Operations window are absent, but something worth investigating here is the use of Groove templates, which are custom grids that can be used to inject a little more human feel. These are also available in the Event Operations window, but their use in a real‑time environment can be more immediate and more fun. Check the MIDI Preference ‘Display Events As Modified by Real Time MIDI Properties’ box if you want to see as well as hear the results. If you want to dive deep on this subject, check out the process for extracting Grooves from existing performances using Beat Detective.
 MIDI Real Time Operations are applied to your MIDI data upon playback, and leave your original note positions unchanged.
Quantising Audio
So far we’ve only discussed quantising MIDI, but audio can be quantised using Elastic Audio — and with the introduction of ARA 2 integration, Melodyne can now be used to quantise the timing of audio as well as in its better‑known role as a pitch‑correction tool.
Elastic Audio is possibly best known as a way to conform loops to the tempo of a session. This kind of time‑stretch algorithm was groundbreaking as a tempo‑manipulation tool in early incarnations of Ableton Live, but it is useful for quantising too. Once enabled in the track header, and after the necessary analysis has completed, you can quantise in a very similar way to using quantise with MIDI. Elastic Audio is file‑based, so even if you’re only using a small segment of a long audio file in your clip, it will analyse the whole file. When complete, you can use Elastic Audio to fix individual timing errors by selecting Warp in the track header and grabbing Warp Markers with the Grab tool, but make sure you double‑click the neighbouring Warp Markers to fix their positions or you’ll end up moving everything!
If you want to experiment with quantise operations across entire clips, you can treat Elastic Audio much like MIDI, using the same tools. Get a tambourine or shaker loop, hard quantise it using the Q button in the Quantize cluster and you’ll have a ‘straight’ loop. Dial in some swing from the Quantize cluster and hear the effect. Dial in some Randomize from the Event Operations window (because no shaker is completely in time), pull the downbeats back into time using the quarter‑note quantise trick detailed above, and you’ll have just the right amount of groove.
Quantising With Melodyne
This used to be the extent of your quantise options, but if you are on Pro Tools 2022.9 or higher you might check out Melodyne as a quantise tool. If you have Melodyne Essential, you’re limited to monophonic pitch manipulation; the semi‑magical DNA polyphonic workflow options of the higher tier products isn’t available. But something which is overlooked by some is that Melodyne offers an alternative, and many think superior, method for timing manipulation and correction.
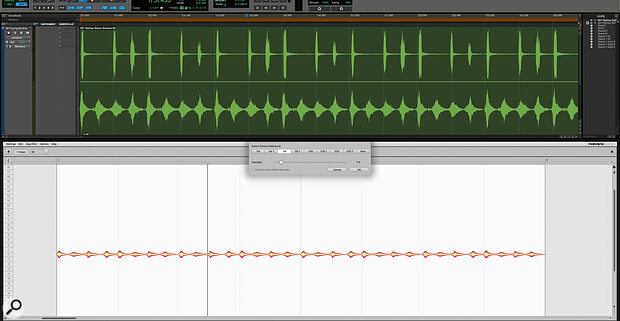
 Melodyne offers a powerful alternative to Elastic Audio for quantising your audio recordings.
The choice between Elastic Audio and Melodyne is made on a per‑track basis, so both can’t be used at the same time on the same track. If you try to switch from Elastic Audio to Melodyne you’ll be prompted that you’ll need to either commit or abandon your ‘live’ Elastic Audio processing. But if you’ve never checked it out, open up a drum loop or similar and see what can be achieved with the Quantize Time Macro. It’s simple but very effective, and sounds great. If you’re finding you can’t manually adjust the length of notes using the Main tool, try clicking the note icon in the top right of the Melodyne Editor to enter the Melodyne equivalent for Slip Mode, or adjust the Time Grid Settings to a suitable value.
There’s much more to quantising in Pro Tools than conforming MIDI and audio to a regular grid, and using whichever combination of one‑click quantise from the new Quantize cluster, the extensive features found in the Event Operations window, the Real Time MIDI Properties and whichever combination of Elastic Audio and Melodyne best suits your purpose, you’ll find there’s not much you can’t do. And for those things, there’s always Beat Detective...


