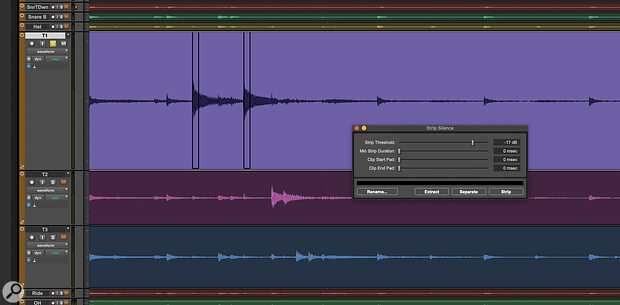
 Strip Silence in action. With the Pads set to 0, the clips are cut off as soon as the signal drops below the threshold.
The Strip Silence function can speed up your mix preparation.
The most useful tools are the ones that save you time. I’m sure we’d all agree with that. More specifically, what we all want is tools that save us time by speeding up the tedious stuff, allowing us to focus on the creative elements of a project. And with the current focus on AI and machine learning, it’s easy to forget that there are some venerable tools in Pro Tools that can radically speed up session preparation, allowing us to get to the fun bit more quickly. One such tool is Strip Silence.
Strip Silence has been around forever; it’s a semi‑automatic way of dividing audio clips into smaller ones based on the amplitude of the audio within those clips. It’s most commonly used to clean up audio on import, removing background noise in a way similar to a noise gate. It achieves similar results, but non‑destructively and with complete control.
In pre‑DAW days, considerable effort went in to rooting out the cumulative noise from tape, outboard and instruments. Noise gates were de rigeur, but although they were effective, they could be unforgiving, particularly when printed to tape. So it’s little surprise that the ability to manually edit out unwanted noise in a non‑destructive way was greeted with open arms by engineers. Manually editing around the odd tom hit is a few moments’ work, but if you’re dealing with more than a handful of hits, Strip Silence becomes invaluable. It’s one of those examples of a tool which is just clever enough to be helpful without taking away control.
Manually editing around a few tom hits is a few moments’ work, but if you’re dealing with more than a handful of hits Strip Silence becomes invaluable.
Using Strip Silence
Strip Silence can isolate all your clips in one operation. Open Strip Silence from the Edit menu, or using Command+U (Control+U on a PC). It’s a simple window and the principal control is the Threshold slider, with other controls available to fine‑tune the results. In the example of toms in a drum part, the procedure would be as follows: display the entire section of audio you wish to edit. To make sure that you’re not getting any false triggers, make sure you can see the whole song (I use Option+A to zoom out horizontally to show the entire session, or if I need a particular section zoomed in, I’ll use Option+F to zoom horizontally to fill the screen with my selection).
With Strip Silence open, raise the Threshold control: black rectangles offer a preview of the clip boundaries that would be created by a Strip operation at that threshold. By adjusting this control, it is possible to quickly lasso the audio you need. Still images don’t quite convey just how intuitive this is in use!
Is That All?
I think of Strip Silence as being halfway between manually editing to remove unwanted noise between sections of wanted audio, and the automated processing of a noise gate. This is its real strength, as it allows the user to automate the process but still have full control when needed: no more endless tweaking of side‑chain filters or automating the threshold to chase down false triggers.
However there is more to Strip Silence. The other three sliders give useful control over the placement of clip boundaries. Minimum Strip Duration does exactly what the names suggests, preventing the unwanted creation of multiple short clips. For example, a flam on a tom‑tom might otherwise be detected as two separate clips, and with deep bass, it is possible for clips to be created at the peaks of the waveform in the same way that ‘chattering’ can happen with a gate.
Clip Start Pad and Clip End Pad can be used to extend the head or tail of automatically created clips. Clip Start Pad can be used to include breaths in vocals, string squeak and pick noise on guitars, or the slow attack of pads. Clip End Pad can similarly be used to extend clips to include natural decay and reverb. These controls can also be used to reduce the amount of manual tweaking necessary when working with awkward audio.
 Using the Pad controls, you can precisely extend the clip boundaries.
While clean audio is easy to separate using just the Threshold parameter, these additional sliders bring the control necessary to get the results you want in more difficult cases where there are obtrusive levels of noise or bleed. On material such as drums, these controls mean you don’t have to use the Threshold to determine the size of the clips that are created. Instead, you can choose a much higher Threshold setting to detect just the peaks of the wanted hits, and the Pad controls to extend the clip boundaries. This is useful because loud spill can be excluded through use of a higher Threshold, and the Pad controls can the then be used to ‘grow’ the resulting narrow clips.
Creating Fades
Strip Silence does, of course, produce complete silence between the clips it creates, and the transition to and from this silence can be distracting if it is exposed in a mix. It is usually desirable to create short fades at the beginning and end of clips, and this is made considerably easier by the Pro Tools Batch Fades command. Select all of the created clips (if they are the entire contents of a track, a triple‑click with the selector tool will do this). Next, open the Batch Fades window from the Edit menu, or hit Command+F/Control+F. This window can look intimidating, but most of the controls affect crossfades, which aren’t being created in this case, and what to do with existing fades. In this case the only control that might need adjusting is Fade Length.
 Use the Batch Fades tool to soften the transitions to and from silence after you’ve used the Strip Silence tool.
Vocals
Strip Silence isn’t only useful as an alternative to a gate when tidying up drums. Vocals present a different set of priorities, and frequently benefit from judicious use of Strip Silence. The softer attack and inherent variability of vocals make Strip Silence’s various options invaluable, and allow you to achieve results that would be impossible using a gate and laborious automation. Removing breaths and bleed from between phrases is particularly important when heavy compression is in use, as it often is with vocals. Vocals that are tracked as overdubs or in a good vocal booth should be very clean, but in cases where bleed is significant, the coming and going of spill from other instruments can limit what is possible. A useful trick is to use one of the other modes of the three available in Strip Silence.
Strip is the most commonly used function, removing the material in the gaps between hits and phrases. Separate divides the material at the clip boundaries but doesn’t remove any material, while the last option, Extract, can be useful if you need to keep the quiet material but apply different processing to the wanted audio. Duplicate the track, dial in the required parameters and hit Strip; then select the duplicate track and, using the same parameters in Strip Silence to get the same clip boundaries, hit Extract. You’ll end up with the bleed‑only sections on a separate track from the vocals, allowing you freedom to process the vocals a little harder than you otherwise might, while reintroducing some of the bleed to make the results more natural. If necessary, appropriate fades can be applied on both tracks to crossfade smoothly between them.
Group Think
When you use Strip Silence your timeline can start to look rather fragmented. If you want to ensure the relative positions of all of your clips are preserved, don’t overlook Clip Groups. By selecting a collection of clips using the selector tool and hitting Command+Option+G (Control+Alt+G on PC) you create a Clip Group, which can be ungrouped at any time using the same modifiers but using ‘U’ instead of ‘G’. Clip Groups can occupy more than one track and can even be nested (ie. Clip Group within Clip Group), so if your timeline is looking too busy, take advantage of these useful containers to keep things organised.
Lastly, if session organisation is important to you, the Rename button offers the ability to automatically rename your clips, with options to add a suffix and clip numbering. Be aware that if your Clips List is set up not to display auto‑created clips, you won’t be able to use this feature until that is enabled.
Strip Silence is simple, effective and surprisingly powerful, but most of all it’s a tool that helps with a task all of us face during our productions. As such, it’s definitely worth getting to know.
Peaky Finders
The Strip Silence Threshold control can be useful for analysis. If you need to identify the loudest peak value in a piece of audio you can use the Gain AudioSuite plug‑in to give an offline measurement — but this won’t show you where in the track the peak occurs. To find the highest peak in a clip, open the Strip Silence window, view the entire clip, and raise the Threshold slider. The last clip you see disappear is the loudest peak in that clip.


