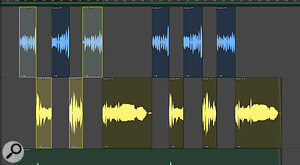
 The Grab tool comes in three variants: the Object Grabber, the Time Grabber and the Separation Grabber.
The Smart Tool might be smarter than you knew!
When I started using Pro Tools in the late ’90s there were a couple of features I was drawn to. For someone used to an analogue console, the Pro Tools mixer felt very familiar: a lot more so than the Cubase or Logic mixers of the time. Another was the fact that you could drive Pro Tools from just two windows — a big bonus at a time when typical monitors were CRT and maybe 800 x 600 pixels. Those points don’t count for much in 2022. Lots of DAW mixers are very analogue in feel, notably Reason’s SSL‑style console, and given the lack of proper 4K support for PC users using Pro Tools, the monitor issue today is that, for many users, screens are too big not too small! One area which it took me longer to appreciate, however, is the power of editing in Pro Tools.
Editing in Pro Tools is a massive subject, of course, too big to cover here in its entirety. However, once the initial confusion over questions such as “Where are the scissors?” (there aren’t any) and “Where is the sample editor?” (again, there isn’t one) has subsided, many users quickly settle into editing using the Smart Tool and stay there. The Smart Tool is a hugely powerful invention, and I certainly consider it one of Pro Tools’ crown jewels. The bar across the top of the ‘big three’ edit tools — Trim, Selector and Grab — rolls them all into one super‑useful tool which will meet your needs 90 percent of the time. It’s simplicity itself to use: position it over the top half of a clip and it acts as a Selector tool. Over the bottom half of the clip it becomes a Grab tool. At either end it’s a Trim tool, and in the top corners or where two clips meet, it handles fades or crossfades.
The Smart Tool is a hugely powerful invention, and I certainly consider it one of Pro Tools’ crown jewels.
Tool’s Gold
So useful is the Smart Tool that some users rarely switch it off. There are some really good reasons for doing so, though. In MIDI workflows, for example, the Smart Tool is OK, but you’ll probably get further faster using the Pencil tool. Depending on exactly what you do, you might find the Scrub tool useful (there’s an example of this later in this article), and for zooming duties I’m very much of the opinion that there are more efficient ways to zoom than using the Zoom tool. However, one thing which gets overlooked is that the Smart Tool itself isn’t always the same. In fact, the Smart Tool can potentially bring together 12 different combinations of other tools.
There is only one Selector tool, but there are four Trim tools and three Grab tools. By default, you’re probably combining the Selector tool with the Standard Trimmer and the Time Grabber. This combination of tools gives you the familiar and most intuitive combination. The Selector makes Edit selections, probably while linked to the timeline selection so you get the familiar ‘what you click is what you play’ behaviour. The Time Grabber selects the entire clip, and if you click and drag, it moves it. The Trim tools adjust the beginning and end points of the clip (of course, the Trim tool does far more than this, but we’ll leave that aside for this article).
There are tools and techniques for even the most basic operations that can help you work faster and more efficiently in Pro Tools.
Gift Of The Grab
 As the name suggests, the Separation Grabber automatically divides clips at edit selections.
 The two other alternative Grab tools are, in my experience, rather overlooked, but they both usefully extend the basic functionality of the Time Grab tool. The first of these is the Separation Grabber. Denoted by a hand with a little pair of scissors, this Grab tool automatically separates an edit selection when it is grabbed. If you wanted to remove a section of a clip and move it somewhere else you might select it, cut and paste it. There’s nothing wrong with this, but it is much faster to select it with the Smart Tool by clicking and dragging in the top half of the clip, separating the edit selection by hitting B, then grabbing it from the bottom half and dragging it to its new location. For a handful of quick edits this is very efficient, but if you were doing this many times over and over, you would definitely benefit from using the Separation Grabber, as this eliminates the second step: you simply grab the selected part and separation is automatic. I find this very useful when editing and organising raw files for the creation of multisamples. Separate at Transient and Strip Silence can be very useful for this, but if you need to do it manually the Separation Grabber can really speed things up, as can the Scrub tool, which proves its worth when visually checking waveforms isn’t really enough. The Scrub tool is useful for more than just amusing attempts at vinyl scratching!
The other variation of the Grab tool which can be combined into your Smart Tool is the Object Grabber. This does everything the Grab tool does, but can make selections the Time Grabber cannot. Say you’re using the Time Grabber, and selecting an entire clip with the first click. Shift‑clicking on to another clip selects everything between the first and second clips. The selection is contiguous. To make a non‑contiguous selection, for example the first and third of a group of clips, but not the second, you’ll need the Object Grabber. This enables you to do something in a single operation which would otherwise take several operations to achieve. For example, in order to obtain the same result with the Time Grabber, you might have to move a larger, contiguous group of clips and then delete the ones you don’t need afterwards. That’s fine, but the Object Grabber is faster!
Clip Groups
If you want to protect the arrangement of these clips relative to each other, it is a great idea to create a Clip Group. To do this, just select them and hit Command+Opt+G (Ctrl+Alt+G on Windows); they can be ungrouped at any time by hitting Command+Opt+U (Ctrl+Alt+U on Windows). If you’re not already using them, you really should get into Clip Groups. They can be nested (Clip Group within Clip Group), they can group clips across non‑contiguous tracks, and they can be created on blank space on audio and MIDI tracks on the timeline. But be aware that they can’t be used to group non‑contiguous selections made with the Object Grabber.
 Having moved and arranged your clips, the best way to maintain their relative positions is by putting them into a Clip Group.
A Clip Group is just a container for clips, and as well as offering the security of knowing that the clips within a group can’t inadvertently be rearranged, they also provide an excellent way to reduce clutter on the timeline. Additionally, Clip Groups can be exported from and imported into sessions, too.
Another way of ‘containing’ clips in Pro Tools is to use Basic Folders. These are another excellent way to reduce clutter, and like their relatives the Routing Folders, they can also be used as a way to move group of clips whilst keeping their relative positions intact. Each Folder track displays an overview of its contents on the timeline, and it is possible to edit the contents from this overview. Only basic edit operations are supported, but if you need to quickly try spinning in the background vocals from the last chorus back to the first chorus, copying and pasting from the Folder track overview will get the job done very neatly. This lets you make edits across multiple tracks in larger sessions without having to display large numbers of tracks.
 It’s possible to edit the contents of a Folder track from within its overview.
As if to prove a point, we started by looking at alternatives to copying and pasting, and we’ve ended up back at copying and pasting, but this time from the overview of Folder tracks. You can cut, copy and paste in a Folder track overview, and making edits by separating works too, the newly created clips being visible in the overview. However, Grabbing and Trimming from the Folder track overview doesn’t work; you have to do this using the clips themselves.
Ultimately, it doesn’t matter how you get there as long as you get there, but knowing that alternatives exist is a good thing. Depending on what you are doing and how many times you are going to have to do the same thing, there are tools and techniques in Pro Tools for even the most basic operations that can help you work faster and more efficiently. Keep the Object Grabber in mind for the next time you need to select multiple clips, and if you’ve never used it, make sure to check out the Separation Grabber!


