More than just a live-sound mix controller, PreSonus’s StudioLive CS18AI offers hands-on control over Studio One.
One of Studio One’s primary calling cards is its speed and efficiency. Until recently, however, it lacked a physical control surface that worked more intimately with the program than was allowed by the HUI protocol. The StudioLive CS18AI control surface was PreSonus’s answer to that need, and part of the company’s move towards horizontal integration across their product lines.
The CS18AI was created to serve two masters, or, rather, to be the master of two workers: the company’s RM-series rackmount mixing engines, and Studio One. While CS18AI pairs nicely with the RM mixers, it has much to offer users who wish to use it only with Studio One, and this month I’m going to look at some of what’s possible. There is currently no documentation to speak of on the CS18AI’s Studio One control features, aside from a few videos such as the PreSonus Live video at www.youtube.com/watch?v=Yy-e36IL3GY, so I’ve included a few basics to orient you.
Hooking Up
When used only to control Studio One, the CS18AI can be connected to your computer by either wired or wireless standard Ethernet. (Making use of the CS18AI’s modest audio I/O requires connecting it to an Ethernet AVB network.) If Studio One is running on your computer when the CS18AI comes online, it should recognise Studio One and attach itself automatically. If this doesn’t happen, it is easy enough to connect the two in the UCNET screen on the CS18AI.
Once connected, you need only press the DAW button on the CS18AI and you’ll be in control of Studio One. Right now, the CS18AI is focused on bread-and-butter control surface tasks: basic transport control, locating to markers, arming and disarming tracks for recording, writing automation and editing plug-ins. Obviously, automation is a major application of the CS18AI with Studio One, but I will limit my comments on automation to one important tip, which is that when controlling Studio One, the CS18AI’s Mute Groups buttons become automation mode buttons. and seconds (absolute) time references. Touching a marker locates to it. The Jog function allows scrolling.") Screen 1: The Markers list on the CS18AI’s touchscreen. Note the button in the upper right corner, which switches between beats (relative) and seconds (absolute) time references. Touching a marker locates to it. The Jog function allows scrolling.
Screen 1: The Markers list on the CS18AI’s touchscreen. Note the button in the upper right corner, which switches between beats (relative) and seconds (absolute) time references. Touching a marker locates to it. The Jog function allows scrolling.
Jump To It
Large, physical buttons such as those on the CS18AI are always nice for essential play/stop/record activities, but the unit’s touchscreen comes to the fore when locating to markers. The Marker button takes you directly to Studio One’s Marker screen (Screen 1), where you need only touch the line for a marker to locate to it. Gotta love that. Two-way communication means changes performed in either Studio One or on the CS18AI are immediately propagated to the other, but at present, names can be be edited only on the computer. A ‘jog’ function in the Markers screen scrolls through a song rather than jumping to a marker location, but it does not scrub content as it scrolls, as true jog wheels traditionally have done.
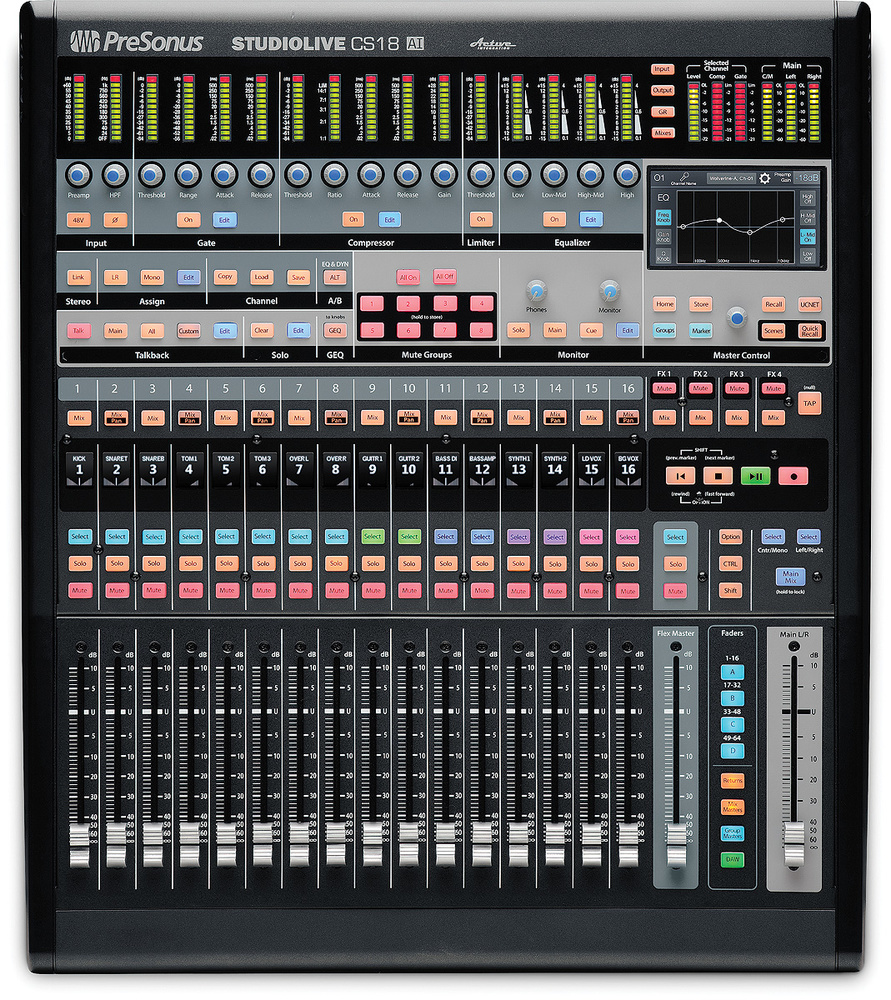
Faders are a major feature of most control surfaces, and one of the most useful additions to a DAW environment. Take a look at those opposable thumbs of yours — you were born to grip.
A key issue when using a control surface is knowing which channel strip is mapped to which on-screen DAW channel. The CS18AI has ‘scribble strip’ displays to show channel names, but only eight characters can be displayed, even though Studio One, of course, can fit many more characters. The CS18AI shortens longer names by using the first three and last three characters, with two dots between to indicate the name is actually longer. To distinguish between between six guitar tracks played by your friend Mortimer, you will need to use a very compact channel-naming code in Studio One.
Fortunately, there is a pretty good alternative. Each channel’s scribble strip shows a number, which matches up to those appearing just below the fader on the channels in Studio One’s mixer. While channels can be rearranged in Studio One’s mixer, channel numbering always reflects left-right location in the mixer, so moving a channel changes its number (Screens 2A and 2B). This changeability is good from the point of view of console layout, but it can also put more emphasis on scribble strip labels to keep everything straight on the CS18AI. layer shown here.") Screen 2A: Channels in the Studio One mixer and on the CS18AI. Where is channel 4? It is a bus channel acting as a snare submaster, so it appears on the Mix Masters layer on the CS18AI, rather than the A (1-16) layer shown here.
Screen 2A: Channels in the Studio One mixer and on the CS18AI. Where is channel 4? It is a bus channel acting as a snare submaster, so it appears on the Mix Masters layer on the CS18AI, rather than the A (1-16) layer shown here.
Flexible Friend
The CS18AI uses layers to accommodate more than 16 Studio One channels. Four banks of audio channel faders control a total of 64 channels; should you need more, the Ctrl modifier button provides access to an additional four channel banks, giving a total of 128 channels. The Returns button accesses up to 16 effect channels in Studio One, while the Mix Masters button accesses bus channels. If you use bus channels for send effects or intersperse effect and bus channels between other channels in your Studio One mixer layout (rather than segregating them to one side, as some people do), they will be assigned across a couple of layers, which could take some getting used to.
The Flex Master, which can be assigned to any channel and maintains its assignment regardless of which layer is active, is great when you need to balance a key mix component against other tracks. For instance, you might assign the Flex Master to the lead vocal channel so that you can balance the vocal against instruments on other layers, which come up on the rest of the CS18AI’s faders. Assigning the Flex Master is easy: simply select the channel you want to control and press the Edit button in the Assign section of the CS18AI.
The CS18AI accesses up to eight channel sends using the Mix buttons at the tops of the first eight channel strips, but there’s a twist. The send mix numbering on the CS18AI maps to the send slots on each Studio One mixer channel positionally, so the faders of a send mix may be sending to different effects. This is not intuitive, so be careful adjusting send levels.
 Screen 2B: The hat track was dragged all the way to the left in Studio One, making it channel one. The CS18AI reflects this. Note that we now see channel 4 on the CS18AI because the snare submaster was moved to channel 5, which is now the missing channel number in this shot.
Grab & Go
The CS18AI provides plug-in editing capabilities, which are accessed by selecting a channel and touching the FX button in the home screen. A list of effects inserted on that channel appears, and touching an effect in the list activates it for editing: the plug-in UI opens within Studio One, and the CS18AI’s Fat Channel controls become plug-in parameter editors. Labels at the bottom of the scribble strips identify the parameter controlled by the knob at the top of the channel strip.
Fat Channel controls can also be used for editing virtual instruments, and PreSonus have already mapped all of Studio One’s bundled instruments and other plug-ins to the CS18AI controls. With an instrument, pressing the FX button immediately initiates editing of the instrument, even though the plug–in list on the CS18AI shows up empty. However, whereas many plug-ins have only a fairly small set of core controls, editing an instrument can easily require accessing more than 16 parameters. The key is to keep track of which parameter is being adjusted by each physical knob, fader or button. When there aren’t enough physical controls to go round, one sometimes bumps into limitations; for example, when controlling the bundled Fat Channel plug-in, only the four knobs in the EQ section are available, so only band gain can be controlled, not bandwidth or centre frequency. Perhaps modifier key functions in a future update will add access to bandwidth and frequency.
For third-party plug-ins, Studio One’s Control Link system lets you map controllers to parameters in its usual fashion: touch the parameter, touch the control, and click the assign button in Control Link. However, the Device Control Map window in Studio One offers another intriguing mapping capability. Double-click UCNET Remote in the list made visible by the External button in the Studio One mixer to open the Device Control Map window. Then Right-click on any button, and choose Assign Command from the drop-down window.The Keyboard Commands window opens, and you now can assign the button to execute any available command. Since the Keyboard Commands window includes macros, the potential power of this feature is clear.
Sadly, though, maps are stored only on a per-song basis, and can’t be remembered or recalled globally. This would be a good feature to add in a Studio One update.
Early Promise
A control surface with knobs, buttons, and touch-sensitive motorised faders is a wonderful thing to use with a DAW. The CS18AI is off to a good start controlling Studio One: it can do most of the basics and throws in a few really nice extras. By the time you read this, a firmware update for the CS18AI will be available, but control of Studio One is not a major focus in it. In the future, however, we can hope that PreSonus will take the CS18AI to the next level as a Studio One controller.


