 This month's Mix Rescue project took place in SOS reader Isaac Ellis's living room, using his no-frills laptop Pro Tools setup and its bundled plug-ins. The speakers you can see are NHT's budget-friendly SuperOne 2.1 nearfields and an Avantone MixCube.
Our engineer visits a reader's home studio to help improve his mixes, and shows that you can get great results from even the modest of monitors.
In an ideal world, we'd all have purpose-built mixing studios with impeccable acoustic design, top-flight monitoring hardware, and every plug-in under the sun. The reality, of course, is that many small-studio operators find themselves strapped for cash, making the best of domestic rooms, budget monitors and the plug-ins bundled with their DAW software. Fortunately, it's still possible to get decent work done under such circumstances, as long as you're ready to do a bit of extra legwork. And to illustrate this point, I'd like to talk about a mix I recently did with SOS reader Isaac Ellis, using a no-frills version of Avid Pro Tools.
The software was running on a laptop, which meant there wasn't masses of processing power to spare, so it was fortunate that the session wasn't too track-heavy: there were just six drum mics, bass, three guitars (two rhythm parts and a solo), five synth tracks, a lead vocal, and two double-tracked backing harmonies. Also in our favour was that Isaac had already comped and tidied up the multitracks very capably, which meant I could focus 100 percent on the sonics — something of a rarity amongst the 60-odd projects I've tackled for Mix Rescue!
Setting Up The Monitoring
Normally I work in my own mix room, but in this case I'd agreed to visit Isaac's house, so there was a certain amount of setup work to do on that front. First off, I had a listen to the monitoring system in Isaac's normal 3 x 4 metre work room, which comprised a pair of M‑Audio BX8 active monitors. These are two-way active designs with an eight-inch woofer, and were mounted on tubular steel stands, from which vantage point they certainly delivered plenty of level and capacious bass. But as appealing as those qualities are for general playback, they aren't actually that important for critical mixing tasks. Much more crucial are well-controlled time-domain response and smooth low-end presentation — attributes which these particular monitors had unfortunately sacrificed, as many cheaper ported monitors do, by over-hyping their low-frequency resonance characteristics in pursuit of maximum bass power.
Anticipating that this might be a concern, I'd taken the precaution of bringing a small pair of NHT SuperOne nearfields with me that I knew would be far more suitable. At only $350 a pair, they're nothing fancy (and certainly not the most pleasant or detailed listen!) but their closed-box design makes it far easier for me to make reliable decisions about the most important aspect of any mix: namely, the balance. They're passive designs, but I was able to borrow an old 40W Technics hi-fi amplifier to drive them and that worked out fine.
Once the NHTs were substituted for the BX8s, I had another listen through to my regular stock of reference material. While the new speakers certainly sounded more controlled and provided a much more believable low-frequency impression, the room itself wasn't doing the monitoring situation any favours; its modal resonances were playing havoc with the frequency response from one listening position to the next. Now, I know from long experience that it's possible to work around this kind of thing to an extent, by mentally 'averaging' the sound from different locations in the room. However, this also makes the mixing process harder work, and can be pretty time-consuming too, so Isaac and I decided that it was worth moving the DAW and the monitoring system into the adjacent living room instead, a larger well-furnished space with much more benign resonance characteristics.
Even in that room, we were going to have to be proactive in pre-empting mix problems resulting from our monitoring situation's remaining unavoidable weaknesses. To this end, I immediately set up my Avantone MixCube single-driver mid-range monitor on top of one of the nearfields. Because this is effectively a point-source sound generator, it suffers from none of the phase interactions that can occur between stereo speakers, or between individual speaker drivers around their crossover frequency, so the timbres of instruments remain more consistent as you move listening position. Room reflections don't undermine the solidity of phantom images on a mono speaker system either (because there aren't any phantom images!), which helps with balance judgements. Plus, the speaker's lack of bass reach means that it doesn't really interact at all with the room's low-frequency resonance modes in any reasonably sized space. As such, you can more reliably judge a mix's mid-frequency content — which is, after all, the energy that's most likely to survive the journey to the mainstream listener's ears.
Filter Mojo
. However, these filters were also used in their 6dB/octave mode for low mid-range frequency tailoring (middle screenshot) or in 18dB/octave mode to remove unwanted subsonics from the bass part without unduly tampering with the balance of its note fundamentals.") To mitigate any low-frequency problems arising from the less-than-ideal monitoring environment, 12dB/octave high-pass filtering was used as a safety precaution on pretty much every track (as you can see in the top screenshot). However, these filters were also used in their 6dB/octave mode for low mid-range frequency tailoring (middle screenshot) or in 18dB/octave mode to remove unwanted subsonics from the bass part without unduly tampering with the balance of its note fundamentals.
To mitigate any low-frequency problems arising from the less-than-ideal monitoring environment, 12dB/octave high-pass filtering was used as a safety precaution on pretty much every track (as you can see in the top screenshot). However, these filters were also used in their 6dB/octave mode for low mid-range frequency tailoring (middle screenshot) or in 18dB/octave mode to remove unwanted subsonics from the bass part without unduly tampering with the balance of its note fundamentals.
 For all their balancing power, the small size of the NHT monitors naturally restricts their low-frequency extension, so there was inevitably going to be a limit on how well we'd hear the lowest couple of octaves of the mix's spectrum. But I wasn't overly concerned about misjudging the mix's overall low-end level — that's something that's fairly straightforward to remedy with mastering EQ after the mix has been signed off. What did worry me was that some low-frequency detritus on one of the tracks might smuggle itself unnoticed into the final mix file, compromising the mix in a way that mastering processing would struggle to remedy (at least, not without undesirable collateral damage to the kick or bass).
So I resolved to high-pass filter pretty much every channel in the mix, so as to reserve the sub-80Hz frequencies pretty much exclusively for the two main low-end instruments. I didn't just filter everything in the same way, because I wanted to take advantage of the variable filter slope in Pro Tools's bundled EQ III plug-in to start addressing low-mid–range frequency-balance issues on several of the tracks. For example, the proximity-effect bass boost on the snare, guitar-solo and vocal recordings was clouding their tone in the mix, so all of these had their filter frequencies raised a little, and with the guitar solo I also switched the slope from 12dB/octave to 6dB/octave to increase the filter's mid-range effect. The 6dB/octave slope came in handy for assertive high-pass filtering on many of the synth parts too, because most synth patches tend to be designed to sound big in solo, which meant they had much more low end than will typically fit alongside prominent bass and guitar parts into a high-energy rock mix like this one.
I didn't neglect to high-pass filter my effects returns either, partly because I was unfamiliar with these plug-ins and have occasionally encountered effects that inexplicably generate unwanted subsonics, and partly because I wanted to avoid their muddying the lower mid-range — a spectral region that can be something of a battleground when you've got snare, bass, guitars, synths and vocals all fighting for a piece of the action. Perhaps more surprisingly, I high-pass filtered the kick drum and bass guitar as well. Had I been monitoring on a familiar full-range system I might not have bothered, but in this scenario I decided to play safe by filtering both instruments at 20Hz — albeit using an 18dB/octave filter slope to minimise audible tonal ramifications.
Drums Processing
Mind you, I later adjusted the kick-drum's high-pass setting while refining the overall drum sound. The impetus for this was that neither the kick nor the snare felt tight or punchy enough in its raw form. By raising the kick's filter frequency to 45Hz I was able to curtail the instrument's sustain — a drum's lower frequencies tend to take longer to decay, so filtering them out will often make it sound shorter as well as less bassy. In addition, both tracks needed a dose of extra attack, so I searched the Pro Tools plug-in set for a dedicated transient processor — in vain, as it turned out! There are many different ways to skin the proverbial cat, though, so I went old-school and used a slow-attack compressor setting for the same ends.
 In the absence of any dedicated transient processor, Mike instead used this slow-attack compression setting to boost the snare close-mic's attack.The trick to making this work is to use a reasonably high compression ratio, and then set the processor's threshold and release time so that gain reduction kicks in quite assertively on each hit, but mostly resets before the next hit. Once that's configured, you can lengthen the attack time so that the front edge of each hit sneaks past the compressor before it has time to clamp down properly, effectively boosting the instrument's attack phase relative to its sustain. The exact attack time you choose will depend on the kind of enhancement you're looking for: with the shortest attack times, you'll get a spindlier attack focusing on the upper spectrum, whereas longer attack times will give better low-frequency impact and more of a sense of extra 'thud'.
In this instance, I thought the kick drum needed more 'click', whereas I wanted the snare to have better low-mid-range punch, so I ended up using a longer attack time for the snare than for the kick. A useful by-product of the kick-drum processing was that it made the drummer's foot feel more consistent. The snare compressor's longer attack, however, compromised its ability to control that drum's mix level, so I added a limiter later in that channel's plug-in chain to keep the drum's louder peaks in check. The tone also felt lacking in complexity and sustain, but there was no supplementary under-snare mic to provide this. Fortunately, I've recently discovered Wavesfactory's great freeware plug-in SnareBuzz, which can simulate an under-snare mic signal based on the over-snare mic's audio, and this did a very serviceable job of thickening and lengthening the body of the snare drum sound the way I wanted.
Dealing with the remaining drum mics was mostly a question of simple EQ, although many of these decisions were informed by what was happening on other tracks. For example, while brightening the cymbals with an 8kHz shelving boost, I discovered that this brought the hi-hat forward of the snare, so I cut a little around 4.5kHz too, as well as boosting the snare mic in that zone. The snare only popped through properly, though, once I'd shifted the spectral focus of the rhythm guitars away from that zone by emphasising their 1-3 kHz frequencies instead. (In common with a lot of project-studio guitar recordings, the amps sounded like they'd been driven harder than necessary, which had led to a surfeit of noisy 4-5 kHz distortion components.)
Some boxiness to the combined snare tone was tackled by another small cut to the overheads, this time around 550Hz, while some overbearing hi-hat spill on the tom mics inspired stringent high-frequency cuts on those channels. The snare and toms benefited from localised low-mid-range cuts (as did the bass and rhythm-guitar parts) in order to ration the 'warmth' frequencies and avoid muddiness creeping into the overall mix tonality. Getting the kick to make its presence felt on smaller speakers needed some boost in the 1.5kHz zone, but I also applied some cuts on the synth parts in that same spectral area to make space for that — as well as for the core of the lead-vocal timbre.
The lead vocal also benefited from MDynamicsMB: a lower band working below 270Hz controlled proximity-effect variations caused by the singer moving in relation to the microphone, while a higher band compressed the upper spectrum above 3kHz to fortify it against frequency-masking from the cymbals, guitars and synths.
 The overheads were picking up unpleasantly spikey-sounding stick noise from the ride cymbal, but this was easily dealt with using fast high-frequency limiting.
Multiband & Full-band Compression
 Two bands of multiband compression processing were used for the lead vocal track. At the low end, this helped even out the singer's proximity-effect variations, while in the upper spectrum it added extra density to combat high-frequency masking effects from other instruments in the arrangement.There were a few troubleshooting jobs that required something a bit more powerful than static EQ processing, though. For example, the overhead microphones had occasionally captured distractingly powerful stick transients from the cymbals. Again, my instinct was to reach for the kind of multiband transient processing which isn't actually bundled with Pro Tools, and I couldn't even find a traditional multiband compressor on board I liked the look of either. In the end, Isaac and I decided to install the free trial version of Melda's flexible MDynamicsMB and, as I'd hoped, a helping of super-fast limiting above 3kHz made short work of those unwanted high-frequency signal spikes.
The bass track provided another application for multiband dynamics, this time firmly compressing the signal below 80Hz to maintain a solid low end — something the performer had (understandably) struggled to do on account of the part's unremittingly fast, athletic riffing! The lead vocal also benefited from MDynamicsMB: a lower band working below 270Hz controlled proximity-effect variations caused by the singer moving in relation to the microphone, while a higher band compressed the upper spectrum above 3kHz to fortify it against frequency-masking from the cymbals, guitars and synths. I could also have used the plug-in's high-frequency compression facilities for de-essing purposes, but Pro Tools' much simpler De-esser plug-in did that job just fine, both softening the lead vocal's sibilance directly, and weakening the influence of the esses on some of the vocal send effects.
 for the song's higher-energy chorus sections.") The lead vocal had a fairly moderate 2.2:1-ratio compression setting during the song's verses, but this was chained with a more aggressive UREI 1176-style limiter (below) for the song's higher-energy chorus sections.
The lead vocal had a fairly moderate 2.2:1-ratio compression setting during the song's verses, but this was chained with a more aggressive UREI 1176-style limiter (below) for the song's higher-energy chorus sections. There was traditional full-band dynamics processing too, over and above the transient-enhancement treatments I'd already applied to the kick and snare. With the standard Pro Tools Compressor plug-in, I selected a 4:1 ratio for the bass part, using fairly fast attack and release times (10 and 80 ms, respectively) to level out the individual riff notes. The same plug-in provided 6-8 dB of general-purpose 2:1 level control for the lead vocals too, as well as a more assertive 5:1 treatment on the backing vocals, both of which settings used longer release times to avoid unnatural artifacts or overemphasised consonants. For the chorus, though, I also switched in the onboard Pro Tools 1176 limiter emulation for the lead vocal, using its 12:1 ratio and faster time constants to give the performance a touch more rock attitude!
The only other full-band compression was on the master bus, where I took the slightly unorthodox approach of compressing both as an insert and as a parallel process. My reasoning here was that I wanted to use a high-ratio setting to increase the general 'density' of the mix as well as adding bucketloads of mosh-friendly gain-pumping, but without the drum peaks getting totally mashed.
 was an aggressive 5:1 treatment in a parallel configuration for lots of gain-reduction action, while the second (right) was an series effect using a more moderate 2:1 setting.") In order to emphasise the gain-pumping artifacts of the mix's master-bus compression, but without completely trashing the drum impact, Mike actually used two separate instances of the Pro Tools Channel Strip plug-in. The first (left) was an aggressive 5:1 treatment in a parallel configuration for lots of gain-reduction action, while the second (right) was an series effect using a more moderate 2:1 setting.
In order to emphasise the gain-pumping artifacts of the mix's master-bus compression, but without completely trashing the drum impact, Mike actually used two separate instances of the Pro Tools Channel Strip plug-in. The first (left) was an aggressive 5:1 treatment in a parallel configuration for lots of gain-reduction action, while the second (right) was an series effect using a more moderate 2:1 setting.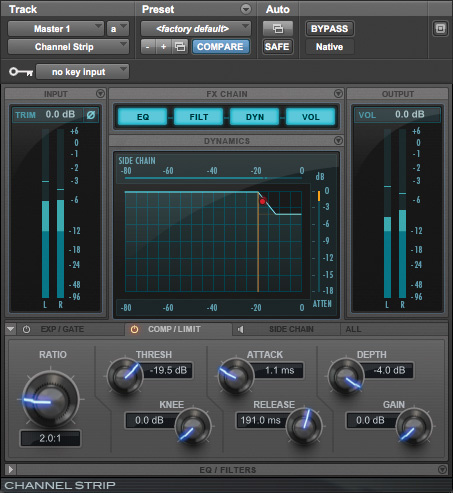 So first I sent the whole mix to two Pro Tools buses, and inserted a 5:1 compression setting onto one of them using the bundled Channel Strip plug-in, triggering 4-8 dB of gain reduction. Then I tweaked the release-time and make-up controls to boost lower-level details and introduce the first infusion of gain-lurching side-effects, while the unprocessed mix signal maintained the impact of the drum peaks. Once that was in place, I inserted a further Channel Strip compressor onto the DAW's master bus to exaggerate the pumping effects further, but stopping short of the point where the subjective power of the drums began to suffer unconscionably.
Effects Contrasts
While all these processing moves helped achieve a more suitable balance, it was the effects we added that made the biggest difference to the emotional impact of the mix. A lot of project-studio mixes make the mistake of laying effects like some kind of uniform blanket across the whole timeline. That's a shame, because dynamic effects changes are one of the best tools a mix engineer has to underline the musical message.
On the simplest level, this might just be a case of automating an effect's send and return levels to suit different arrangement textures. In this project, for instance, the band wanted an ostentatiously cavernous reverb for the drums, in keeping with some of their favourite commercial influences, but if we'd left this on constantly throughout the song, it'd have been a disaster: the ear-catching nature of the huge space would quickly have lost its novelty as the listener's ear adapted to it, at which point we'd have been distancing and cluttering the mix for minimal benefit; and we'd have squandered the opportunity to contrast the musical sections and create a sense of increased size during the mix's climactic moments. Just by automating this reverb's send and return levels, I was able to increase contrast between the verse and chorus textures, make the choruses suddenly sound more epic when they arrived, and also pull off an attention-grabbing mix stunt by killing the reverb midway through the song's second verse.
A lot of project-studio mixes make the mistake of laying effects like some kind of uniform blanket across the whole timeline. That's a shame, because dynamic effects changes are one of the best tools a mix engineer has.
Using a variety of different effects patches can also help enliven a production. Yes, there's a role for global send effects in many mixes, to introduce some acoustic connection and blend between overdubbed parts — indeed, I used a couple of short, neutral-sounding reverb patches for that purpose here. But in studio-produced music styles, it's also worth using effects to differentiate different tracks, not only because this sets each part's musical contribution into more audible relief, but also because it heightens the sonic contrasts between song sections as the instrument line-up changes.
 Here are some of the different stereo widening treatments used in this month's remix. Although they all serve a similar function, namely widening the stereo picture, they all sound quite different, and help increase the music's section contrast and the long-term dynamics of the mix.

 In Isaac's project, it was the synths that provided the most scope in this respect, because the five tracks each included a number of distinct parts that I could separate out for independent effects. So, for example, the opening sirens and some of the wilder pitch-modulated SFX were flavoured with a slowly modulating two-pole phasing; the rhythmic synth texture at the end of the first verse gained a sequenced filtering effect and some wonky dotted-rhythm multitap delay; and the middle section's celeste-like arpeggios featured independent left- and right-channel unsynchronised feedback echoes with wide delay-time modulation.
Of course, such sonic changes tend to be most appreciated by the listener when they're applied to the lead vocals, so I chose (like a lot of producers) to focus the lion's share of my effects efforts there. For instance, during the first verse the lead singer starts off using a short multitap delay with some stereo spread, but this transitions in the prechorus to a wider and trippier quarter-note echo with heavy ensemble effect, before returning to a simple mono eighth-note feedback delay which fits more efficiently within the busy full-band chorus texture. Although these three effects are all things you'd ostensibly file under 'delay', each nonetheless has a recognisable identity that helps characterise the song section in which it appears.
I used stereo widening extensively too, and here again the unique sonic fingerprint of each of those treatments added variety to the production as a whole. I'm not talking about simple MS processing here (although I did use this for the drum overheads and some of the effect-return channels), but rather different effects-based widening approaches. So, for example, I had a classic Harmonizer-style pitch-shifted delay patch widening many of the vocal parts, but that didn't sound the same as the phase-offset widening of the synth's phaser effect, the subtle high-speed auto-panning on the guitar solo, or the Haas-style left-right offset on one of the echo returns. All of these enhanced the stereo width in some way, but you'd be unlikely to mistake one for another!
The Acid Test
 Thanks to careful monitoring techniques and some pre-emptive mixing moves, the mix's overall tonality needed very little adjustment when Mike checked it on his own monitoring system after the mixing session.
After the usual dusting of detailed fader automation and a good deal of referencing against various relevant music releases, we arrived at a version of the mix that met with the band's approval in situ, but there remained a shadow of doubt as to how well the mix would hold up on the full-range monitoring in my own studio. Our precautions paid off, though, because the few remaining tweaks I wanted to do at that point fell well within the bounds of mastering-style processing: some EQ for a slightly slimmer overall mix tone, some LF compression to control the kick-drum's low end more closely, and a touch of upper-mid-range cut to take the edge off the guitar distortion during the song's choruses.
All in all, I hope this month's project has demonstrated that budget monitoring and a no-frills DAW setup need be no barrier to achieving commercial-grade results, as long as you carefully hedge your bets at the low end and use effects dynamically to support and enhance the flow of the music.
Featured This Month
 The Purple Hat Mob are a Preston-based alt-rock band inspired by Arctic Monkeys, Radiohead and Tame Impala.
Their line-up comprises David Marley (guitar, synth, lead vocals), Stuart Marley (guitar), Jarrar Khan (bass), Alexander Malinowski (keyboards) and Isaac Ellis (synth, backing vocals, drums).
Audio Examples
These Soundcloud players will allow you to hear the 'before' and 'after' mixes in MP3 format. In the ZIP file below, we've included high-quality versions to audition in your DAW.