This month we tame a vocal that varies in dynamic range, and look at ways to create 'bigness' in the mix without overcooking levels.
It's not often that SOS gets sent a track for Mix Rescue which lasts almost 10 minutes and has no bass part to speak of, but I suppose there's a first time for everything! The track in question, Imprint's 'Let Me Go', draped lush, gothic-tinged strings, bells and piano over a stark framework of distorted industrial loops and apocalyptic sound effects. At the centre of all this was an impassioned vocal performance reminiscent of singers such as Tori Amos and Bjork, courtesy of the song's writer, Sin.
Rescued This Month...
Based in London and the South East, Imprint comprises members Sin and Blink, who create their own unique blend of dark, ambient electronica. They are also involved in a number of collaborations with other artists, such as Dead Industrie and Autarky, and are currently preparing to take their sound out live.
First Stop: Vocal Processing
Listening to the band's original mix, my overriding concern was the vocals, so I started work there. While crucial to the song's emotional impact, these were rather indistinct and buried in the original mix. A more upfront sound, despite the obligatory long reverb, was required to make the lyrics more audible and encourage the listener to connect with the performance.
Apparently recorded in a single take with an AKG C900 handheld condenser mic, the wildly dynamic performance presented a number of technical problems. To start with, extreme level fluctuations made it impossible to find a good general level for the vocal fader within such a busy mix, and some serious compression was clearly needed to deal with this. However, I didn't want to end up with an aggressively squeezed rock-style sound, which wouldn't really have been appropriate here.
The compressor I always think of when I need heavy-but-transparent dynamic control is the classic Teletronix LA2A, so I went on the hunt for a plug-in which might emulate this design. Noticing an unmistakable similarity between the GUI of the freeware Antress Modern Painkiller plug-in (www.modernplugins.in-tw.com) and the front panel of the LA2A, I gave it a whirl and it turned out to be just the ticket, heaping on the gain reduction with comparatively few side-effects — I was even able to use the more assertive limiting option with no problems.


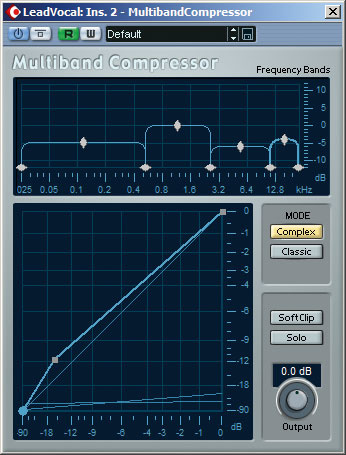

 Mike went to work on the main vocal first of all, using the processing shown here: the Multiband Compressor plug-in was used to deal with fluctuating proximity effect and sporadic vocal harshness; the full-band Antress Modern Painkiller compressor took care of more general dynamic control; and GVST's GSnap sorted out a few moments of shaky tuning. The Platinumears IQ4 plug-in was added right at the end of the mix process to cut a single abrasive frequency region when Sin was using her chest voice.Against a basic rough balance of the other tracks, it quickly became apparent that other aspects of the vocal needed addressing too. It sounded as if Sin had been moving around quite a lot while performing, which meant that the amount of bass boost on the recording due to the proximity effect was pretty inconsistent. My first instinct was to just roll off some of the low end — I do this pretty much as a matter of course with busy tracks, because this biases the vocal tonality towards the upper frequencies and tends to improve intelligibility. It helped a little, but by the time I'd dealt with the boomier notes, the thinner ones had become 'size zero'.
I've encountered this problem before, and my solution to it is to use a multi-band compressor to strap down the lower frequencies firmly, evening out the vocal tone. I used Cubase's Multiband Compressor, and inserted it before the Modern Painkiller so that the low-end unevenness wouldn't cause the full-band compressor to react unmusically. A fairly high-ratio setting kept things well under control, and while I was at it I also gently compressed the octave above 11kHz to give the sound a slightly airier and more intimate quality.
This wasn't all, though, because Sin was making virtuoso use of the change between her 'head' and 'chest' voices, and the microphone suited her head voice much more than her chest voice — especially in the 6-10kHz region. Lots of energy in this region was giving the head voice a nice, breathy quality, but it was also emphasising a harsh edge to her chest voice. Equalisation was, naturally, of no real use here, so I went back to the multi-band compressor and applied some high-ratio compression in the 6-10kHz range to try to take the edge off the chest-voice harshness.
Reverbs & Delays
The dry vocal sound was now beginning to hold its ground against the other tracks, so I turned my attention to its effects, as this was another vital element of the mix that I felt I should tackle early on. A lot of the time, I wait until I've got all the dry tracks working together before getting too heavily involved in send effects, but here I wanted to have the freedom to create the desired 'intimate vocal in a vast underground cavern' sound I was after, before hemming myself in with the other tracks.
A long reverb was clearly essential, so I pulled up a four-second 'warm cathedral' impulse response in Christian Knufinke's new SIR2 plug-in. Although the reverb wash was important, I also had to make sure that it didn't pull the vocal back into the mix or get in the way of the clarity of the lyrics, so I took a few precautions against this. A long pre-delay setting of 160ms kept the onset of the reverb well away from that of the dry sound, and some adjustments to the amplitude envelope of the reverb softened the initial early reflections and focused the effect more on the smoother reverb tail — this also helped stop vocal sibilants from ricocheting around distractingly.
 Sin, who forms half of the band Imprint, lays down some vocals.
 Once all the main parts of the arrangement were in place, Mike spent some time automating the fader, EQ and effect sends on the lead vocal to maximise the intelligibility of the lyrics, and to keep a fairly consistent vocal tone as the mix texture changed. The lower block of nine automation lanes were entered while setting up the GVST GSnap pitch-correction, adjusting the plug-in settings to keep the processing as natural-sounding as possible.I now had some sense of a large space without swamping the vocal, and I supplemented with a couple of delays to enhance the sense of size. You might ask 'why not just use more reverb?' The reason is that too much reverb quickly fills up all the gaps in a mix, making it sound cluttered, whereas delays (and particularly tempo-sync'ed delays) can give much the same subjective impression of size as reverb but without taking up as much mix real-estate.
I used two different delays in the end, one sync'ed to half notes and the other to quarter notes. The former was fairly uncomplicated, with a little feedback and some EQ bracketing (using a high-pass filter at 360Hz and a low-pass filter at 6.6kHz). I gave the quarter-note effect a bit of a different character by plumbing it through a mildly overdriven rotary-speaker simulator, and then compressing the delay return to duck the delay. This got it more out of the way while Sin was singing, but allowed the echoes to bubble up between vocal phrases.
In a similar way to how I'd deliberately softened the onset of the reverb, I also tweaked the delay lines to 'blur' them a bit, and set them back in the mix. A little modulation of the delay time helped make the repeats a less distinct, but the main thing I did was to pass each of the delays through Silverspike's Room Machine 844 room-ambience simulator. This plug-in is great for giving the impression of a real space, but it doesn't weigh down your mix with a big reverb tail, so it was ideal for this task.
The drive and compression applied to the quarter-note delay was bringing up the sibilant sounds in the vocal part, drawing undue attention to the effect and making it difficult to find a decent level for it in the mix. Inserting a de-esser at the start of the effects chain easily sorted this out, though — you can get away with far harsher de-essing in an effects return than you can on the main vocal signal itself, which makes it a doddle to set this up.
By this point, I had a nice warm-sounding space surrounding the vocal, but with the singer well clear of the effects and perfectly intelligible. However, this did inevitably make the vocalist sound a little detached from the track as a whole. One way around this would have been to pull the existing effects a bit further forward, but I chose to use another separate effect instead, leaving myself more flexibility for re-using the vocal effects on other tracks later on.
What I went for was a very short ambience impulse response from SIR2, which I then high-pass filtered at around 650Hz to just add some early reflections to the upper end of the sound. Using a very short, bright reverb patch like this is a good way to glue a vocal to a backing track while still keeping it apparently 'dry' and upfront. I opted for using no pre-delay, to encourage the dry vocal to merge with the ambience and cohere better with the rest of the track, although I did use SIR2's envelope settings to soften the onset of the reflections again.
As a final touch, once the reverbs and delays were in place, I also set up one more send effect — a modulation treatment from Cubase's Symphonic plug-in. This was just to widen the stereo image of the lead vocal a little, which is a favourite tactic of mine where there's only one vocal in the track and I want it to seem bigger and more hi-fi.
Beefing Up The Drums
The other main challenge with this mix was dealing with the drums, which comprised a main loop and an extra, distorted layer. Sin had told me that these were as important to the track as everything else put together, and that they really needed to pack a punch, so I tried a variety of tricks to get them sounding as big as possible. Pushing up the fader was only the start — subjective power is as much about illusion as it is about raw signal levels.
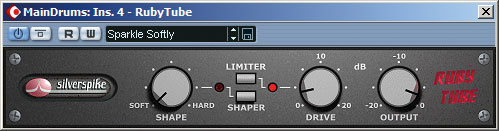
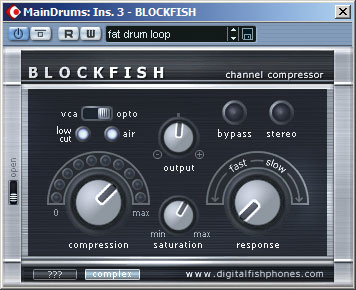
There are various ways to fool the ear into thinking that drums sound louder than they are. One approach is to try to increase the sustain of the drum hits, and a way to do this is to compress. I used Digital Fishphones' Blockfish with fast attack and release times to dip the drum transients and bring up the tails of the hits. While I was at it, I took advantage of Blockfish's saturation control to add subtle distortion artifacts to the sound, which is another common way of increasing subjective loudness. For similar reasons, I also added some emulated tube saturation from Silverspike's Rubytube. There isn't any real logic behind the saturation settings I chose — I just fiddled with the controls until I found something that sounded 'bigger'. One thing to watch out for when using distortion on drums, though, is that overcooking things can begin to cause bass drums to break up and lose some of their punch, so I was careful to avoid that.
An unwanted side-effect of my processing was that the level of the one little treble percussion sound in the loop ended up being too loud in relation to the main drum sounds, so I popped Digital Fishphones' Spitfish de-esser in to poke it back down to a suitable level again. I also boosted a couple of decibels with a peaking filter at 800Hz to harden the 'knock' of the kick drums a little more, and notched down some drum harmonics that were dominating a little at the low end — cuts of 3-4dB at 47Hz, 59Hz, 96Hz, and 174Hz were all that were needed. I often high-pass-filter the low end of loops to leave room for the bass, but obviously there was no need for that here!
Although things were already better, the drums were still in mono (despite being supplied as a stereo audio file), and I wanted to give them a bit of width. On another recent project, I'd had some luck using a stereo pitch-shifter for this purpose, so I rustled up a send to MDA's Detune plug-in and set up a subtle five-cent shift. And it sounded rubbish! In a fit of pique, I smashed the hell out of it with Rubytube, which (to my surprise) made it begin to sound quite good, giving a bit of life to the upper frequencies of the loop, so I high-pass filtered the return channel at 780Hz to home in on this. Curious now to see if the effect might benefit from a bit more sustain, I took a deep breath and broke a solemn oath that I'd made during my first week of using Cubase SX: thou shalt under no circumstances use the bundled Reverb B plug-in. Fortunately, inserting this between the Detune and Rubytube plug-ins worked so well that the resultant episode of self-loathing proved fairly manageable...
Adding some of each of the reverb and delay send effects to the drums glued them to the vocal, although I kept the level of the Cathedral impulse much lower here, relying more on the quarter-note delay and ambience sends. The ambience level was set quite high, as this also helped increased the impression of power, a bit like room mics can do in a drum-kit recording.
Ducking & Pumping
My final trick for inflating the drums was to use the drum channel to rhythmically duck the string and synth parts in the arrangement, much as you might routinely do in many dance styles. Cubase SX 2 doesn't make it easy to do this [this has been overhauled in Cubase 4.1], because there's no side-chain access to its plug-ins, but I got around it using Twisted Lemon's Sidekick v3, which implements its own side-chains, independent of the host sequencer. Because you can only use a limited number of instances of this plug-in at once, I set up the ducking as a send effect, regulating the amount of ducking per track using the individual track send controls. The disadvantage of this approach was that if I decided I wanted more or less ducking on a given track, changing the send level also changed the mix balance of that track. Not ideal, but workable nonetheless.
The ducker was set up with an instantaneous attack and a release time of around 200ms — which is longer than I normally associate with pumping effects, but it was what sounded best with Sidekick for this track. Having set up the ducking on the string parts, I also used it for the hyper-distorted drum layer, so that it would contribute more between the drum hits.
Finally, I very slightly pumped the track as a whole, using the Antress Modern Compressor plug-in, again setting the release time by ear to around 160ms. I brought its limiter slightly into play too, while also simultaneously sneaking up the drum fader, effectively ducking the whole backing track very briefly for each hit.
Fleshing Out The Drum Loop

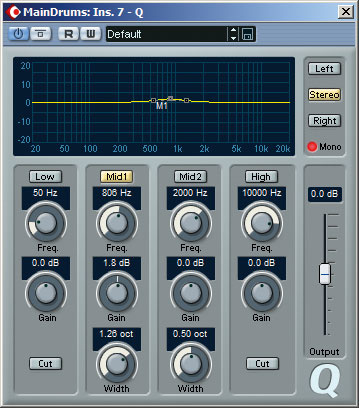
 Compression and saturation treatments were used to get the main drum loop sounding as loud as possible, but this made a high-frequency percussion element in the loop over-prominent, so a Digital Fishphones Spitfish de-esser was set up to bring this back into balance. A little broad EQ boost around 800Hz was also dialled in, to emphasise the 'knock' of the kick drum's attack.The distorted drum layer which is added during more climactic sections of the track took a little more work. The tonality of the distortion was the biggest problem, as it included lots of energy at the frequency extremes. At the low end this clouded up the whole mix, while at the high end it masked the high frequencies of the vocals and strings, making them seem dull. High-pass filtering at 140Hz and cutting 18dB at 9kHz with a high shelf sorted out the worst of the problems, but I still needed to cut 3dB at 5.3kHz and boost 4dB at 830Hz before I could find a decent level for the sound in the mix. Again, the stereo image of this track was very narrow, so I sent to the Symphonic plug-in from here as well.
As the vocal and drum sounds began to slot into the rough balance of the other tracks, I began to feel that, despite the copious distortion, the drum parts still weren't delivering enough interest at the high end, so I decided to layer in an additional percussion loop for the second half of the track. A tambourine overdub clearly wasn't going to cut the mustard here, so I pulled something off a Glitch/IDM sample library I'd recently reviewed (Soniccouture's Abstrakt Breaks).

 Although the synth and string parts required only a little bass EQ cut before they worked with the drum and vocal tracks, a fair bit of level and EQ automation was required to keep the parts in a suitable balance throughout the track. The arrangement of these parts already created quite a lot of changes in texture, but Mike also muted some further sections to help improve the overall dynamics of the mix.As luck would have it, the very first loop I tried slotted in perfectly and added a nice hint of backbeat. I used the hi-hat and percussion parts from the loop's construction kit, panned them half-left and half-right, and then compressed them both fairly hard to smooth off the transients and push the sounds into a background role. High-pass filtering at around 280Hz and shelving off a couple of decibels at 12kHz highlighted just the required frequencies. I inserted instances of the Sidekick plug-in to get a more pronounced ducking effect on these percussion tracks, and then sent to the quarter-note delay and distorted reverb effects for a bit more complexity.
Balancing Synth & String Parts
The string and synth parts took very little processing, other than a few decibels of low shelving cut between 200Hz and 450Hz on the different tracks. I did compress the lower violin counter-melody a little to keep it under control, though, and both synth parts also benefited from some thickening and brightening using Rubytube. I sent to a selection of the different vocal delays and reverbs, depending on which track suited which sound, aiming for a smooth blend of the different parts, and I set up Cubase's Phaser plug-in as well, to smooth some of the parts even more, making sure to set the effect's feedback to zero — I wanted just a gentle hint of modulation, rather than an obvious phaser sweep.
The biggest hurdle to get over with the strings was their balance throughout the track, as the changing string arrangement was the primary source of mix dynamics, and keeping a good balance and level for the strings throughout these changes required quite a lot of fader automation. In addition, the drum parts also masked the frequencies of the strings in different ways as the track progressed, so I had to do some surreptitious riding of the low EQ gain controls as well, in order to keep the sound subjectively consistent.
Sound Effects, Bells & Piano
Turning to the remaining tracks, I first dealt with the two sound-effect hits which are most audible during the opening section: one a burst of distortion panning from side to side, and the other a huge reverberant drum. I compressed these a little to add sustain, and gave the drum hit more weight with a 7dB peaking boost at 70Hz and a 5dB high-shelf cut at 3.6kHz. A coating of the vocal reverbs and delays brought the sound effects into the space occupied by the rest of the parts, the cathedral impulse working particularly well in this case.
The dry bell track sounded, frankly, more like a rather cheesy door-chime than a death knell, partly because it had far too distinct an attack transient — it felt like you were standing in the belfry right next to the bell itself, rather than contemplating your mortality from the crypt. Some limiting from Cubase's Dynamics plug-in soon remedied this, while low-pass filtering moved the tonality into the right ball park, and a deep notch at 2.4kHz killed a couple of over-harsh resonances. Lashings of the cathedral reverb and a bit of the ambience and half-note delay completed the picture, although I had to reduce the modulation of the delay effect a little, as it was making the bells sound rather out of tune.

 Fast-attack compression and limiting were combined to round off the over-spiky attack transient in the bell part and give it more of a distant feel, and some judicious EQ cuts also helped soften the tonality too. Copious reverb and delay completed the job, leaving the sound much more ominous and in keeping with the track as a whole.The piano sound needed fairly stiff processing to make it fit within the track, as the timbre wasn't particularly attractive, and very woolly into the bargain — so much so that I broached the idea of overdubbing a new piano part with the band, although in the end I figured that a lo-fi sound was probably more suited to the style of the track. A big 8dB peaking cut at 250Hz, combined with a 6dB shelving boost, made a useful difference, but the sound still proved very difficult to mix — weird resonances were appearing and disappearing all over the place in a very uncontrolled way. Crushing the sound with a rather ludicrous four-band limiter setting in Cubase's Multiband Compressor plug-in allowed me to salvage something more stable (if not exactly pleasant-sounding), and I could then sink this into the mix with the vocal delays and reverbs.
Adding Atmospherics
The balance of the tracks in general was now working pretty well, so I took the opportunity to ride the lead vocal fader to keep the lyrics as close to the surface as possible. Some EQ rides were also necessary to compensate for frequency-masking as the arrangement changed, and I adjusted the effect send levels to suit different song sections and to pick out the ends of some phrases. An instance of GVST's GSnap pitch-correction plug-in (www.gvst.co.uk) came in handy too, tightening up the odd wayward intonation moment — inevitable when dealing with a one-take wonder such as this. I don't always like the way automatic pitch-correctors sound out of the box, so I automated the GSnap settings to keep the sound as natural as possible.
 To give the mix a bit more depth and texture, Mike added in a selection of background sound effects, as you can see in this screenshot: the upper folder of tracks comprises a variety of snippets of a reversed recording of the cathedral reverb, while the lower folder contains a variety of atmospheric film sound effects.Although I was becoming increasingly happy with the mix from a purely sonic perspective, I couldn't help feeling that it wasn't yet involving enough, in terms of emotion — despite the space and depth implied by the effects, everything just seemed a bit empty and two-dimensional. So, although it involved stepping a little outside the normal Mix Rescue brief, I resolved to try pruning a few bits out of some of the tracks to give a bit more contrast and build-up, and also to experiment with adding in some extra atmospheric background samples from a film sound-effects sample collection.
Starting with the introduction (before the drums enter), one of the first things I did was underpin some of the existing sound-effect hits with a low, thunder-like rumble, as well as layering in a metallic swell which you can hear for the first time after the lyric '...to find my peace'. Then I recorded the output of the cathedral reverb using Silverspike's Tape It utility plug-in, reversed the audio, and reimported it into my Cubase Project, editing a few bits into the gaps between vocal phrases. With the help of the odd pitch-shift and a bit of high-pass-filtering, it was possible to achieve a nicely disconcerting and evolving backdrop. In tandem with this I began chopping out various audio sections to try to give a bit more light and shade in the arrangement.
I extended these activities to the rest of the track in a similar way: the drums had a couple of different textural loops introduced behind them during certain sections (one a kind of demonic whispering and the other comprising swirling brushed metallic scrapes); the outro was suffused with a subtle machine-room drone; and various reverse reverb snippets were scattered around the place willy-nilly. One other thing I did was loop a small section of the vocal track to create a disembodied vocal pad in a couple of places — you can hear it for the first time just under five minutes into the track.
First Draft, Feedback & Final Tweaks
As usual, I sent off a first draft of my mix to the band for their feedback, and fortunately they seemed pretty happy with where I had taken the song, although they still wanted a couple of things tweaked. You can hear from the original mix that the distorted drum layer really makes its presence felt, and mine wasn't giving them that same jolt, so I pulled up the level a bit and added in a bit more of the distorted reverb effect to get this to fit the bill a little better.
The other thing they mentioned was that the strings needed to be more 'sweeping', and, on returning to the track after a couple of days' break, I could see what they meant — I'd overdone the low cuts on the string parts (a common foible of mine), leaving them a bit thin. This was fairly easy to remedy, though, with a couple of EQ adjustments.
For my own part, some referencing during the adjournment had isolated a different problem, which was that the lead vocal still had a rather piercing edge to it when Sin used her chest voice. I was unable to get any better results using the Multiband Compressor plug-in, so dealt with the issue more surgically using the Platinumears IQ4 dynamic EQ plug-in (www.platinumears.com/IQ4gui.zip).
Dynamic EQ is a powerful process, which combines the functions of compression and equalisation such that the gain of each equaliser band changes in response to the incoming signal in the same way that a compressor's gain-control element does. For this application, I only needed to use one band of the EQ, tuned to the most abrasive frequency (which turned out to be 8kHz). I set the threshold so that the band's gain reduction only triggered for the chest-voice notes, and chose a ratio which just reined in the problem. The Q, Attack, and Release parameters were then refined by ear for the most natural result.
One last thing bothering me was that the reverbs and delays (which took up almost as much space in the mix as the instruments!) were making the overall tonality a little dull, so I went though the returns one at a time, bypassing them to see which were the main offenders, and then applied a few low mid-range EQ cuts to those channels where I though it was necessary.
Mission Accomplished
This mix illustrated a number of methods that you might experiment with in your own mixing. For example, the processing I used to beef up the drums in 'Let Me Go' can be transferred to many different styles, although it'll always be a question of degree. A wide dynamic range is not uncommon in vocal tracks either, and some of my tactics on this track might well bail you out of a tricky situation when compression alone can't deliver the goods.
One of the trickiest things with very reverberant styles of music is keeping the mix sounding clear, and delays can be more useful than reverb here. However, there's a lot you can do with reverb pre-delay settings, EQ in effects returns, and effects level automation as well, so remember to give these a shot too. Finally, if your mix has comparatively few musical parts, it's often surprising how a bit of extra background atmosphere can make the final result sound more finished. And it's not rocket science finding suitable sounds for this — any budget film sound-effects library should have plenty of suitable material.
Remix Reactions
Sin: "I noticed a HUGE difference across the whole track straight away and was blown away by what Mike had done — it actually gave me goosebumps! When he sent us the first draft it was almost there already, but when we'd sent him back what we thought needed tweaking it arrived back sounding unbelievable.
"The vocals are now heard instead of being lost within the song, and the effects on them are perfect. The drums are punchy without being over the top, the strings sing and soar, and the bells finally sound like bells... All the little extras Mike layered in really add to the final result. It was always going to be tricky getting the balance right between the delicate parts and the more aggressive parts, as there's quite a lot taking place within the song, but now 'Let Me Go' sounds like it should.
"All in all this has been a huge learning experience, and one that I have really enjoyed. Comparing the original with the new mix, you can hear many, many differences, and while I think both mixes have their own merits, I have to say I prefer Mike's. I wanted this song to soar, and now it does!"
Blink: "The first thing you notice is the vocals, and the effects on them, which add a ghostly quality. A lot of the rhythmic sounds have been made fuller and a lot more immediate. When the drums kick in, they are very forward, which is good, as it retains the aggression in the song, although I still feel that the distorted drums could be brought forward a bit more, as a counterpoint to the main drums.
"The effects and reverbs add more texture to the song, without necessarily taking away the focus, and the use of the 'rhythmic rumbles' is very in keeping with what we were aiming for. I also like the addition of the snare sound, which fits well with the rest of the song. In general the whole mix sounds a bit warmer than the original, probably due to the added textures, although personally I also liked some of the cold sound of the original as well."
Hear The Differences For Yourself!
If you want to compare Mike's remix with the band's original version, or fancy checking out some of the remix processing in isolation, you can find a series of audio examples at endpoint29cc8e70.chios.panth.io/sos/jan08/articles/mixrescueaudio.htm