Sonar 's Synth Rack is a great time-saving concept that has started to deliver on its full promise with version 6 of the software. However, not all aspects of it are completely obvious - so this month we'll be doing our best to put you on track with the Rack.
In short, Sonar 's synth rack presents a 'greatest hits' version of what's happening with the various soft synths you have loaded, allowing you to do a lot in terms of instrument manipulation without having to open up the GUIs (Graphic User Interfaces) for the various instruments. It does this by centralising crucial controllers, as well as allowing easy access to automation options, freezing and unfreezing, preset selection, and more.
I never really used to use the Synth Rack much, but that's changed because of considerable enhancements in Sonar 6. However, there are also a few limitations you should be aware of, particularly with regard to program selection from within the Synth Rack. We'll start this tour with the control assignment aspect of the Synth Rack, which is my favourite part. But first, note the power on/off switch in the upper-left corner of each instrument; when it's in the off position, this disconnects the instrument from the CPU to save power.
Assigning Real-time Controls
The new Synth Rack lets you duplicate various synth controls at the Rack itself, thus letting you bring the most tweakable and important synth parameters to a common location. (These controls are not macros, in the same sense as Ableton Live 's Instrument Rack controls or Reason 's Combinator, because they don't inherently control multiple parameters, although they can provide a similar function if you assign them to be part of a Group). You can then edit the sounds or create automation moves by changing the control positions, or bind the controls to a hardware controller.
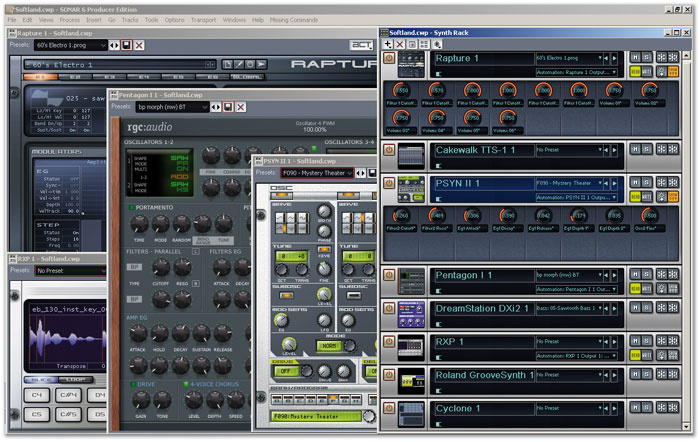
 is on.") Ten important controls from the Pentagon soft synth have been assigned to the Pentagon section of the Synth Rack. They are visible because the Show button (towards the upper right) is on.
Ten important controls from the Pentagon soft synth have been assigned to the Pentagon section of the Synth Rack. They are visible because the Show button (towards the upper right) is on.
There are two buttons involved with real-time controls: Show Controls (the button toward the right labelled Show) and the button to its left, Assign Controls (with the graphic of a control and the '+' sign). You can assign controls to the Synth Rack in two different ways. One method works very similarly to the ACT controller assignment method (explained last issue). To assign controls using this method:
1. Click on the 'Assign Controls' button and the instrument GUI shows up.
2. Move the parameters you want to assign as controls. Note that although the dialogue box mentions parameters being 'touched', you can't just click on a parameter; you actually need to alter it from the existing setting. Also note that the order in which you move the controls is important, as the controls will be assigned from left to right along the bottom of the instrument's rack, in the order in which you moved them.
3. After you've moved the controls you want to add, click on the Assign Controls button again.
4. A dialogue box opens that says "X parameters were touched during Learn. Are you sure you want to assign these controls?" ('X' is the number of parameters moved). Click on Yes and the parameters appear as controls along the bottom of the rack (see screen above).
The other method is more labour-intensive, but may be preferred by some:
1. Right-click on the Assign Controls button.
2. A pop-up menu appears with all the parameters that are available for assigning as controls.
3. Assign a control and it is added to the first empty control slot.
4. Continue assigning controls until you've added all the ones you want.
With either method, as you move the controls in the synth rack, the corresponding controls will move on the instrument's GUI.
Another interesting point is that if you assign particular controls for a synth, you can choose to have Sonar remember them (even in a different project, or if you've closed and re-opened the program). To do this, when you see the Insert Soft Synth Options dialogue box while installing a soft synth, tick 'Recall Assignable Controls'.
Right-click Control Options
You can do a lot more than just move a control to vary a parameter. If you right-click on a knob, you'll see a set of options that will be familiar if you've worked with automation in previous versions of Sonar.
* Grouping
Soft-synth controls can be made part of a Group (choose the Group option when you right-click on a control), so you can edit multiple synth parameters with one control motion, either of an on-screen control or from a hardware remote controller. In addition to being able to add a synth control to a Group, remove it from the Group, or clear the Group, calling up the Group Manager when you right-click on a control provides several more options (see screen, right).
If you choose Absolute in the Group Manager, any difference between synth parameter settings that exists when you choose to Group them remains as you move the associated on-screen or hardware control. For example, if Parameter 1 is set to 1.000 and Parameter 2 to 0.500 when they are Grouped, and you turn the control associated with Parameter 1 to change its value to 0.500, Parameter 2 will be at 0.000 to maintain the same absolute difference between the two controls. If you instead choose Relative, the two parameters track ratiometrically. With the previous example, if you change the value of Parameter 1 to 0.500 (half the original value), then Parameter 2 (which is Grouped) will also go to half the original value, or 0.250.
 Grouping is just one of the many functions you can access by right-clicking on a control in the Synth Rack. The front dialogue box shows the Group Manager.As one example of how to use this, when controlling the level of two different synth oscillators you'd probably want to use ratiometric control. This way the volume relationship between the two oscillators would remain the same, and turning one down all the way would cause the other to turn down all the way, regardless of their initial settings. But if you're, for example, lowering the LFO rate, you'd probably want the rates to change linearly, by the same absolute amount. If one LFO's speed was offset by 2Hz compared to a second LFO, that absolute 2Hz difference would then be retained as you changed the LFO speeds.
Selecting Custom means that you can set separate start and end values for individual controls, and do so in two different ways. One option is to enter start and end values in the Group Manager dialogue box. The other is to set the control to the desired start or end position, right-click on the control, and go Value / Set Start = Current or Value, or Set End = Current, respectively. If you set a control value, right-click on the control, and go Value / Set Snap-To = Current, whenever you Ctrl+double-click on the control it will snap to the value you selected prior to setting the 'Snap To' value. And why would you want a 'Snap To' setting? Simple: If you're doing your automation by moving controls in real time and you want to to jump instantly to a particular value, moving a knob manually may overshoot or undershoot the value. By using Snap To, you can hit the required value precisely.
Note that certain rules apply to Grouping when you choose specific start and end values. For example, if Control 1 covers a range from 80 to 90 and Control 2 covers a range of 0-127, when you rotate Control 2 over its full range Control 1 will go from 80 to 90. If you move Control 1 over its full range, it will cover that range; but Control 2 will remain at 0 until Control 1 hits 80, go to 127 as Control 1 goes to 90, and remain at 127 as Control 1 goes higher than 90. Also note that if the End value is lower than the Start value, you can reverse the 'sense' of a control. A good use for this is reducng level somewhat when raising resonance, or doing crossfading effects (such as morphing between two different sounds).
- Remote Control
To assign one of the Synth Rack controls to an external hardware controller, right-click on the control and choose 'Remote Control' to bring up the standard remote assignment dialogue box. You can specify a controller but it's a lot easier to use the Learn function and just wiggle the controller of your choice.
 If a synth's programs don't show up in the Synth Rack preset selector, type the name of the preset into the black Presets field on the instrument itself, then click on the Save button. The preset will now appear in the Synth Rack's preset selector.
I sometimes take advantage of limiting the range of a Grouped control when I want a hardware controller to cover a limited range of a parameter, typically for finer control. I Group the limited-range synth control I want to vary with a 'dummy' synth control (ie. one that doesn't affect the sound) set to vary over its full range, then assign the hardware control to the 'dummy' control. For example, suppose you want fine hardware control from something like a footpedal over filter cutoff, where the footpedal covers just a one-octave range of the cutoff frequency. You'd set the range of the filter-cutoff control to one octave, by defining Start and End values as described previously, then Group it with another synth control that covers its full range (for example, the attack of an unused parameter, such as pitch envelope). Assign the footpedal hardware control to the pitch-envelope attack parameter; when the attack is at minimum, the filter will be at the lower range of the specified octave. With attack at maximum, the filter will be one octave higher.
- Reassignment & Deletion
If you want to reassign a control to a different parameter, right-click on the control and select Reassign Control. This brings up a list of available parameters (which can be pretty lengthy with some instruments). You can also select Delete Control from the same right-click menu.
- Appearance
The Synth Rack window can be resized (within reason), and if you shrink the window, the controls on the top row will 'spill over' and create another row below the main one.
- Hey, where are the controls?
If a soft synth (for example, TTS1) doesn't allow for the new style of Cubase-like read/write automation in Sonar 6 (in other words, you don't see Read/Write buttons for it in the Synth Rack), you can't treat any of its parameters as assignable controls. The Assign and Show Control buttons won't even appear.
Choosing Programs
To the right of the instrument title, there's a box with a drop-down menu for preset selection — and here we enter the land of confusion, because presets show up for some synths but not others, including, oddly enough, some of the newer ones. Thanks to some research from Mike (known as Infinite5ths) on the Cakewalk forum, here's the story on what works and what doesn't work.
If a VST/VSTi plug-in allows loading and saving of .fxb files from within its custom GUI, or has presets coded directly into its DLL file, these presets show up in the Synth Rack preset list. If you have multiple .fxb banks, the most recently-opened one populates the preset list. Also, some instruments are programmed so that Sonar recognises their proprietary presets, and presets show up for some (but not all) DXi synths.
The bottom line is: if the presets appear, great! But if they don't there's a workaround for populating the list. Call up a preset from a synth whose presets don't show up in the presets drop-down menu, type the preset name into the black Presets field in an instrument's upper left, then click on the Save floppy disk icon. The preset will be saved in a format that allows it to show up in the Synth Rack's program browser from now on (see screen above).
At first I thought this was a major limitation (who wants to re-type all those program names?), and in some ways it is, but I've also actually found a benefit, as this approach lets you treat the Synth Rack preset selector as a list of favourites. Whenever I find a preset I think I'll want to use in the future, I save it as described above. That way, only my favourite presets show up in the list for instruments whose presets normally don't show up. (Of course, I can always access the other presets via the instrument's user interface or custom browser.) If you want to see all of Mike's contributions to a thread on this subject, go to http://forum.cakewalk.com/tm.asp?m=915277.
Synth Rack Icons
You can load a synth icon for each element of the rack. I'm not sure how valuable that is, as the synth name shows in the title bar, which you can't hide, anyway. It does make for some nice eye candy, but I find the included icons tend to be hard to read. Consequently, I made some of my own that 'zoomed in' further, so that any features are more easily identified, and they also include part of the name. Any 96 x 96-pixel BMP file will do the job. Most of the time I ended up with slightly larger icons and reduced them in Paint Shop Pro.
Synth Rack Buttons
The buttons located toward the right pretty much duplicate functions found elsewhere, but of course the whole point is that they're conveniently folded into the Synth Rack. The top four buttons are Mute, Solo, Freeze synth and Thaw synth. (It's worth pointing out that when you freeze a synth, you can still see its audio in the synth audio output track, which can be pretty handy.) The lower four buttons are Automation Read, Automation Write, Assign Controls and Show/Hide controls. If you've populated your rack with a lot of controls, you'll appreciate the show/hide option.
There are still a few other aspects of the Synth Rack we haven't touched on. One is the Automation Assignment drop-down menu below the Preset Selection area. Sonar 6 makes it possible to put the automation data for a soft synth on any track (I usually put it on the track containing the audio output). There's also the mini-menu bar at the very top of the window. (Can we just call it a minibar? Sounds like more fun!) From left to right, here's what the buttons do:
- Insert: This duplicates the Insert / Soft Synths and Rewire Devices command found in the main program menu.
- Delete: Use this to remove whichever synth has the focus.
- Properties: This calls up the properties page for the synth that has the focus, if you don't feel like double-clicking on the synth name.
- Insert soft synth options: Here you can choose how many outputs to include, whether you want to create an accompanying MIDI track, and so on.
- Freeze: Duplicates options that normally appear when you right-click on a track.
Final Thoughts
With dual-monitor setups, one common layout strategy is to show the host on one monitor and instrument and plug-in GUIs on the other. The Synth Rack is ideal for displaying on the second monitor, as it provides access to all your instruments in an abbreviated form; but when you want to open up the Properties page for a selected synth and do more detailed editing, that's easy enough.
The other really useful factor, of course, also comes into play with ACT (Active Controller Technology, covered last issue), as you can click on an instrument to give it the focus and your hardware controller then lets you change parameters for the selected synth. With some advance thought to controller assignments in the Synth Rack and ACT assignments, this can provide a very efficient way to add expressiveness to your synth presets...and that's always a good thing!

