 Touch Tracks objects can be placed in any track in the Arrange window, whereupon single MIDI notes on these tracks can be assigned to trigger other sequences and groups of sequences.
We look at the creative potential of Logic's Touch Tracks feature and the corrective potential of the audio fade‑in, as well as showing you what 'solo safe' is and why you need it.
The great thing about using Logic is that you can work with it for years, and then suddenly stumble across a feature you've never used before, which opens up a whole world of new possibilities. One such feature is Touch Tracks, a facility that seems to have been designed primarily for live use — however, it can be just sensational for helping you fine‑tune an arrangement.
Sampling MIDI
In a nutshell, Touch Tracks allows you to assign individual sequences, or even folders containing multiple sequences, to specific keys of your MIDI keyboard, allowing you to trigger each section of your song as and when you want it, using a single finger. That means that if you've written ten different sections for a dance track and you don't know the best way to put them together, you can create a set of folders containing the song parts, assign them to keys and try things out in real time, just like you would when triggering chunks of audio from a sampler. However, it's worth noting that version 4.5 of Logic can only assign MIDI data to Touch Tracks notes — Emagic's UK distributors inform me that the facility to incorporate virtual instruments into a Touch Tracks setup is apparently being added in the v4.7 update, which will be available free from the Emagic website.
Touch Tracks are a part of the MIDI Environment — to get a Touch Tracks object, first go into your MIDI Environment window and select Touch Tracks from the New menu. This opens a new window with a piano keyboard running down the left hand side. Pressing any key on your keyboard highlights the corresponding screen key so you know where you're assigning things. Drag the desired sequences or folders from the Arrange window onto the appropriate notes in the Touch Tracks window to assign them. When you have done all this, create a track in the Arrange window, assign the Touch Tracks object to this, and start playback on the sequencer. Once the sequencer is playing, you can happily trigger your assigned sequences from your MIDI keyboard — Touch Tracks objects, like arpeggiators, only work while the sequencer is running. Unless you want your original recorded sequencer parts to play back at the same time as your Touch Tracks parts, you'll probably want to mute their tracks or drag them out of harm's way.
Velocity Scaling
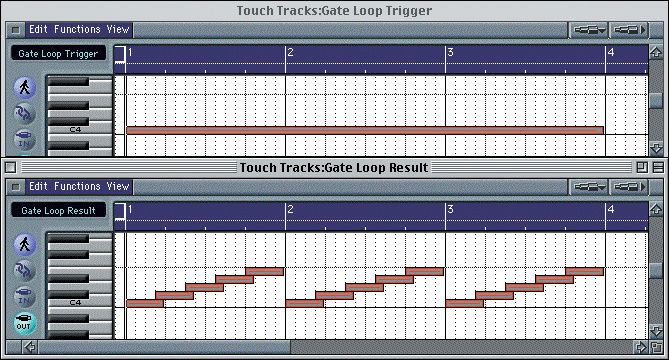
 The top screenshot shows a bar‑long sequence, which has been assigned in this example to the note C4 within the Touch Tracks window. The middle pair of windows show a long held C4 trigger note alongside the response which this generates from the Touch Tracks object in 'Gate Loop' mode — the assigned sequence loops continuously until the trigger note finishes. The final pair of windows show how 'Toggle Loop' mode, on the other hand, requires a second MIDI note to stop the repetition of the assigned sequence once it has been triggered.
By default, the velocities of the sequence data assigned to each Touch Tracks key will be scaled according to the velocity with which you hit the corresponding key on your MIDI keyboard — if you hit the MIDI note with a velocity of 127, the sequence data will play back with unchanged volume, whereas a trigger velocity of 64, for example, will cause all notes in the triggered sequence data to play back with their original velocities halved. This velocity scaling is great for build‑ups in sound‑to‑picture work, but its intesity can be changed if you wish, by altering the entry in the Velocity field for any note — the default is entry is '100 percent', but there are also '50 percent' and 'Off' settings. Note that a grey vertical line in any field in the Touch Tracks window shows that its value is the same as that in the field above it.
If you select a number of the notes in the Touch Tracks window (by rubber banding them), you can assign a single part to all of them. But why would you want to do that? Because you can assign different playback attributes to each of them. By default, Logic assigns each of the Touch Tracks you rubber‑banded different transposition settings. The note to which you originally dragged the sequence data remains untransposed, but those above and below it are transposed by semitones up and down respectively. Not that you have to stick with the default settings— to alter the transposition value for any of the notes, simply select it then click and drag its transpose parameter box.
Playback Parameters
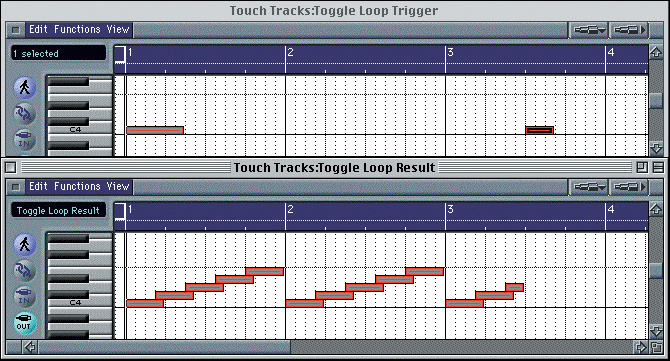
There are also a number of other playback parameters available. For example, each Touch Tracks key can be set to trigger its sequence in a number of different ways — there are six modes to choose from: 'Multi' loops the assigned sequence indefinitely, while 'Single' plays it once; 'Gate Loop' loops the sequence indefinitely until the requisite MIDI Note Off message is received, while 'Gate' will also stop playback when the end of the sequence is reached; in 'Toggle Loop' mode, pressing a key will start looping its assigned sequence indefinitely until you press the key again, while 'Toggle' will also stop playback upon reaching the end of the sequence. The screenshots at the top of this page illustrate how 'Toggle Loop' and 'Gate Loop' work in practice.
If you wish the playback of the sequence data assigned to any Touch Tracks key to remain perfectly in sync with the tempo of the Logic song, then you'll want to set the Start field accordingly. The default entry in this field is 'Free' which means that any sequence data will begin playing the moment the MIDI Note On message is received from your keyboard. However, if you choose one of the other options — 'Next 1/16', 'Next 1/4' or 'Next 1/1' — the playback will only start at the specified bar division immediately following your key press. For example, with 'Next 1/1' specified in the Start field for a specific note, playing that note on your MIDI keyboard will always trigger its assigned sequence data at exactly the start of the next bar. However, in addition to the setting in the Start field, there is also a Delay field (which functions in much the same way as that in the Parameters box in the Arrange window), and this could be used in conjunction with the above example to initiate sequence data playback only on the last beat of each bar.
Finally, there's the Group field, which allows you to prevent certain sequences from playing together. If two Touch Tracks keys have the same Group assignment (there are 99 available) then only one of them can play at any one time. Every time you trigger a new sequence within the same group, any others within that group will stop, so if you're wanting to experiment with layering different sequences then you should either set all their Group fields to 'Off' or make sure that each of them occupies a different‑numbered group.
Touch & Go
Once you're all set up it's simply a case of letting your inspiration lead you. If you like what you're hearing, why not simply hit the record‑enable button on the track to which the Touch Tracks object is assigned? That way you'll be able to pick the best bits from your real‑time experimentation at a later date — there's no sense in letting any of those inspired flukes get away! Paul White
Removing Vocal 'Pops'

When recording vocals, the blasts of breath from 'P' and 'B' sounds can often create a discernable 'pop' when they hit the microphone's diaphragm. While this is easy to remedy during recording by using a pop shield (a layer or two of fine fabric mesh between the singer and the mic), I recently had to deal with some vocals which had been recorded without the benefit of one. The vocal popping even on the raw audio was pretty bad, but with the required compression it was elevated to the status of 'tragic'.
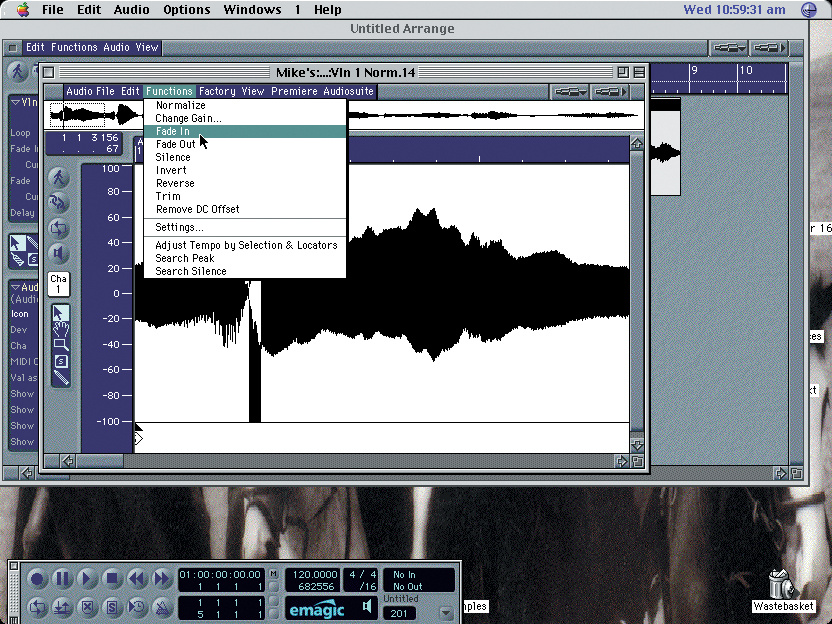
Working within Logic, I could look at the waveform using the Sample Edit window, and the pops showed up as larger‑than‑usual spikes of energy at the starts of certain words. I decided to simply highlight the offending areas and apply fade‑ins to the audio via the Functions menu. The results turned out to be surprisingly natural sounding, though they could be improved by starting the fade‑ins fractionally before the beginnings of syllables, so that the consonants didn't have to start from complete silence. On one particularly bad pop, I had to do second fade‑in before the end result became usable — however, it still didn't sound obviously unnatural.
Remember, though, that Function‑menu processes are destructive, so you're limited to only one stage of undo. On critical material, it would be very wise to make a backup of your original audio file before starting work. Paul White
Solo Safe
If you are using any send/return effects loops in your Logic mix, it's really nice to be able to solo individual channels without these effects being muted. It is rare to find such a feature on anything but the more expensive analogue consoles. However, in Logic you can make any channel you like 'solo safe'. Simply hold down the PC's Alt key (Ctrl key on a Mac) and click on the relevant Solo button — a cross will appear through the button to indicate that the channel is now solo safe. Mike Senior


