 The External MIDI option can be found in the upper left MIDI input box on Software Instrument tracks.
Play and record external MIDI instruments in Logic.
The way that Logic handles external MIDI instruments such as hardware synths and drum machines has changed over time, and some people now find the method less than totally obvious. It is actually easy enough if all you have is a single mono- or multitimbral synth: create a new track, select Software Instrument as the track type and then choose External MIDI in the upper‑left MIDI input box. In the box directly below the track type, select the audio interface input(s), mono or stereo, to which your synth is physically connected — 'Presonus 7/8', in the screen shown above. In the Output section select the MIDI port connected to your synth, select the MIDI channel and, in the box below, set the audio output to the main stereo output (1‑2), or to wherever else you wish to route the audio from the synth.
If you need more than one synth track, as would be the case for a multitimbral instrument, just enter the number in the field at the bottom of the New Track screen and you'll get multiple tracks, all set to consecutive MIDI channels. The track that you get looks just like a software instrument track but you'll see an External plug-in inserted instead of an instrument. Open the External plug-in and you'll see that the settings you entered when creating the track are all in place. Hit Record in Logic and you can record MIDI just as you would with a software instrument, but now your external synth is providing the sounds. At this point, patch selection can be handled by inserting Bank Select and Program Change messages in the Event List, or you can choose to set these directly on the external synth using its own front‑panel controls.
An important fact to note here, however, is that although each External MIDI track displays the usual areas for inserting audio effects plug-ins, only the ones in the first track will actually do anything. Also, whatever you insert there will be applied to all the parts coming from a multitimbral instrument unless it has multiple outputs routed individually into Logic and sending separate audio streams.
Of course, if you've got enough separate outputs on your instruments and inputs on your interface you can leave your external MIDI as 'live' sources right through to your final mix. Otherwise, at some point you'll probably want to record the synth parts as audio so that you can apply individual effects and EQ to the different parts of a multitimbral source.
Despite numerous suggestions to our Apple contacts, Logic's bounce-in-place doesn't work for external MIDI, but it is easy enough to create a new audio track with the input set to the interface inputs where your synth is connected, then record that — though you must first mute the MIDI instrument track so you only monitor the sound from the new audio track. The External MIDI instrument will still play and its audio will still be routed to the audio interface: the track mute button affects only the audio you would have heard from the External MIDI Instrument track. To stop other MIDI channels from playing while you record individual parts as audio, use the Mute tool to mute all the MIDI regions in the tracks you are not recording in that pass. Individual effects and processing plug-ins can then be added to your new audio tracks after recording in the usual way.
Environmental Science
That's all easy enough, but some years ago, back when Logic users had to make frequent visits to the Environment pages just to make things work, I set up all my external MIDI instruments as multitimbral Environment objects. This allowed me to enter patch names and bank-change protocols so that I could call up patches and banks directly from within Logic's Main page Inspector window. I could also use MIDI mixer controls to adjust the level and pan of each part of my multitimbral instruments, with the audio from the synth conveniently coming back into Logic via a Live Input Track.
 You can use Logic's I/O plug-in to effectively turn any audio track into a live input track to monitor and record audio from external synths.This way of working was so intuitive and efficient that I decided to see how close to that setup I could get starting from scratch In Logic Pro X. Of course, if, like me, you created a setup like this in an earlier version of Logic, it will still open and be converted to Logic X format. Having done all the hard work, make sure you save your setup as part of a new Template so that you don't have to keep reinventing the wheel, so to speak. In fact that is exactly what I've done for my own sessions, but in the interests of science, here's one way to set up a similar system from scratch. I'm not claiming it is the only way to do it, or even the officially approved way, but it works for me.
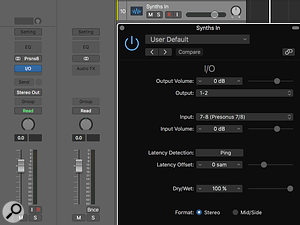
First, rather than use the external MIDI Instrument plug-in, I started by creating my own version of a Live Input Track by creating an audio track, then inserting the I/O plug-in found in the Utilities section of the plug-in menu. Here you just need to set the output to 1-2 and the input to the interface inputs to which your synths are connected (7-8, in this case). Set the Track Input to 7-8 also. This is the track where your synth sounds will come back and also where you can record them as audio. (Once recorded, I just drag them across to a fresh audio track.)
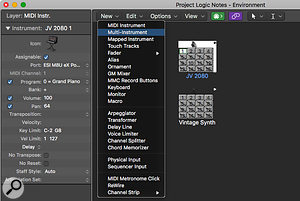
 If you need to deactivate a channel in a multitimbral Environment instrument, just select the relevant block in the graphic and then untick the 'Assignable' box in the Environment Inspector.Now, from the MIDI Enviroment menu, go to the MIDI Instruments layer and select New Multi-Instrument so a 16-part multitimbral Environment object is created for you. By default, all 16 parts are switched off, denoted by a diagonal line through each numbered block. Just click on a block to activate that part. Note that if you need to switch blocks off again, just select them and then untick the 'Assignable' box in the Environment Inspector window. Your 16-part instrument defaults to being named after the port to which it is connected, but you can give it a more useful name. Click on the name and the Inspector opens up. Here you can change the MIDI port, if necessary, and also tick the Program and Volume boxes to allow control over these parameters. Tick all the inspector boxes for all the active parts if you need full control over them.
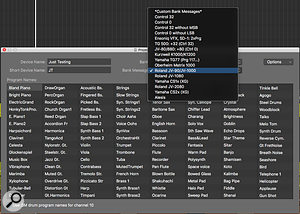
Now double-click on the loudspeaker icon at the top of the Multi-Instrument icon and you'll see a new window full of General MIDI patch names by default. Four boxes at the top of the window allow you to select a Bank Change message from a menu of common options (you can add your own bank names). You also enter a short name for the synth and a full device name, which defaults to the port name unless you decide to change it. An Options window allows you to cut, copy or paste the preset names shown and to choose either patch numbers or GM patch names. There's also a tick box in the Inspector for disabling transposition for channel 10, if you're using it for drums.
 Once you've completed the epic task of typing in your patch names, save as a Template and back it up in as many places as you can find —you won't want to do it twice. Now you can select your MIDI synth patch in the Track Inspector, where you can also change the bank.You can click on any patch name and replace it with your own, but as I remember all too well from when I owned an Oberheim Matrix 1000 (with 1000 presets), it can be fairly tedious! Fortunately, you can import lists of preset names if you can find them online, and users have even been known to resort to text-reading programs to extract patch names from a scan of the product manual. There are also completely filled-in Environment objects for some synths available online, thanks to some very altruistic users out there, and these can be imported directly into your MIDI Environment page or copied and pasted from another Logic song.
So, how to create the necessary MIDI control tracks? That's actually pretty easy and no longer involves 'knitting a scarf' in the Environment. Just select the Multi-Instrument Environment object and drag it into the Tracks section of the Main page. A dialogue box will open up, asking if you'd like tracks to be created. Tracks are only created for those instrument parts that have been activated, but if you turn off a part retrospectively, the corresponding MIDI tracks don't disappear, so you'll have to delete them manually.
 In this window you can select a Bank change message from a menu of common options.I fell foul of one issue, which may be related to the fact that my synths are mixed externally, so they all go to the same two ports on my audio interface. With two or more Multi-Instruments set up, things could get confused unless I moved the audio track I created as the synth return to come below, rather than above, the MIDI control tracks in the Main window's track area. Until I moved the audio track to the end, any MIDI track I selected also selected the audio track and any port changes I made applied to all instruments, not just the one I'd tried to select. Other audio tracks placed above the MIDI control tracks worked quite normally.
The audio input track for the synths doesn't need to be set to input monitor to hear the synths, as the I/O plug-in takes care of that, and if you need to record one of the synth parts as audio, just set that track to Record and mute any MIDI regions you don't want to be included. All in all, it's not as onerous as I'd expected, though trying to find out how to deal with external MIDI synth patch names by searching Logic's Help was so frustrating that I gave up and resorted to trial and error! I hope this column will help anyone grappling with the same issues.


