We explore some of Logic’s lesser‑known features that you might easily have overlooked and wondered where to find them.
Logic Pro was designed to be a flexible and open‑ended piece of software. But with this flexibility comes complexity. It doesn’t help that many of its features are not obvious in use and, while the basic functionality as a DAW is very easy to get your head around, getting to grips with (and finding) all the features you may find useful is very difficult — even reading the whole manual might not help!
In this workshop, we’ll go through a few of these more obscure features, many of which I have stumbled across when trying to achieve something that’s musically out of my comfort zone.
Pan Sends
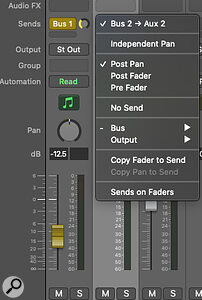
 The Independent Pan option allows you to pan a source and its aux sends independently of one another.When you send a signal from a stereo track to a stereo bus, the signal panning matches the channel’s settings. Sometimes this is not what you want — I’m very fond of having different effects in different places in the stereo image. I’d been setting up complex routing to achieve this before I had a Eureka (or D’oh!) moment and discovered that Logic Pro allows you to do just this right from a send itself.
If you choose Independent Pan from the Send menu, and then Sends on Faders, you’ll see that the fader turns yellow. Now the pan control affects just the send and the yellow fader sets the send level. You can assign this to a Key Command to make swapping between these modes easier.
External Instruments
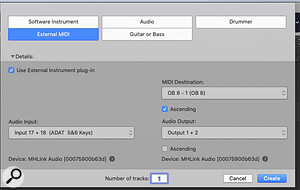
Logic Pro’s MIDI features were second to none when the software was developed and while most of us have moved from using dozens of external MIDI devices to plug‑ins, there is a resurgence of interest in hardware instruments. Logic Pro’s External Instrument Track can send MIDI information to external MIDI devices such as synths or hardware effects. Here you can choose the MIDI channel and port required to communicate with said instrument. However, to record the audio from that Instrument you’ll also need to set up the audio inputs that the hardware is patched in to.
 Ticking the Use External Instrument Plug‑in box allows you to define an audio input alongside a MIDI port when using external synths in Logic.For years I was creating extra audio tracks for these audio inputs, until I noticed that a little box named Use External Instrument Plug‑in had appeared. Checking this opens an extra audio input section where you can define both the MIDI connection and audio input for recording your hardware synthesizer.
Virtual Controllers
While prices for old analogue gear are soaring, there are real bargains to be found in the keyboards and modules created during the great knob and slider drought of the 1990s. Some of these instruments are almost as sophisticated as newer plug‑ins, but with the added character of their digital‑to‑analogue converters — EMU’s Proteus series, I’m looking at you. However, trying to adjust a filter in something like a Proteus really is akin to painting a hallway through a letterbox. Helpfully though, many of these devices have extensive MIDI controller and System Exclusive (SysEx) features that make them eminently accessible via MIDI (you’ll find this information in the hardware’s manual).
You can easily create ‘virtual’ knobs and faders in Logic to control these devices, and again you’ll need to open the MIDI Environment to do this. This time navigate to the Create layer menu item and rename the new Layer accordingly. From the New menu, create a Multi‑instrument and assign it to the MIDI port and channel your hardware is on. You’ll need to know which controller number/SysEx commands adjust which parameter on your hardware, but Logic Pro’s on‑screen controls can send both types of data. Create your faders and knobs from the New menu and assign them the required output controller number (or SysEx string) in the Inspector. Finally, patch them to the Multi‑instrument so that when adjusted, their data passes through to your connected hardware.
 Logic’s MIDI Environment lets you create ‘virtual’ controllers that can communicate with even the most arcane ’90s rackmount devices.
Most of these old digital synths and effects have internal patch memories, so wouldn’t it be useful if you could change these patches directly within Logic Pro? And wouldn’t it be even better if you could select them by name? The good news is you can!
 It’s also possible to extract patch names from old hardware, which you can then select from the Program section of the Inspector.
To do this, create an External Instrument track (with the Use External Instrument Plug‑in button unchecked) and select the MIDI port and channel that your instrument is connected to. Then give the track a useful name in the Inspector (if one isn’t automatically created from your Audio MIDI Setup program). Next open the MIDI Environment from the Window menu and Navigate to the MIDI Instruments pane via the pull‑down menu at the top of the Inspector. You’ll see a Multi‑instrument object has been created.
Now we’ll need to find a text‑based list of the patches that are on your MIDI hardware. If the patch names are in ROM or still at default, you might be able to find a list of them on the Web, but if you’ve edited your patches, you’ll need a piece of software such as MidiQuest (https://squest.com) to extract them. As a bonus, MidiQuest can also export them as text files in the correct ‘one patch per line’ format that you’ll need for the next bit...
Double‑click on the MIDI object you that you created and you’ll see a bank of patch names displayed alongside a pull‑down menu where you can select different patch banks (MIDI patches are often in banks of 128). If you use the Options pull‑down menu, you can paste in the patch names from the text file. Now, when you select this track in the Arrange page, you can change banks and patches using the Program section of the Inspector — just remember to make sure the Program box is checked! You can also manually type in your own names into Multi‑instrument to make it easier to select patches with hardware that uses numbers rather than names for its internal programs.
Logic continues to surprise me with its depth of features...
Quick Sampling
While you can import audio files into the main window to create audio tracks, dragging them from the Finder (or Browser) to the track list will present you with several options as to how you want the audio to be used. This feature allows you to quickly create simple or complex Sampler instruments, or add audio to Drum Designer or Alchemy (in its various forms).
 Dragging audio files into the track list will give you a variety of options for what to do with it, rather than simply placing it into the timeline.
Reuse & Recycle
It may be that you have a plug‑in chain or audio or MIDI regions in another Project that you’d like to reuse in a new one. To do this, open the Browser and select the little camera icon at the top right and choose the All Files tab. From here you can navigate to the folder where the Project is located that you wish to import material from. Select this Project (and any Project alternatives) and you’ll see a display of all the content in that Project. You can decide which elements to import — for example, if you just want a Plug‑in chain, select just these. Once you have chosen these elements, clicking on Add will place them in your current Project.
Plug‑in Manager Sub‑folders
Logic Pro’s Plug‑in Manager is brilliant for organising your virtual effects and instruments. It’s easy to create folders to organise your most‑used Plug‑ins, but you can also add sub‑folders to these by using a colon between the names of the folder and sub‑folder. If you create folders (use the + at the top of the list) called Synth:Analog and Synth:Digital, for example, then drag the required instruments into these folders, they’ll appear as sub‑folders in the plug‑in track menus.
 Logic’s Plug‑in Manager lets you create sub‑folders, into which you can organise your plug‑ins and virtual instruments.
Fine‑tune Your Automation
The Event list is a great place to finely adjust Note positions, velocity and controller information, but you can also tune your Automation here. Use the Key Command to open the bespoke Track Automation Event List. Here you can precisely adjust all the relevant parameters relating to Automation events. I find this very useful when dropping levels to limit the effect of plosives on vocals, for example.
Take Notes
Adding text notes to the bottom of a channel strip is a useful way to keep track of your, um, tracks; it’s a sort of digital version of the masking tape we used to stick on the bottom of a mixing console. These notes are also available on the track itself — but you must explicitly make them visible by right‑clicking on a track and selecting Notes from the Channel strip components menu, in the same fashion as you do in the Mixer.
Speaking of notes (the other kind!), if you’re producing ambient music and your MIDI data consists of long notes, it can be really irritating if you start playback when the Playhead is in the middle of that note as, by default, no sound is heard. However, if you check the Notes box in the Chase section of the Project’s MIDI Project settings, these long notes will play back perfectly wherever you start playing the Project from.
This is a pretty brief dip into the murkier waters of Logic Pro and I hope you found something in there that you hadn’t known about, or tried, before. Logic continues to surprise me with its depth of features and by the time this is published I’ll probably have found another dozen obscure (to me) ways to do things in Logic Pro!


