Here's how to spice up your drums with Logic’s stock plug‑ins.
I tried something different this holiday season: rather than taking advantage of all the year‑end sales, I opted instead to explore some of Logic’s stock plug‑ins that, prior to now, I have been overlooking.
While some Logic plug‑ins like Compressor, Amp Modeler, ChromaVerb and Delay Designer have evocative interfaces, most of the others employ a sterile, one‑size‑fits‑all appearance. The uniform look of these interfaces undermines their power. Sure, they don’t jump off the screen and wow you with their bells and whistles, but rest assured, Logic’s stock effects punch well above their weight.
Shape Up
Transient shapers are a fantastic way to add attack to any sound. But before shelling out for a third‑party plug‑in, check out the stock Enveloper in the Dynamics menu. Its layout is simple — possibly too simple. If you have a bass that’s in need of more attack or a snare that could use more snap, reach for the Enveloper. And while we tend to think of transient shapers as tools to control the initial impact of a sound, Enveloper also allows us to harness the tail as well.
The Enveloper isn’t just for single sounds, either. Insert it on a full drum or percussion loop, and you’ll be surprised at the amount of variation this plug‑in can deliver.
’80s Excitement: Enverb
Before clicking ‘Add to Cart’ on a third‑party ’80s‑inspired reverb plug‑in, have a look at Enverb. Enverb is a simple yet potent reverb with built‑in envelope controls. This makes it perfect for humongous ’80s gated drum effects. Due to its lookahead feature, Enverb can also create some pretty dramatic reverse reverb effects.
Can these effects be achieved with any reverb plug‑in and a gate or envelope shaper? The answer is yes, of course. But having one plug‑in that specialises in this particular type of processing makes it more satisfying than digging around your hard drive for that boutique ’80s reverb plug‑in you bought four years ago.
There’s no dearth of saturation plug‑ins for you to blow your cash on, but before you’re persuaded by another, check out the Exciter plug‑in located in the Specialized menu. The Exciter adds two types of tasteful nonlinear harmonic distortion to high frequencies above a user‑defined frequency. Don’t be fooled by the stark layout and modest array of controls. Most sought‑after plug‑ins are simple. That’s their appeal.
As with any high‑frequency saturator, the effect can become fatiguing if over‑used. I use it sparingly to add a little top‑end presence to dull tracks that are getting lost in the mix.
Experimenting with these unexplored tools buried deep within Logic Pro can be more rewarding and valuable than buying the latest virtual gadget.
Tone Deaf
Test Oscillator is another under‑the‑radar plug‑in that deserves some of your attention. Combine it with a noise gate plug‑in side‑chained to one of your drum tracks, and you can easily add a sub‑frequency sine wave to a kick drum or some white‑noise sizzle to a snare track. Another tried and tested device to add some excitement to transitions is filter sweeps over a white noise tone for a riser effect.
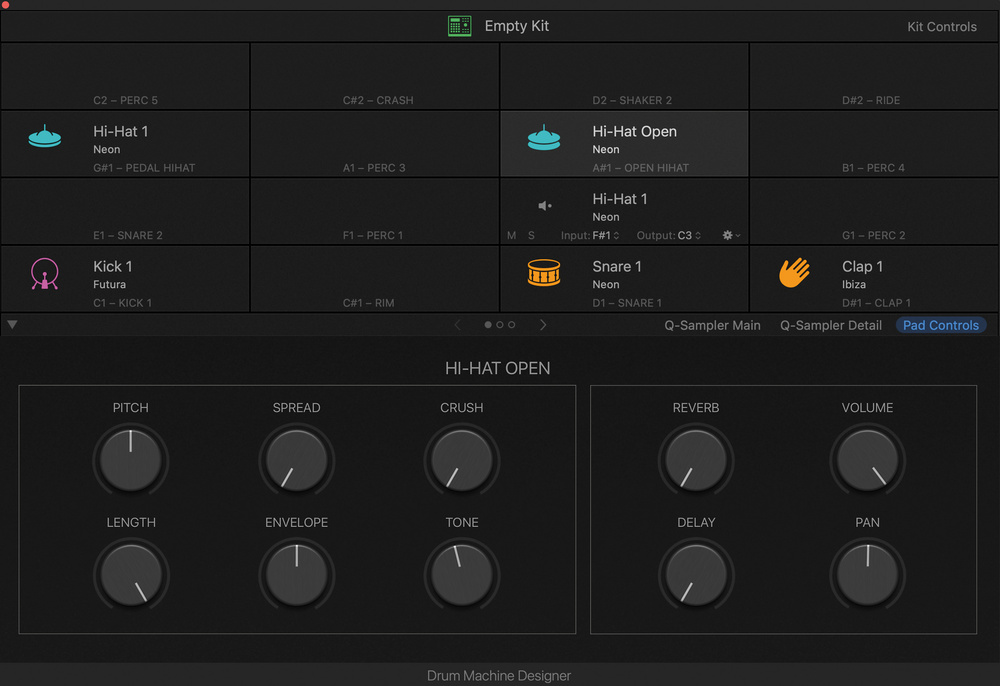
Now that we’ve been introduced to these stock tools, let’s put them to use. Open up a new Logic Pro project and start with a Software Instrument with Empty Channel Strip selected.
Open an empty Drum Machine Designer instrument. Select the Instrument pull‑down menu, scroll past your instruments and other folders and select Drum Machine Designer. I’m not sure why DMD is located in such a seemingly odd place on the list, but I suspect it’s because it’s not really a plug‑in: it’s a container/track stack and, therefore, deserves its own classification.
The reason I load an empty instance here is because I want to make a custom kit. But feel free to open any kit from the library for this tutorial.
We can now load sounds individually from the Library pane. With the first pad selected (C1), let’s add Futura from the kicks menu. Now select the third pad (D1) and let’s add the Neon snare. Continue adding sounds with this method. For this example, we just need kick, snare, clap and hi‑hat. If you click on the pad, the Library will update to the menu of sounds usually associated with that position.
Use the settings in the Pad Controls tab to adjust pitch, volume, or whatever else is needed.
Open up the stack for our kit, and open the mixer. Let’s delete all of the plug‑ins but keep the sends for now. With all of the mixer channels selected, click each row of effects and choose No Plug‑in.
 Screen 1: Let’s start with a kick, snare, clap and hi‑hat loaded into Drum Machine Designer, and programme in a simple ’80s‑inspired pattern.
You can now program any beat you like. I’m going for a fun ’80s‑inspired vibe with a tempo of 180 bpm for my four‑bar pattern. Take a look at my basic groove in Screen 1.
 Screen 2: You can tune the frequency of your sine‑wave oscillator by using your MIDI keyboard.On the kick, let’s add Enveloper and boost the gain on the attack. Next, we’ll open a new track with the Test Oscillator. It can be found in the utilities menu. This plug‑in will immediately start producing its tone. Select Sine Wave from the Generator section. Insert Noise Gate on the Test Oscillator track and crank the threshold to stop the sound for now.
Next, go to the side‑chain drop‑down menu and choose our kick drum. With both tracks soloed, bring down the threshold on the gate until the sine wave is reliably matching with the kick.
One last thing, and this is really cool, you’ll probably want the sine wave to be on the low side to give some sub girth to the kick. But what’s a good frequency? Well, why not start with the key of the song? While on the Test Oscillator track, simply hit the song’s key on your MIDI keyboard and the sine frequency will adjust to it! This feature will also allow you to easily change the pitch to match the chords of your song (Screen 2).
Make It Snappy
 Screen 3: Creating a gated reverb effect.Let’s get to work on our snare, again using Enveloper. I boosted the gain to 80 percent for more snap. Now bring in the Exciter from the Specialized menu and dial in a little high end. You could definitely experiment with the same procedure we did for the kick and the Test Oscillator, but using white noise rather than a sine wave on the snare. But for now, I’m leaving it as is...
Open the Enverb plug‑in on your snare track and choose the Gated Drums preset. Dial in a good dry/wet balance, as I’ve done in Screen 3. I prefer this reverb as an insert on the track rather than on a send, because it’s such a big part of the sound.
Now, let’s build some excitement with a ‘riser’ effect. On a new track, add another Test Oscillator and insert a channel EQ. Automate the High Cut filter to sweep the white noise to create a riser, as in Screen 4.
 Screen 4: Combine white noise from the Test Oscillator plug‑in with a low‑pass filter to create a riser effect.
Lastly, let’s try the Fast Reverse preset from Enverb on the clap to achieve that synth‑pop reverse sucking effect. Because the plug‑in can look ahead, the clap can stay on the beat and the plug‑in can actually begin its effect before the hit. Keep in mind, however, that all look‑ahead plug‑ins add latency, so Low Latency Mode should be engaged for this type of processing.
Of course, these are only ideas and jumping‑off points. I firmly believe that spending time experimenting with these unexplored tools buried deep within Logic Pro can be more rewarding and valuable than buying the latest virtual gadget — especially when you consider that the latest gadget is usually just a highly‑marketed version of something Logic has included, albeit in a banal interface, for years.


