 Setting up Logic Pro for Atmos mixing is simple.
We show you how to get started in the brave new world of Dolby Atmos.
I’ve been involved with surround sound for many years, with much experience of multi‑channel, Ambisonic and diffusion systems (which use multiple speakers with different frequency‑response characteristics to simulate an immersive experience from a stereo or mono source). However, this has nearly all been in the experimental and installation areas of creative practice. I’ve never been a fan of using surround for music production, as stereo seems to hit the sweet spot between soundstage, instrumental separation, and visceral excitement. The latter in particular often appears absent in the multi‑channel productions I’ve heard. However, the incorporation of Atmos capabilities into Logic Pro, and the ability to create and monitor binaurally on headphones without having to have a multi‑speaker setup, has prompted me to revisit surround for music mixing.
This workshop should help you get started with the new tools that were introduced in version 10.7 of Apple’s flagship DAW. One caveat: Atmos requires Big Sur at a minimum and, while Logic Pro has an Apple Music render facility in version 10.7.3 (something missing from the initial launch), you’ll need Monterey for this — and also for the head‑tracking feature to work. The latter can only be used with certain Apple headphones and requires an M1 Mac.
For a thorough introduction to Atmos and immersive audio in general, I recommend that you read Sam Inglis’ excellent article in SOS January 2022 (https://sosm.ag/immersive-audio) before you start exploring.
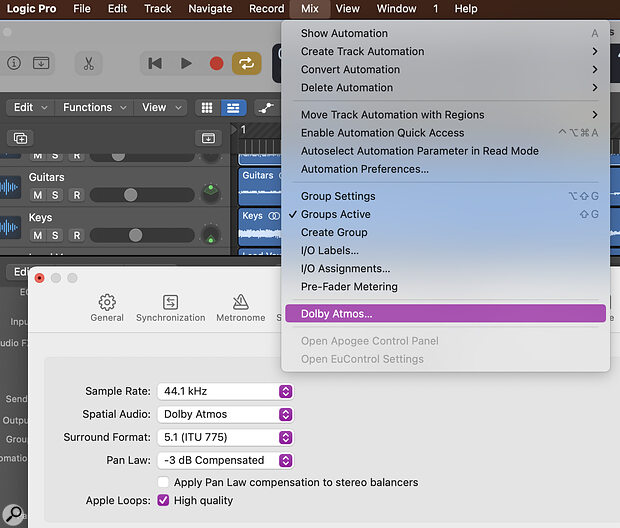
It’s important to remember that in Logic Pro, Atmos mixing needs to be treated as a completely separate process from a ‘traditional’ stereo mix, so it makes sense to work on a new Project Alternative (from the File menu). To get started, your buffer (in File / Audio Preferences) will need to be set to 512 when working up to 48kHz or 1024 for higher sample rates, and Atmos needs to be ‘switched on’ from the Mix menu. This is also where you choose the system that will be used for playback of the bed audio (more on this later). I’ve been using 5.1, as that’s the hardware surround system that seems to be commonly used by those who have bought my albums! For this workshop, I’m going to be using stems from a track I’m also mixing in stereo, while placing sounds that suffer from audio masking alongside some of what Howard Jones called ‘musical moments’ in the Atmos immersive ‘space’.
The Atmos plug in can be seen as a sort of virtual monitoring system, which enables you to hear on headphones what your mix will sound like via various playback systems.
Make Your Bed
Atmos mixes consists of channel‑based ‘beds’ (Logic Pro can only have a single one) that make up the foundation of a track, alongside objects that can be moved around in a three‑dimensional space. The bed can be as basic as a mono or stereo track or a complete multi‑channel Project. The advantage of the bed is that it can (theoretically) be folded down (or up) to sound acceptable on whatever playback system is used. It also takes advantage of overhead monitors (in the 7.1.2. format) and the Low Frequency Effects (LFE) channel — which is great for those Moog Taurus pedal notes. You’ll notice that when you enable Atmos in a Project, a plug‑in is automatically placed on the master channel, and that each individual track now has a surround panner. You can think of the Atmos plug‑in itself as a virtual monitor section that allows you to hear (and render) audio ready for Atmos playback. Unfortunately, Apple have not implemented some of the features of the Dolby Atmos Renderer in the Apple Renderer (basically, the surround bed distance features), so mixes will sound different between these systems.
By default, the track panners are set to ‘bed mode’. I’m finding that a stereo mix of the main elements of a track, positioned so that it sounds pretty much like it would in a two‑channel playback scenario, works well, although I like to remove elements that can get lost in a stereo mix, such as backing vocals, heavily distorted guitars and special effects. These I will instead place elsewhere in the surround space of either the bed itself or in the 3D space. I also find that bouncing stems through my array of analogue hardware seems to maintain some of the energy and ‘mojo’ this usually gives me in a stereo mix.
 The ‘bed’ Surround Panner and the Atmos 3D Object Panner.
Double‑clicking on the default pan object brings up the Surround Panner window, where you can define where in the bed‑based immersive space you want your audio to be located. This is very intuitive in use — you just drag around the L and R objects to place audio in the space, though numeric entry points are also available for precise placement. The circular ‘puck’ can also be dragged around to change the spread, or width, of channel elements, while the Separation control allows you to ‘mix’ these into each other or separate them completely (this option isn’t available if you are using surround stems). If you’ve set up a 7.1.2 bed format with height channels, you’ll also see an Elevation control appear, as well as a separate Spherical display window that helps places audio above the listener. If you right‑click on a pan object and select the 3D Object Panner, this will open a different window. You use this panner to place Atmos objects in the 3D space separately from the bed tracks. Again, it’s a pretty intuitive system, with the same objects and spreader ‘puck’ as for the Surround panner, but with the addition of an elevation parameter to allow you to locate audio above the listener’s head. There’s also a Spread parameter that can be used to ‘defocus’ the position of any audio object.
If you open up the Atmos plug‑in and select a Render monitor option, you’ll see your 3D objects represented in the window as blue dots, which become visible only when audio is playing, so the display isn’t overwhelmed (it’d be even better if the dots could reflect track colours). It is also possible to see where these objects lie when Logic Pro is stopped by clicking on their names in the 3D objects box. You can drag the box around to see more clearly how your audio is located, or use the preset orientations at the bottom of the window. I’ve set up a Screenset with all my track panners and the Atmos plug‑in displayed for easy recall, making it simple to switch between level mixing, processing and surround panning. I also find that using Folders, Groups and VCA Groups helps me keep track of the bed and 3D objects when mixes get complex.
You can automate any of the surround and object panner parameters in the usual fashion. I suspect that this feature will be initially overused, as creators explore the potential of the Atmos format — in the same way that stereo effects were often abused in the (g)olden days of early audio experimentation. If you want to use effects in your Atmos mix, you’ll need to bear in mind that any effects placed before the Atmos plug‑in on the monitor bus will only affect the bed tracks, and those placed after the plug‑in are for monitoring purposes only. If you want to process the audio, you’ll really need to do it at track level. Multi‑mono versions of many of Logic Pro’s effects are available, so you can process individual channels from a single plug‑in window.
 Any multi‑mono version of Logic’s built‑in plug‑ins can be pressed into service in an Atmos mix.
Return To Render
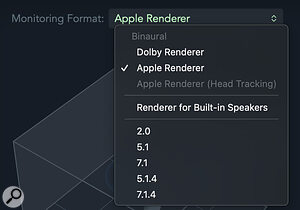
The Atmos plug‑in includes a virtual monitoring system, which enables you to hear on headphones what your mix will sound like via various playback systems. You’d use the Apple renderer if your mix is destined for Apple Music, or the Atmos one for playback on Dolby Atmos‑enabled systems. There are also options for built‑in speakers, and the common surround‑sound formats for ‘traditional’ bounces.
 The Apple renderer can output in Apple Music, Dolby Atmos, and traditional multi‑channel surround monitoring formats.Once you have the mix to your satisfaction, you can Export your Project as an Audio Definition Model Broadcast Wave Format (ADM BWF) file, which is the standard Atmos Dolby distribution format. If your Project isn’t at a 48kHz sample rate, the renderer will convert it automatically. You must make sure your rendered file’s LUFS value does not exceed ‑18, so it’s vital to place a loudness meter before the Atmos plug‑in to monitor your output. In fact, it’s pretty good practice to place multi‑mono level meters on your tracks and use the Gain plug‑in to keep your levels in check.
Conclusion
In some ways, mixing music in and for Atmos is easier than working in stereo — you don’t really have to worry about how your music will sound on a plethora of different systems, as most of the listening is going to be on headphones. On the negative side, the Apple and Dolby renderers can sound very different depending on the material!
While the jury is still out as to the usefulness of Atmos for music production, its incorporation into Logic Pro means that more users can experiment with immersive sound — which could be a big deal for podcast and indie game producers. As in the early days of recording, where there were no ‘rules’ as to how a piece of music was supposed to sound, so it is now with Atmos for music. I really hope Apple incorporate some kind of Atmos delivery into Garageband in the future as well, as this should open up the creative potential for surround sound even further. Who knows, maybe the future Atmos George Martin is reading this article right now...


