Cakewalk have strengthened the MIDI side of Sonar 5 considerably, in recognition of the rise of software synths that benefit from enhanced MIDI controllability. We run through some of the new features and suggest how you might want to use them...
As announced last issue, Sonar has hit version 5.0, and while its new synths, REX file support and other topics with a bit more sex appeal might overshadow its MIDI side somewhat, the MIDI facilities of the program have also been overhauled. From layout to effects, there have been substantial changes — so let's talk about how to make the most of these.
In-track MIDI
The most fundamental change is integration of MIDI data into track views and the merging of more information into the standard MIDI Piano Roll view. But another pivotal change is that you no longer need to open up a separate window to do effective MIDI editing: it can be done within a MIDI clip in the Track view.
So what makes seeing the MIDI data in a track better than seeing it in the usual Piano Roll window? It's all about context — you can see MIDI data in context with other MIDI and audio tracks. This is useful when, for example, you want to check whether a MIDI bass note lines up precisely with an audio kick drum hit or is off by a few milliseconds. You no longer need to look carefully to see where on the timeline the note hits, then compare it to where on the timeline the kick hits: just move the tracks next to each other and compare directly.
This takes on additional importance because, as we'll see later, controller data can now be shown superimposed on note data, rather than being in a separate, isolated strip. It's also possible to edit controller data in context with other tracks.
MIDI Scale & Zoom
The first key to working with Sonar 5 's MIDI features is understanding the MIDI scale/zoom function. Load up a sequence with some MIDI data and, in the Track view, expand one of the MIDI tracks to a reasonable height. Note that (similarly to how the audio tracks have a scale for audio level values) the MIDI tracks now show either a keyboard or note numbers that relate to the MIDI data in the track. Here's how to use this new feature.
 The new scale and zoom control gives a much better view of what's happening within a MIDI track when you're working in the Track view. 1. Right-click on the scale and choose either Notes (shows a keyboard with musical note values such as C3, C4, and so on) or 7Bit Values (shows the MIDI note number instead). Note that the option you choose affects all MIDI tracks, not just the one on which you clicked. If the track is zoomed so far out that it's not possible to draw the keyboard graphic, note numbers will be shown even if the Notes option is selected. Zooming in will affect the note-number display (ie. the notes move further apart) until there's enough space to show the keyboard graphic, at which point it's displayed.
2. To zoom (this is done on individual tracks and is not a global control), click on the MIDI track's scale. Drag up to zoom in or down to zoom out. Note that when 7Bit Values is selected, the notes in the track still zoom, but the scale doesn't change.
3. To 'scroll' up and down to see a higher or lower range of the keyboard, right-click on the scale and drag up or down. (Incidentally, the standard Piano Roll view doesn't use the same scale/zoom protocol, but retains the method used in Sonar 4: (+) and () scroll buttons in the window's lower-right corner.
When you're using the scale and zoom options, a particularly handy function in the scale's right-click menu is 'Fit Content' (you can see the option in the screen shot above). This automatically scales the track so that all data fits within the selected track height.
In-line Piano Roll View
In-line Piano Roll View (PRV) takes track integration one step further, as it allows you not only to view the data in context, but edit it. To do this:
 Clicking on the PRV button allows you to see a MIDI clip in a way very similar to the standard Piano Roll view, except that it's in context with the other tracks. Also note the controller data in the background and the in-line Piano Roll toolbar floating over the clip. 1. Click on a Track's PRV button. Also note that there's a separate toolbar for PRV mode, which you can dock or float over the clip (see the screen on the right).
2. The second drop-down menu from the top (just above the volume and pan controls) determines what type of data you'll be entering or editing. You can choose from Notes/Velocity or one of a list of controllers. To add a new controller, select 'New Value Type' and choose the required type of controller, value and channel.
3. If you want to add notes with the Pencil tool, use the upper-left drop-down menu to select the required note value.
4. The remaining drop-down menu is a 'view filter' that allows showing/hiding of velocity, various controllers, clip outlines and notes. A track with a lot of controllers can get rather confusing, so this makes it easier to focus on a limited number of items for editing.
Another useful feature of PRV is that you can shift-click on one of the scale's keyboard notes to audition it, or shift-click-drag and run your mouse over the keys to hear all the notes as you mouse over them.
The PRV toolbar is extremely useful. I dock it along the lower edge of Sonar 's main window, along with the other toolbars I use the most. The toolbar consists of buttons for the Select, Draw and Auto Erase tools, along with buttons that show/hide notes, controller data and velocity tails. Two additional buttons select the Fit Content option and turn PRV mode on and off.
There is one limitation of working in PRV as opposed to the separate Piano Roll view: scrubbing of MIDI notes is possible only in the standard Piano Roll. In the Clips pane, the scrub control affects only audio tracks.
MIDI Step Recording
'Real' musicians have always tended to look down on step recording as a crutch for those who aren't capable of playing a part in real time. But step recording has a variety of other uses, such as fast transcribing of sheet music, creation of arpeggios and entering of complex chords.
 This screen shows the Advanced Step Recording dialogue, along with a series of notes that were step-recorded. Note how the spaces between notes correspond to the full-stop symbols inserted between the steps in the pattern section. Sonar 5 has made step recording far easier and more efficient. For my way of working, the biggest improvement is the handling of keyboard-shortcut bindings. The bindings are optimised so that you can play the notes you want to step with your left hand and use your right hand with the key bindings to edit the step-recording characteristics (note lengths, add step sizes together, step forward, step backward — which you can now do repeatedly — move one beat forward, and so on). The results of step recording show up immediately in a clip (even if you've enabled PRV mode in a track) and you can use other commands while step recording, including changing tracks. You can edit the key bindings if desired, but I found that the default ones worked just fine.
The step-recording dialogue box now has two settings, Basic and Advanced. Advanced mode has several additional features, including the ability to randomise note durations. There are also some more advanced navigation options, such as the ability to link the point where data is inserted to the Now time. Linking to the Now time is a much faster way to jump to particular sections of a tune, compared with using the advance and back options.
It's also possible to have Sonar 'learn' a pattern and step accordingly. In other words, if you keep having to enter rests in particular parts of a pattern, Sonar can automate this process. Here's how:
1. Choose the Advanced step-recording dialogue. (This technique isn't possible with the basic dialogue.)
2. Select the desired step size. In the screen shot overleaf, the step size is set to 8th notes.
3. In the Pattern field, enter which steps should have notes (indicated by a number) and which should have a rest (indicated by a '.' — or you can also type 'r'). For example, in the one-measure pattern shown in the screen shot above, there are two eighth notes, followed by an eighth note rest, followed by another eighth note, followed by two eighth note rests, followed by two eighth notes.
4. Start playing. Rests will be inserted automatically between the notes you play, according to the pattern you entered.
There are other nice benefits associated with this feature. For example, every pattern you use in a song can be accessed via the pattern drop-down menu. So if, for example, you use one bass timing pattern in a verse and another in a chorus, you can alternate between them when step recording.
MIDI Effects Make-over
Functionally, Sonar 5 's MIDI effects are pretty much the same as those in previous versions of Sonar, although there have been enhancements here and there. However, the look has been very much improved, so you needn't hide anything if you open one up while an important client is looking at the monitor! The new look is reminiscent of Project 5, with more readable parameters. My only disappointment is that the very cool Session Drummer plug-in looks as uncool and user-unfriendly as ever. One warning: If you install Project 5 after Sonar 5 has been installed, don't install the Project 5 MIDI effects. They'll overwrite the Sonar 5 ones with older versions. If you do this by accident, you can always re-install Sonar 5 but tick only the MIDI effects for installation.
New View For Piano Roll
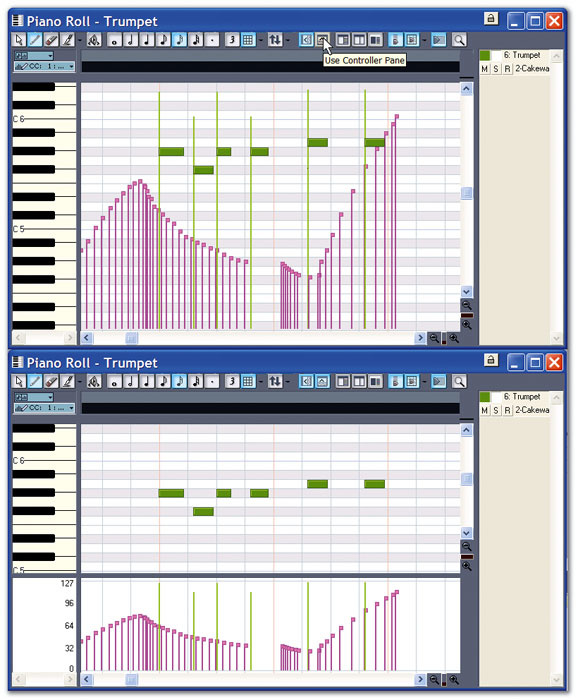
Even the Piano Roll view has been updated. The biggest change is the ability to either have controllers and velocity integrated in the same pane as the notes, or segregated in a separate controller pane toward the lower part of the window, as in previous versions of Sonar.
 You can now adjust velocity for notes in a similar way to how it's done in Project 5, which is more straightforward than in previous versions of Sonar.
You'll also find two drop-down menus like the ones used in the in-track Piano Roll View. One chooses the data that will be displayed in the window (velocity, controllers, notes, clip outlines and so on), while the other facilitates the entering and editing of velocity and controller data. When you're displaying multiple controllers, the window can get extremely cluttered. So when you choose one of the controllers, it is automatically sent to the 'front', while the other controllers are shaded lighter and put in the background. This makes it easy to adjust one controller while still seeing it in the right context with other controllers. However, even then you can have too many controllers for comfortable viewing — which is why being able to hide particular controllers is extremely helpful.
One of the most useful additions to the Piano Roll view is easy velocity adjustment, as was first introduced in Project 5. Here's the process:
1. Select the Draw tool (the one that looks like a pencil).
2. Mouse over the top edge of the note until seven parallel lines appear to the right of the pencil (see the screen below).
3. Click. The note and its associated velocity stem become brighter, and you'll see a readout that shows the note name, note number, velocity and duration.
4. Drag up to increase velocity or down to decrease velocity.
The big advantage of this approach is immediately obvious when you want to adjust velocity on individual notes within a chord: you can easily distinguish each note's velocity. However, if you want to change velocities for a lot of notes simultaneously it's still easier to use the controller pane, as you can draw a line over the velocities and have their values conform to the line you drew.
More 64-bit Confusion
One of the recurring questions in forums is whether you need to use a 64-bit computer to take advantage of Sonar 5 's 64-bit audio-processing engine. We touched on this briefly in last issue's Sonar Notes, but it's worth reiterating that even a 32-bit computer takes full advantage of the 64-bit double-precision audio path. In other words, audio quality will be the same whether you run Sonar on a 32-bit or 64-bit machine. It's not dependent on the operating system either — you'll hear the same results with Windows XP or x64.
The difference between 32- and 64-bit computers lies in operating speed, and the ability to address huge amounts of RAM. A 64-bit machine with a 64-bit operating system will be somewhat faster and will be able to address more RAM than a 32-bit machine.
Also note that you can use 32-bit VST plug-ins in a totally 64-bit environment (processor and OS). Some people have a hard time with this concept because it's counter-intuitive: you'd expect to need plug-ins designed to work with 64-bit systems. But Cakewalk's BitBridge technology lets 32-bit plug-ins 'look like' 64-bit plug-ins, in a similar way to how their SurroundBridge in v4 allowed stereo plug-ins to function in a surround environment. All clear now?
The Piano Roll View & Multiple Tracks
One of the advantages of working with the standard Piano Roll view instead of the in-line version is that you can see multiple MIDI tracks simultaneously and choose a specific one on which you want to work. You might want to see multiple tracks at the same time in the case of keyboard parts where the right-hand and left-hand parts are in separate tracks, drum tracks where different drums and percussion are on separate tracks, and doubled parts where you want some variations. To work with multiple tracks:
 With the Track pane showing, you see a list of all tracks whose data is visible in the Piano Roll view. Within the Track pane you can also enable and disable editing for individual tracks. 1. Select the tracks you want to see in the Piano Roll Track pane. There are two ways to do this. The first one is to select the tracks, either in the Track or Console view, then go View / Piano Roll (or type Alt+5). The selected tracks will be visible in the Piano Roll view. Alternatively, with the Piano Roll view open, type T (for 'Pick Tracks') or click on the Pick Tracks button (the double arrows). In the Pick Tracks dialogue that appears, Control-Click on the tracks you want to see, or Shift-click to select multiple contiguous tracks.
2. If you don't see a list of the tracks toward the right of the Piano Roll window, make sure the Show/Hide Track Pane button is on. This is the button to the immediate right of the Pick Tracks button.
3. To highlight a track so that it becomes the 'active' track (as indicated by its notes being brighter than the other tracks) and therefore can be edited, you have four options:click on the track name in the Track pane; click on a note that's in the track; select the track in the Track view; or select the track in the Console view.
4. You can now edit the active track at will — enter notes, erase, and so on.
Note that each track in the Track Pane has Mute, Solo and Record buttons. Sometimes it's handy to be able to access these functions from within the Piano Roll view rather than having to jump over to the Track or Console view. Another trick is that you can switch all tracks in the Track pane to the next higher or lower number using the drop-down menu to the immediate right of the Pick Tracks button. For example, if the Track pane shows tracks five, eight, nine and 13, selecting Show Previous Track(s) will cause the Track pane to show tracks four, seven, eight and 12, while selecting Show Next Track(s) will cause the Track pane to show tracks six, nine, 10 and 14. Finally, you can Show/Hide track data by clicking on the track's colour button (the leftmost square associated with a track). If the colour is visible, you'll see the notes; click on it to turn it white, in which case the notes are hidden. Note that if some tracks are hidden and some are visible, you can use the invert button (or type 'V') to reverse these. For example, if tracks two and six are hidden while three and 10 are visible, typing 'V' causes tracks two and six to become visible, while tracks three and 10 become hidden.
Long Live MIDI
With the surge in virtual instruments driven by MIDI data, MIDI has once again come to the forefront of the sequencing process. By revamping the way Sonar handles, displays, and edits MIDI, Cakewalk have shown that they recognise this trend and have made it a lot easier to work with virtual synths — or any MIDI-related sequencing.
Sonar News: Cakewalk Release Mac-compatible Soft Synth
 The Dimension Pro is a fine synth in its own right, but what raised eyebrows at AES was its Mac compatibility. Cakewalk's big announcement at the recent Audio Engineering Society (AES) show in New York was the availability of the Dimension Pro software synthesizer (the original version first appeared in Project 5 V2) for PC and — yes — Macintosh. The instrument, which lists for $359, supports Audio Units, DXi and VSTi formats and comes with two DVDs of content.
If you look at Project 5 V2 comments on Internet forums, the prevailing opinion seems to be that it's worth upgrading Project 5 just to get this synth. Indeed, it's very powerful, not only featuring a ton of presets (1500, to be exact, spread over the two DVDs) for plug-and-play types, but also offering sufficient depth for hardcore tweakers. It employs samples, physical modelling components and 'analogue' sound generation (based on waveguide generators and wavetable oscillators), all of which can work together in various ways, and you can mix and layer up to four stereo parts per program. There's also a Vector Mixer for real-time sound morphing.
As for pedigree, the design comes from Rene Ceballos, who's known for the z3ta+, Triangle DXi synth, and Pentagon virtual analogue synth (which is now included with Sonar 5). As Cakewalk now own rgc:audio (Rene's company), I suspect that we'll see other cross-platform instruments appearing before too long. What about a Mac version of Sonar? Cakewalk still don't seem sold on the concept, but I can't help wondering if Apple adopting Intel chips might throw some weight in that direction.

