Sampling a record may be child's play, but using such samples effectively in your own compositions requires plenty of skill and finesse.
Music that's based around samples of commercial records is big business these days, and getting started with this kind of production seems easy, requiring little more than a computer, some DAW software, and a few CDs. In reality, though, fitting a sample from one record into a whole new production presents plenty of practical challenges, both while making the music and when creating a final mix. In this article, I'll explore how to tackle these challenges so that they don't stand in the way of your creativity.
Matching Tempo & Pitch
A primary concern with any rhythmic sample is matching its tempo to that of your track. Some kind of time-stretching algorithm is built into pretty much every DAW now, and they usually produce excellent results with simple non-percussive samples (solo vocal or instrumental phrases, for example) as long as the tempo-shift range is modest; perhaps a five percent stretch either way. When you make larger tempo adjustments to complex mixed audio, though, noisy and harmonically rich components of the signal will start exhibiting 'wavery' processing artifacts, and transients can sound smeared or flammed. One way to circumvent this for samples containing clear rhythmic events (drum hits or guitar picking, for instance) is to cut the sample into slices and reposition each to fit the new tempo. If you move the slices closer together, you have to remove overlaps between the sample slices; and if pushing slices apart, you have to extend the audio at the start of each slice to cover the gaps. In both cases, you'll usually need to crossfade at the edit points for a smooth-sounding outcome. For short samples, this is easy enough to do using your sequencer's editing tools, but for longer sections you'd be well advised to investigate any automatic beat-slicing routines your DAW has to offer. If these aren't up to scratch, similar functions are available in some software samplers (such as Native Instruments Kontakt), as well as via dedicated loop-slicing utilities such as Izotope Phatmatik Pro and Propellerhead Recycle.  This screenshot shows a drum loop that has been 'sliced' in Reaper, to sync it to a slower project, a tempo-matching technique that often sounds more transparent than time-stretching for percussive sounds.
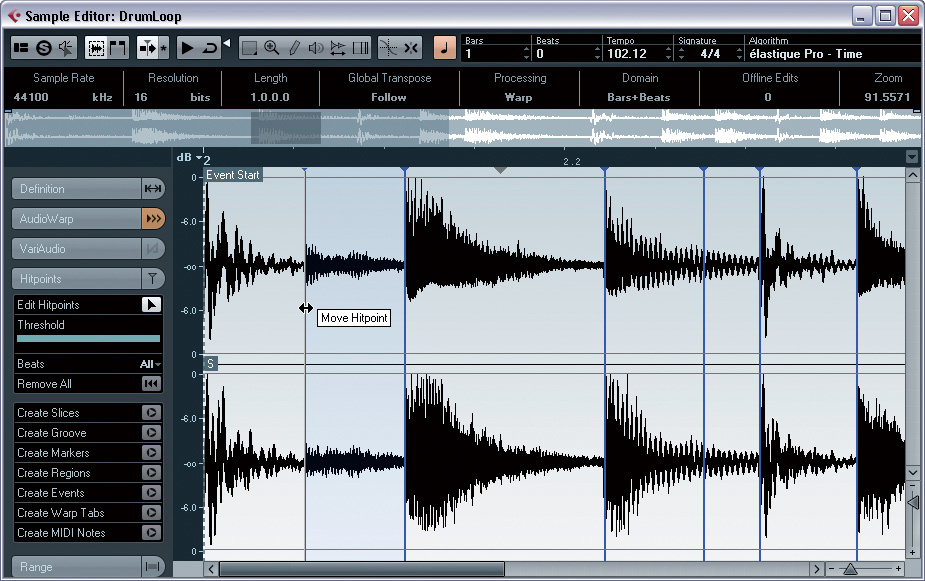
Beat-slicing can also lend a hand when a sample is ostensibly at the correct tempo, by correcting unwanted flams between sampled rhythmic events and your own rhythm programming. Although some productions have made a virtue of samples with a loose rhythmic feel, massaging the timing of the sample, or even hard-quantising it, can really help consolidate your track's groove in most situations. Many sequencing applications have sophisticated audio 'warping' functions, which allow you to shift the timing of individual beats using time-stretch processing, but I've noticed that groove manipulation can often entail quite dramatic momentary time-stretches — so for full-mix or rhythm-section samples, I usually find myself sticking to beat-slicing.
For most electronic musicians, matching the key or pitch of a sample with their production will be less of a sticking point than adjusting its tempo, because a range of two or three semitones either way can deal with most harmonic clashes, and almost all pitch-shifting algorithms can handle this degree of shift very competently. Indeed, there are dozens of commercial releases that shift a sampled line or chord wholesale over a small range, to allow more harmonic variety: well-known examples include the bass in The Chemical Brothers' 'Block Rockin Beats' and the Sugababes' 'Overload'; the horns in Lily Allen's 'Smile' and Portishead's 'All Mine'; and the piano in Caro Emerald's 'A Night Like This'.
 Although the slicing and warping tools in DAWs make hard-quantising audio easy, a virtue can be made of deliberately looser timing, as demonstrated by Ms Dynamite's 'It Takes More' and Alicia Keys' 'Karma'.
 Different pitch-shifting algorithms can sound very different, though, so if you have options available, compare their results on critical jobs. They may all produce audible processing artifacts, but one set of side-effects may suit the sampled audio (and your production) better than another. For samples that you want to shift across a wider range, specialist software such as Serato Pitch 'N' Time or Celemony's Melodyne will give you the clearest-sounding results.
Hiss, Crackle & Hum
 Different pitch-shifting algorithms can have very different processing side-effects. For radical shifts, it's worth comparing the available options.Even if you manage your gain structure while recording (as detailed in the 'Clean Capture' box), the 'well-loved' nature of the source media may make it inevitable that some background noise makes it into the sample. This may not be a problem if the sample is embedded in a busy mix (notice how the obtrusive background noise on the opening vocal sample of Moby's 'Why Does My Heart Feel So Bad' is comprehensively masked from consciousness once the full arrangement kicks in, for instance), but samples that occupy more space in a sparse arrangement may require some processing.

 can be quite effective at tackling background hiss. To pull down the hiss by more than about 6dB you'll probably need to call on dedicated noise-reduction software such as Voxengo's Redunoise..") Fast, low-ratio expansion of a sample's upper frequencies (as in the UAD Precision Multiband plug-in) can be quite effective at tackling background hiss. To pull down the hiss by more than about 6dB you'll probably need to call on dedicated noise-reduction software such as Voxengo's Redunoise..High-frequency EQ cut can tackle broadband high-frequency 'hiss', but usually this dulls other sounds, making the cure no better than the disease. Full-band dynamics processing rarely provides a significant advance either, because it only works in gaps between sounds, and mixed samples rarely have many of those. The most fruitful tactic tends to be multi-band dynamics processing, targeting just the offending high-frequency region. I usually use a fast-acting low-threshold expander at a very low ratio (say 1.2:1) above 2-3kHz. This tracks the high-frequency energy levels of the desired elements of the sampled signal pretty closely, and usually enables around 6dB of apparent noise reduction before things start to sound odd. For more serious hiss-removal activities, you'll need more specialised help: my affordable tip is Voxengo's Redunoise, although more general-purpose restoration bundles such as BIAS Sound Soap 2 or Izotope RX2 will also do a fine job.
Fast, low-ratio expansion of a sample's upper frequencies (as in the UAD Precision Multiband plug-in) can be quite effective at tackling background hiss. To pull down the hiss by more than about 6dB you'll probably need to call on dedicated noise-reduction software such as Voxengo's Redunoise..High-frequency EQ cut can tackle broadband high-frequency 'hiss', but usually this dulls other sounds, making the cure no better than the disease. Full-band dynamics processing rarely provides a significant advance either, because it only works in gaps between sounds, and mixed samples rarely have many of those. The most fruitful tactic tends to be multi-band dynamics processing, targeting just the offending high-frequency region. I usually use a fast-acting low-threshold expander at a very low ratio (say 1.2:1) above 2-3kHz. This tracks the high-frequency energy levels of the desired elements of the sampled signal pretty closely, and usually enables around 6dB of apparent noise reduction before things start to sound odd. For more serious hiss-removal activities, you'll need more specialised help: my affordable tip is Voxengo's Redunoise, although more general-purpose restoration bundles such as BIAS Sound Soap 2 or Izotope RX2 will also do a fine job.

 Three ways to take the edge off vinyl crackle: transient reduction using SPL's Transient Designer; fast high-frequency limiting using Cockos ReaXcomp; and level-ducking with careful crossfade audio edits.
 However beneficial vinyl crackle may be to the overall vibe, its transients can be distractingly sharp-sounding. To round them off, straightforward high-frequency EQ cuts or fast peak limiting can yield some improvement, if the tone of the sample will tolerate them, but a dedicated threshold-less transient processor such as SPL's Transient Designer will usually allow more transparent results, because it acts so quickly and will process any lower-level clicks. Alternatively, if your DAW offers adjustable crossfades, you can tame crackles with a bit of editing: cut the sample where there's an over-prominent crackle; apply a crossfade to just cover the spike (it should be visible on the waveform); and adjust the fade-in/out curves to a concave shape that dips the level at the crossfade's mid-point.
 A final nasty that sometimes crops up is 50Hz/60Hz hum or buzz, stemming from an earth-loop problem when capturing the sample. It's best to re-record, but if you can't, simple notch EQ won't solve the issue. Instead, use a comb-filtering plug-in such as Tone Boosters' TB_HumRemover to cut the individual pitched harmonics of the hum/buzz. One word of caution, though: if any musical pitches in the sampled audio match the hum/buzz frequency, they'll also be nixed, and you may need to automate the processing depth as a workaround.
 If your sample includes earth-loop hum, a comb-filtering plug-in can help. Here, I've set Tone Boosters TB_HumRemove to zap the fundamental frequency and seven further harmonics of 60Hz US mains hum.
Fitting Samples Into The Mix
The record you sampled was designed to stand alone, rather than having to compete with other sounds, so however carefully you build your track, the sample may still need some radical EQ. Given the requirements for a tight, powerful low-end in many sample-heavy genres, high-pass filtering is extremely common practice. For instance, compare the first verse of  It's very common for the mix EQ of a repeating sample to be automated so that its tone can be adapted to the demands of a changing arrangement. In the mixdown project shown here, a high-pass filter on the main hook sample only rolls off the low end when the main programmed bass synths enter the fray.
, or by panning the two channels of a stereo file more centrally.") Narrowing wide stereo samples can be achieved using a simple M/S plug-in (such as Voxengo's MSED, pictured), or by panning the two channels of a stereo file more centrally.Dido's 'Thankyou' to its sampled appearance in Eminem's 'Stan': the low end has been rolled off in the latter from around 400Hz. Remember that high-pass filter settings that suit one section of your arrangement may be less appropriate elsewhere. In the Propellerheads' 'On Her Majesty's Secret Service', the severe filtering of John Barry's Bond-film score at 2:35 feels well-judged, given the enormous big-beat monster it's riding on, but earlier in the track, before the full rhythm section arrives, the virtue of such a thin sound is debatable.
Narrowing wide stereo samples can be achieved using a simple M/S plug-in (such as Voxengo's MSED, pictured), or by panning the two channels of a stereo file more centrally.Dido's 'Thankyou' to its sampled appearance in Eminem's 'Stan': the low end has been rolled off in the latter from around 400Hz. Remember that high-pass filter settings that suit one section of your arrangement may be less appropriate elsewhere. In the Propellerheads' 'On Her Majesty's Secret Service', the severe filtering of John Barry's Bond-film score at 2:35 feels well-judged, given the enormous big-beat monster it's riding on, but earlier in the track, before the full rhythm section arrives, the virtue of such a thin sound is debatable.
At the other end of the frequency spectrum, it's not unusual for a sample to compromise the clarity of a more important lead-vocal line, in which case keeping the sample's tone well in check above about 3kHz can be a wise move. This is particularly relevant where the sample includes vocal hooks. Kanye West's 'Gold Digger' and 'Diamonds From Sierra Leone' both noticeably restrain the high end of their central sampled hooks.
Beyond this, you can treat a sample like any other track when it comes to applying mixdown EQ: if you can't hear something important in the sample, try to cut away regions of other tracks that might be obscuring it; and if you're struggling to achieve clarity for your recorded or programmed parts, investigate whether a few EQ troughs in the sample improve matters. In the latter event, try repeatedly toggling the sample's mute button while focusing your listening on other tracks, rather than on the sample. This makes frequency-masking effects more obvious, and makes it easier to decide whether the sample needs further EQ. You may need to adjust the EQ of your sample to adapt it to changes in the arrangement: the timbre might come across beautifully over a simple piano introduction, but be completely muffled by the masking effects of a heavy rhythm section later on. 
Adjusting Stereo Width
 This screenshot shows a simple setup which can create a wide stereo effect from a mono sample: multi the sample to a second channel with a 5-20ms delay inserted in it, and then pan the two channels to opposite sides of the stereo field. Just make sure to check how it sounds in mono!The stereo width of a sample is another important consideration, especially as it's an area over which you can exert control. Wide stereo samples sound impressive in isolation, but listen to the impact on your mix when they stop playing. If the sample is the widest element but drops out for your main hook/chorus sections, you can undermine the important sense of arrival at these points. A little narrowing of the sample's image may therefore be advisable on occasion, whether you achieve that with simple panning or by using some kind of Middle & Sides-based stereo width-adjuster.
 Here are two lesser-known plug-ins for adding width to a mono sample, both of which boast excellent mono compatibility: Melda's MMultiBandAutopan and Dallas Hodgson's SHEPPi.
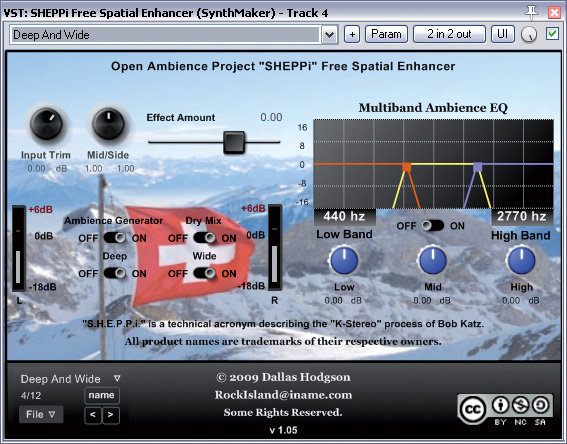 Another approach, of course, is to work your arrangement around the sample, making sure that there's something else to fill any stereo-width holes when the sample drops out. Stereo synth-pads, or wide-panned rock-style guitars are prime candidates, but use whatever works.
It's not uncommon for commercial releases to have poor mono compatibility, so be sure to check that your sampled hooks don't disappear when summed to mono. This might involve nothing more complicated than hitting the Mono button and saying 'that sounds alright', but if you discover nasty tonal changes or a big drop in level, that might be another argument in favour of narrowing the stereo width — or even chucking out one channel of the sample altogether!
How to convert a mono sample into stereo is a recurring newbie query, and not without reason. If your sample isn't responsible for the music's main hooks, you might not want it veiling more important tracks in the centre of the image. As mix engineer Dave Pensado commented on his Pensado's Place TV show: "The middle is the most sacred spot... That's where the money is. You can't put anything there that doesn't belong there, because it's the most important thing. So you put vocals there, you put rhythmic elements, groove elements there. But get [other] stuff out of the middle.” However, at the same time the mix may feel uncomfortably imbalanced if you pan your sample off to one side. Although reverb can expand stereo width, it's not usually the answer, because of its potential for distancing and cluttering side-effects. Slightly more promising are stereo modulation effects such as chorusing, flanging and phasing, but the stylistic baggage of these treatments often rules them out too.
One time-worn technique is to feed the mono sample to two separate mixer channels, one of which is delayed by around 5-20ms. Panning these hard to opposite sides of the stereo field gives the impression of stretching the mono signal right across the stereo panorama. The down side is that comb filtering between the two versions can wreak havoc with your sample's timbre in mono, so take time to tweak the delay while listening in mono to check for the least offensive-sounding setting. If you don't need such a wide stereo picture, you can pan the two channels more moderately, and this will also reduce the mono/stereo timbral mismatch.
Another widening technique that's better for mono compatibility is EQ'ing the left and right channels in equal but opposite ways. A number of software EQs (including those in Cubase and Reaper) have an option to invert their gain settings, so you can use this feature to save time. Feed the sample to two tracks panned to opposite sides, and EQ one with several narrow peaks and dips spread across the frequency spectrum. Now copy the plug-in to the second channel and invert the gain settings. In mono, this should leave the sound pretty much unchanged, but in stereo the sample's spectrum will be smeared across the stereo image in a complex way, shifting it out of the centre. Often, the EQ can push the widened image subjectively off-centre too, so spend a few minutes tweaking both EQs to correct this.
 allows you to lift this note higher in the mix balance without affecting the levels of any other instruments.") This is a screenshot of Voxengo's Gliss EQ, which superimposes its applied EQ curve over a high-resolution spectrum analysis display. The spikes at multiples of 391Hz that show up clearly in the analysis trace are the fundamental frequency and harmonics of a pitched note in this complex mixed sample. Boosting with a series of narrow EQ peaks (as shown) allows you to lift this note higher in the mix balance without affecting the levels of any other instruments.If these ideas don't produce the effect you're looking for, some other avenues worth exploring are high-speed multi-band auto-panning (Melda's MMultiBandAutopan plug-in is tailor-made for this) and polarity-flipped ping-pong delay patches, such as that showcased by the freeware SHEPPi plug-in.
This is a screenshot of Voxengo's Gliss EQ, which superimposes its applied EQ curve over a high-resolution spectrum analysis display. The spikes at multiples of 391Hz that show up clearly in the analysis trace are the fundamental frequency and harmonics of a pitched note in this complex mixed sample. Boosting with a series of narrow EQ peaks (as shown) allows you to lift this note higher in the mix balance without affecting the levels of any other instruments.If these ideas don't produce the effect you're looking for, some other avenues worth exploring are high-speed multi-band auto-panning (Melda's MMultiBandAutopan plug-in is tailor-made for this) and polarity-flipped ping-pong delay patches, such as that showcased by the freeware SHEPPi plug-in. You might be surprised by how effectively detailed level automation can apparently rebalance the internal sounds in a complex mixed sample. You can usually create quite a hilly level envelope before anything begins to seem unmusical to the average listener.
 Low-ratio, low-threshold expansion is one of the few things that can help to reduce the level of reverb on a mixed sample. The screenshot here shows this kind of patch running across five frequency bands in UAD's Precision Multiband plug-in.
Balancing Samples With EQ
 If nothing else can remove an unwanted note in the middle of a mixed sample, try muting it with Melodyne Editor's Amplitude Tool — there's no guaranteeing it'll work, given that the plug-in wasn't officially designed for use on complex mixes of different instruments, but it can nonetheless perform miracles on occasion.The biggest mixdown difficulties typically arise when you need to rebalance the instruments within a sample. The main challenge is to work out how to get independent level control over the instrument you want to manipulate, without unduly affecting the sample's other elements. In the simplest cases — say, a loop containing bass and mandolin — simple shelving EQ may do the trick, but if, as usual, the frequencies of different instruments overlap, even quite involved parametric EQ will be too blunt a tool.
I usually end up using extremely narrow peaking filters (with Q values typically above 10), carefully trained on specific frequency components, so that I can alter the levels of individual pitched notes within the mixed track. Simply tweaking the level of a note's fundamental frequency can often provide all the readjustment required, but on some occasions it also pays to place additional narrow peaking filters at multiples of that frequency as well, to tackle the note's most prominent harmonics. While you can find the frequencies in question by turning up the gain of a peaking filter and sweeping it along the spectrum, I find it a lot quicker to use a high-resolution zoomable spectrum analyser. Prominent pitched notes are usually very clearly visible on the display, making their exact frequencies easy to find.
Some samples will be too complex to dissect even with such surgical EQ tools. Let's say you want to push up a flute's 'A' note with a set of narrow peaking filters, but not the guitar 'A' note a moment later: a static EQ will affect both in the same way. Automation can really up the ante here, controlling the EQ gain settings in real time so that adjustments are applied only when they're beneficial. Such in-depth work would be brain-meltingly tedious with a full-length recording, but for even eight-bar samples it's not a big chore, and well worth it for the tremendous power it gives you over the balance of premixed audio. If you are using a really long sample that needs this kind of work, a specialised dynamic EQ plug-in may provide a more time-efficient alternative.
Dynamics Processing
The level differences between the sonic components of a sample provide the basis of a number of useful rebalancing strategies. The fact that in-sample drum hits usually poke their heads well above the file's overall volume envelope immediately allows you to target them with threshold-based dynamics processing, whether it's limiting to punch them down into the balance, or upwards expansion to give them a lift. Similarly, a sample's low-level components, such as hand-percussion parts and cymbal/delay/reverb sustain tails, will frequently respond well to processes such as parallel compression (if they're too soft) or downwards expansion (if they're too loud). In all these cases, I usually prefer very fast attack and release times, to avoid more obvious gain-pumping effects, and in the case of expansion I like to keep the ratios pretty low — normally well under 2:1.
, but I can think up some other illustration ideas if you need them.") The 'Noise Or Atmosphere' box would make sense around here. I'd run it with a collage of the featured CDs (uncaptioned), but I can think up some other illustration ideas if you need them.That said, normal full-band dynamics processing is frequently too unrefined to cope with sample-remixing tasks, and I often prefer to use fader automation. As good as some dynamics plug-ins sound, nothing in software can yet match the musicality of a human gain-control element! Once again, the comparatively limited length of most samples makes super-detailed, micro-level fader automation feasible without requiring hours of your time, and I'm frequently surprised by how much you can apparently rebalance different instruments in a mixed file without the listener guessing what's going on behind the scenes.
The 'Noise Or Atmosphere' box would make sense around here. I'd run it with a collage of the featured CDs (uncaptioned), but I can think up some other illustration ideas if you need them.That said, normal full-band dynamics processing is frequently too unrefined to cope with sample-remixing tasks, and I often prefer to use fader automation. As good as some dynamics plug-ins sound, nothing in software can yet match the musicality of a human gain-control element! Once again, the comparatively limited length of most samples makes super-detailed, micro-level fader automation feasible without requiring hours of your time, and I'm frequently surprised by how much you can apparently rebalance different instruments in a mixed file without the listener guessing what's going on behind the scenes.
The heaviest troubleshooting work requires bigger guns, though, specifically some kind of multi-band approach to aim the processing towards specific frequencies. Let's say that full-band expansion is pulling down not only the sample's tambourine in relation to the drums, but also the Rhodes piano. Switching to a multi-band setup allows you to turn down the tambourine alone, by expanding only the high frequencies. To give another example, you might limit just the lower frequencies of a sample to turn down its kick-drum relative to its bass.  If you compare Dido's song 'Thankyou' with its sampled incarnation in Eminem's 'Stan', you'll hear that the low end has been aggressively rolled off in the latter, to avoid compromising the production's powerful and punchy low end.On a more advanced level, a particularly useful application of multi-band dynamics processing is reducing printed-in reverb levels using fast, low-ratio expansion across several adjacent frequency bands (I like to use at least five). In this scenario, make sure you adjust the attack and release times so that they relate to the speed at which signal levels in the different frequency ranges move.
Use Stereo Positioning
If you're working with a stereo sample, remember that you can also focus rebalancing processes on specific regions of the stereo field. In the first instance, that means that you can process the left or right channel of the sample independently if there's something fairly hard-panned that needs dedicated processing. However, converting the Left/Right stereo signal into Middle & Sides format provides you with more options. Reverbs, for example, can often be reduced more effectively by applying independent processing to the Sides signal, since their stereo spread is usually a large part of what makes them audible in their own right.
On the other hand, controlling the levels of centrally panned lead instruments will probably cause fewer unmusical gain-pumping artifacts if done on the Middle signal. You can occasionally all but excise a solo instrument or lead vocal from a mixed sample with careful EQ notching and/or multi-band expansion of its Middle signal — enough, at least, that the part can be concealed behind another sound.
Beyond Mix Processing
With the best will in the world, some in-sample balance problems resist pretty much every traditional mix-processing technique, and at this point you have to think laterally. One of the most common difficulties is where there's an instrument or pitch that you'd like to remove completely, and your best dynamics/EQ/automation efforts don't go far enough without unacceptable processing side-effects. My first workaround is to try copying and pasting segments of the sample to piece together the sample I'm hoping for. So an open hi-hat, cymbal crash, or unwanted vocal-effects tail in a drum loop might be removed by copying kick, snare, and closed-hat segments for elsewhere in the sample — or possibly from some other section of the source record, if that's to hand. Another dodge is to locate an isolated specimen from the source record, flip its polarity, and align it carefully alongside your sample, so that it phase-cancels the mixed-in version. This can be spectacularly effective at killing MIDI-triggered parts such as programmed drums.
 Another tactic I turn to in extremis is firing up Melodyne Editor and using its Amplitude tool to mute offending pitches. The processing isn't designed to deal with complex mixed material like this, but in practice the Amplitude tool is much more robust than the pitch-shifting and time-stretching when working outside its comfort zone. If you're lucky, it can pull off the most incredible rebalancing stunts without unmanageable levels of chirpy processing artifacts!
The other thing that can fox mix processing is pushing an individual in-sample sound far enough forward in the mix, perhaps because a couple of notes were badly played, undermixed, or had too much reverb applied to them. If audio-editing patch-ups draw a blank, try drafting in reinforcements in the form of additional MIDI-triggered layers, as DJ Premier mentioned back in SOS July 2007: "If the low end of the sample isn't really heavy, I'll always follow the exact bass line of the song and put that underneath. A lot of people ask me what EQ I use to get the bottom end of my samples to come through so strongly, but I'm like 'Man, it's not EQ. I'm playing the same notes verbatim.'”
A good commercial example of the same principle further up the spectrum is Redman's 'Smash Sumthin', which effectively uses a kind of wah-wah guitar sound to reinforce the French horns in the main orchestral sample. However, for more typical 'undercover' work, the secret when layering sounds alongside a sample is to match the MIDI sound more closely to the timbre in the sample — so don't rush the auditioning process. That said, once you find the right patch, don't be afraid to process it assertively in order to extract the most useful parts of its spectrum, much as you might with a close-mic signal in a drum-kit recording. At the end of the day, it doesn't matter what the MIDI part sounds like on its own, as long as it adds what's missing in the sample. One word of caution, though: if you're going to layer in bass or kick-drum parts alongside those in your sample, it's probably best to high-pass filter the sample at around 100Hz or so, to avoid the potential for phase-cancellation between low frequencies.
Of course, there's nothing to stop you recording live performances alongside a sample, for similar reasons, if you've the means at your disposal. You can hear this approach in action on Gabrielle's 'Rise', for instance, where Jonny Dollar layered in additional backing singers to supplement those on the song's Bob Dylan sample. However, it can be a lot trickier to match the sound of the original sample when working in this way, so brace yourself for plenty of experimentation during tracking, as well as a good deal of editing and processing later!
Sample Magic
In short, then, sampling commercial records offers tremendous creative possibilities, as long as you can avoid studio technicalities raining on your parade. Armed with the techniques described in this article, you should be able to overcome the most common stumbling blocks when working with samples — so you'll be able to focus more of your time and energy on making exciting new music!
Clean Capture
Whatever vintage the format you're sampling from, if you build music in a computer DAW system it's important to consider how to capture the sample in a way that doesn't compromise the character of the source or restrict your mixdown options. For analogue sources, avoid capturing unwanted noise or distortion by observing good gain structure while transferring the audio to your computer. For specific tips, check out Paul White's 'Gain Structure For Soundcard Recording' article at /sos/oct00/articles/soundcard.htm. Also, try to head off mains-related audio problems at source. Martin Walker's 'Solving Computer Audio Problems' feature provides useful guidance: /sos/nov04/articles/computerproblems.htm. When it comes to digital media, don't add unnecessary hiss by sampling your CD player or iPod via its analogue connections, because computer DAW systems will import most common digital audio file formats directly. Sample from audio CD, rather than MP3 or AAC data-compressed formats, because although the sonic differences might seem pretty small for playback, data-compressed files don't respond nearly as well to mix processing.
Sampling & Copyright
If you lift a sample, no matter how small, from a commercial recording and use it in your own music, you should be aware of the copyright implications. If nothing else, if your music benefits from someone else's work, they have a right to be paid for it. The nitty-gritty legalities of sample clearance can get quite involved, so check out this recent article in the SOS on-line archive to get the full low-down.
Creative Arrangement: Further Listening
Much of this article is about adapting samples of other people's tracks for use in your own, but there's more to working with samples than the 'sync it up to a hip-hop beat and add vocals to taste' formula. If you're just starting out with sample-based production, have a listen to the following tracks...
Firstly, it doesn't take much in the way of editing to breathe some additional life into a track. Take Jay Z's '99 Problems': the two guitar power-chords around which it's built are almost ridiculously simple, but one of the things that keeps them sounding fresh is the way they're sporadically varied with basic truncation and retriggering techniques, especially during the last minute and a half. Productions such as Portishead's 'Sour Times', Faithless's 'Muhammed Ali', and Kanye West's 'Diamonds From Sierra Leone' show how you can push your editing further by using fragments of longer samples to create new harmonic progressions, to provide contrast between different sections, and to generate ear-catching hooks and fills. The Kanye West example also illustrates how cutting a sample abruptly mid-flow can demand more attention from listeners by catching them off-guard to an extent, and this concept comes increasingly to the fore in more intricately edited tracks such as Fatboy Slim's 'Rockafeller Skank', Madonna's 'Don't Tell Me', or recent chart hits such as Yoland B Cool & D Cup's 'We No Speak Americano' and Gramophonedzie's 'Do Right'.
Using samples outside their natural-sounding pitch-range is another well-used but still valuable technique. While smaller shifts such as those in Will Smith's 'Miami' or Fatboy Slim's 'Brimful Of Asha' exert a subtle influence over their grooves, extreme slow-downs (Everything But The Girl's 'Single' or Portishead's 'Biscuit') or speed-ups (Kanye West's 'Through The Wire' or Alicia Keys's 'So Simple') have a more obviously unsettling emotional effect. Even if you just repeat a short sample unchanged, that doesn't mean that you have to lock your track's harmonies in a vice, as in The Verve's 'Bittersweet Symphony'. There are plenty of successful tracks that demonstrate how easy it is to introduce variety simply by experimenting with alternative framing harmonies, including Moby's 'Find My Baby', White Town's 'Your Woman', and Fatboy Slim's 'Sunset (Bird Of Prey)'.
Noise Or Atmosphere?

You'll want to reduce noises, clicks, buzzes, and reverb in your samples, but such 'undesirables' can also be useful — so don't apply restoration processing before you've heard how the sample works in the mix. Background noise can 'glue' a production together without recourse to nearly as much delay/reverb processing (it's a stock hip-hop/R&B technique that is showcased on D'Angelo's 'Devil's Pie'). You could even add a layer of background noise to maintain the blending effect, even when the sample isn't playing! In other cases, crispy-sounding noise can push the sample to the front of an otherwise clean-sounding electronic arrangement — Yolanda B Cool & D Cup's recent 'We No Speak Americano' is a great example of this principle in action, as is Fatboy Slim's 'Sunset (Bird Of Prey)'.
Samples with a strong noise/ambience fingerprint also offer fantastic opportunities for enhancing your arrangement, because of the way abrupt changes in atmosphere catch the ear. Gabrielle's 'Rise' and Akon's more recent 'Locked Up' both used this to advantage, leaving a tiny gap at the end of the main background sample to subtly highlight the onset of each iteration. Other artists go further, and Portishead are firm favourites of mine in this respect: check out the way the noise drops, to direct attention to the harmonica, guitar, and piano scratch DJ fills in 'Wandering Star', or how holes in the background hiss of 'Only You' continually refocus your attention on Beth Gibbons' performance.
Madonna's 'Die Another Day' Bond theme is also worth listening to from this angle, because rather than working with background noise, it creates abrupt cuts in the string-orchestra's large-hall reverb tail to increase the variety of a pretty repetitive part. The abrupt contraction of the whole track's atmosphere for the fill at the end of verse two (1:45) is made even more dramatic by contrast with the strong implication of width and space in the strings. Not that you have to completely drop out a track's ambience to make a statement — a sudden change between two contrasting atmospheres can be equally powerful, for example when the crusty-sounding string quartet shows up in Basement Jaxx's 'Red Alert' or when Beck hits you with a blast of Schubert's Unfinished Symphony in 'High 5'.
Listen & Learn!
Words can only tell half the story, but if you go to the SOS web site you'll find some audio examples that demonstrate a number of the processes described here, including how to isolate a vocal from a mix excerpt.