Whether you're recording real players or using samples, our in-depth guide is your key to polished and authentic-sounding strings.
 There was a time when lush-sounding string overdubs were one of the hallmarks of a big-budget production, and while there's still nothing that quite matches the sound of a real string orchestra, these days you can get amazingly good results on a budget. Pulling off this feat involves a combination of arranging, programming, recording and mixing skills, but most software sequencers provide all the tools you need to have a stab at it, even if you're not confident with traditional musical notation. This article will pass on some practical advice to help you create good-sounding string parts for your track as quickly as possible, whether you're using samples or live string players — or both!
Quick Fixes For String Arrangements
Irrespective of how you plan to realise the sound of your arrangement, there are lots of quick fixes that can help transform rookie string arrangements into something more musically effective, regardless of your facility with notation.
- Aim For The Gaps
Strings can be tricky to pick out in a busy mix, so try to direct string parts into gaps in the arrangement, such as those between lead vocal phrases. If the strings are playing alongside other rhythmic parts, you can make the strings more audible by getting them to switch notes on beats when no-one else does, even if this is simply shifting to a different note-spacing of the same chord. It's also worth looking for frequency ranges where nothing's otherwise happening in the arrangement, and parking the strings there: more audibility, less mix-clutter. On a similar tack, the best arrangements don't have all the parts playing all the time, but rather use variations in the instrumentation to help support the structure of the song.
 While simple block chords can work well on occasion, there's a lot to be gained in most situations by giving the outer parts a bit of melodic contour, which helps add musical momentum. Some simple rhythmic figuration in the inner parts can also be very effective for increasing energy levels, and you can develop these figurations into little counter-melody fills at the ends of sections as well. All these techniques can be seen in action in the lower screenshot here, which is based on exactly the same progression as the upper screenshot's block chords.
- Beware Of Footballs
Although there's a lot to be said for keeping things simple, good string arrangements are rarely just made up of block chords, which bore string players to death and are disparagingly referred to as 'football music' by some session players, on account of the rows of identical note values. To avoid this trap for the inner string parts (typically the second violins and violas — see 'Ensemble Line-ups' box, opposite), try giving them some kind of rhythmic figuration, even if this is just a case of them repeating notes, or swapping notes with each other in some kind of rhythm. If you can incorporate some kind of melodic fragment into this figuration at some point where the rest of the track thins out momentarily, there are serious bonus points to be had. You wouldn't have a musical drum part without fills, and it's the same with string parts. For the outer parts (typically first violins and cellos), the best thing is to try to conceive them as melodies in their own right, however basic. If they sound singable, that musical phrasing will add momentum to your track.
- Give Low Instruments Enough Space
You'll usually get more satisfying string sounds if you leave bigger gaps between the low parts than between the high parts. In practice, it's probably easiest to double the cellos at the octave with the double basses most of the time, unless you're after a special effect. It's also not bad practice to give the lower parts enough time for their longer, heavier strings to speak properly, leaving fast runs and figurations mostly to the upper strings.
- Fatten Up Solo Lines In Busy Tracks
In busy commercial string arrangements, what sounds like a single string line is often actually harmonised. You can't pick out the harmonies particularly well because they're partially obscured by other instruments, but they nonetheless help give the top-line melody more body in the mix. The simplest way to harmonise a melody like this is to copy the whole melody line; paste it either three, four, eight, or nine semitones below (listening for the one that works best); and then adjust any notes that don't harmonise well to the nearest neighbouring notes that do. Doubling 12 semitones below isn't usually quite as effective on its own and any other interval you try is likely to sound pretty weird.
- String Players Aren't Fingers!
Keyboard players are particularly prone to the mistake of treating a string ensemble as if it's a keyboard patch. The individual players in an ensemble are much more independent than a keyboardist's fingers are, and good arrangements reflect this. Try to push beyond what can physically be played by a single keyboardist, particularly in terms of combining different playing techniques at the same time — how about pizzicato cellos and double basses, col legno viola trills, and a con sordino second-violin melody doubled by tremolo first violins an octave above (if this sounds daunting, check out the Jargon Buster box elsewhere in this article). I'd also suggest that all the instruments playing the same rhythm should be very much the exception, rather than the rule. A final tip for keyboardists: avoid lots of fast runs of five notes in a row. These might be easy for you to play on a keyboard, but can be a nightmare for string players because they have to keep crossing strings — a reason why amateur string sections so often struggle with Tchaikovksy and Liszt. Groups of four are usually much easier for the upper strings in particular.
- All Players Are Not Equal
If you're arranging for real strings and have any prior knowledge of the calibre of the players, it makes sense to try to adapt the difficulty of the arrangement accordingly. One of the trickiest things on a stringed instrument is playing musically and with a good tone, so it makes sense to reserve your main themes for the strongest players if you have the choice.
 It's now possible to obtain some very convincing string sounds from virtual instruments and sample libraries, such as those from Garritan and Vienna Instruments, but it can still take a bit of work to recreate the sort of complexities and variations inherent in live performance.If you don't know the quality of the players before the session, then bear in mind that there is a tendency for educational institutions, in particular, to assign their most capable players to the first violin parts, and the less able to the second violins, while persuading some of those who would otherwise be left out of the ensemble to play a bit of viola as a sideline. The result of this is that it's fairly common for these parts to be less well played (and with inferior instruments) by amateur ensembles. Remember that it is perfectly acceptable for the first violin to duck below the second violin in pitch, or indeed for the cello to hop over the viola, if you feel that this will achieve a more satisfactory musical result.
Writing Parts For Samplers & Virtual Instruments
If you're planning to realise your string arrangement entirely with samples, you're spoilt for choice in terms of the number of sample libraries and virtual instruments available. Most are capable of producing truly lifelike results, but usually only under certain conditions, so getting the best out of them involves adjusting your arrangement a little to play to their strengths.
The first thing to realise is that large-ensemble sounds are easier to fake than small-ensemble or solo textures — even state-of-the-art instruments like Garritan's Stradivarius still reveal their computerised undergarments if they're not used carefully. If you have important exposed lines in your arrangement, it will really repay the effort if you record at least one real player and mix them in alongside your samples. This is a tried-and-trusted technique for television and advertising music, and is surprisingly effective at disguising the shortcomings of even budget sampled string patches. I've doubled a real viola solo with a no-frills solo cello multisample from my hardware rackmount sampler (remember those?) without giving the game away, for example.
Other things that really show up the deficiencies of sampled string instruments are fast runs and expressive melodic lines. Both suffer from the inability of most sampled instruments to simulate the effects of slurring — playing every note with a separate bow is pretty unnatural for string players, and even live string players have trouble playing musically unless they can slur some notes together. Good string players will also tend to slide between selected notes in legato lines, breathing more life into a phrase, and this is a feat that few virtual string instruments even attempt to replicate. Again, if you're relying on samples to create your string sound, try to avoid these traps in the arrangement unless you can supplement the sound with a live recorded line or two.
Ensemble Line-ups
A stereotypical string ensemble will be made up of five sections: two groups of violins (first and second) and one group each of violas, cellos and double basses. In terms of relative numbers, more of the higher-pitched instruments are usually used, with the first violins in small ensembles often outnumbering the cellos two to one. For example, a small line-up might have four first violins, three second violins, three violas, two cellos, and one or two double basses. While it has become fashionable to use a slightly more bottom-heavy group in film work, this can work against you if you're producing a string overdub for a rock track, where it may make sense to ditch the double basses and even the cellos entirely. Another thing to watch out for is any situation where just two of any given instrument are playing together, because tuning discrepancies are much more obvious between two players than they are for a soloist or for groups of three or more.
Improving The Sound Of Sampled Strings
The main problem with many sampled string patches is that the sampling process robs the overall sound of some of the complexity you'd get in a real live recording, so anything you can do to reinstate some of that complexity is likely to improve things. Layering several different string patches can help, particularly if you give each a slightly different vibrato depth and rate. You can sometimes get away with less-than-stellar individual patches if you pile up two or three together. What's particularly important, though, is that you try to use fairly contrasted sounds, in order to avoid a phasey combination — many sound modules have a variety of different string patches based on the same raw samples, so try to avoid using those together. A low-level tremolo patch underneath your normal arco strings is another way of adding complexity without too many phasing problems.
Layering in a few low-level double-bass pizzicato notes is a useful trick to give a bit of urgency to an otherwise arco arrangement, so I'd definitely recommend trying that. Top professional arranger Richard Niles shared another great layering tip with us back in SOS June 2000: "Whenever I do string arrangements, I will always also use a harp, because harps are very good for that sort of pop 'whoosh' up to choruses."
Unless the string part is very simple indeed, or completely buried in the mix, it's much better to work with separate MIDI channels and sound sources for violin, viola, cello and double-bass parts, rather than just relying on pre-mixed 'ensemble strings' patches. For a start, it lets you have different playing techniques on different parts where necessary, and opens up great textural possibilities, such as high cello melodies accompanied by low-register violins and violas. It also allows you to switch the individual parts into monophonic mode and then use MIDI portamento controls (typically MIDI Continuous Controller numbers five, 65, and 84) in tandem with overlapping MIDI notes to simulate some of the expressive effects of slurring and finger slides.
Irrespective of whether you split the ensemble into separate parts, there are some MIDI programming tweaks worth experimenting with. The first is using a MIDI Continuous Controller to adjust volume levels in real time — CC#7 and/or CC#11 are usually assigned to this as standard in sound modules, but you might need to set it up for yourself in some cases. One of the things that distinguishes real string parts from keyboard string patches is that bows are better at dynamically adjusting playing levels than keyboard keys typically are, and swells are usually an important part of the appeal of real strings. To a lesser extent, using your keyboard's mod wheel (which usually outputs CC#1) to adjust vibrato depth in real time, perhaps only on one of the patches if you're layering, will also make the sound more organic in a way that many musicians are looking for.
If you can get real-time control over the attack and release times of your string samples (often assigned by default to CC#73 and CC#72 respectively), a bit of careful work with these will let you sneak the strings in and out of the texture slowly during your verses and pre-choruses, but then punch through confidently when the chorus riff comes along. In my experience, attack and release times are frequently the secret ingredient that transforms the phrasing of melodic lines into something more like real music.
Tips For Recording Strings On A Budget
For detailed information about recording string instruments and ensembles, you can check out Hugh Robjohns' article in the 'Further Reading' box. However, in addition to what Hugh has to say there, I thought it would be worth adding a few little pointers for making the best of the less-than-perfect players and recording situations you're likely to meet working on a budget.
If you're recording a single instrument, the main thing to remember is not to mic too close, because string instruments put out a lot of mechanical noises which can dominate the sound unduly at mic positions closer than a couple of metres away. A bit of room sound isn't a bad thing either, so don't be afraid of using omni mics if your recording room doesn't sound too bad.
For ensembles, the first thing to say is that it's easiest to try to capture the whole sound with a single stereo mic rig if at all possible, and then make up for any balance problems in the old-fashioned way — by routining and respositioning players. Unless you're confident about dealing with the phase relationships between lots of mics, multi-miking makes it trickier to get as good a sound, in my experience. Remember, as well, that you don't have to sit the players the way you would put them on stage, and moving them around a bit can help the balance. In particular, turning the viola section so that it's more on the angle of the second violins can help project their sound better out to the main mics.
Despite my generally recommending sticking with a single stereo mic pair, if you're relying on the strings to supply low end to your mix you'll almost certainly want to put up an additional spot mic on the cellos and double basses as well. This is something Hugh did in the live string session which accompanied the SOS May 2006 article, and it's difficult to provide the kind of low end many people now expect in commercial non-classical productions without this extra mic.
Everyone has their own preferred stereo miking methods, but I've found strings (especially violins) to be particularly unforgiving of less expensive cardioid mics, whereas cheaper omnis and figure-of-eights seem to cause fewer problems. For this reason, XY or ORFT wouldn't be my first choice for a budget session. In fact, even with better mics, these setups can emphasise scratchiness amongst any less-experienced first violinists, because of the brighter on-axis response of the mics. I'd suggest using the M/S technique if you can, and if you're using switchable polar-pattern mics as well, changing the pattern of the middle mic gives you a lot of control over the amount of room sound — something that can be really useful in slightly dodgy-sounding venues.
For monitoring purposes, string players usually prefer to wear only one side of their headphones, as this gives them immediate acoustic feedback from their instrument (particularly in an ensemble context) and makes it easier for them to control the sound they're making. Players with little experience of studio recording may not work this out for themselves, so it's worth discussing it with them. If the player is using only one headphone, try to kill the other side of the headphone feed to reduce spill onto the recording, especially if you're using any kind of click track.
Live Strings: Getting Around The Notation Problem
Nothing beats adding in a few live parts for improving the realism of a whole sampled string arrangement. Multitracking a single violinist playing along with the top line of the arrangement can make a terrific difference just on its own, and this approach can also pay dividends for exposed lines in other parts. However, many home studio owners fight shy of involving live string players because they don't feel confident with creating the notated parts required for all but the simplest of overdubs. Almost all sequencing software has built-in scoring facilities, but what they output by default is often, in reality, practically impossible to play from unless tweaked by someone in the know. Fortunately, for small-scale string recordings this needn't be an obstacle, because the string players themselves can bail you out. Here's what to do...
First, get the string arrangement working to your satisfaction with the sampled sounds running from your sequencer. Any parts you're planning on doubling with live instruments should be separated out onto separate MIDI tracks, and checked to make sure they're in a suitable range. The very highest registers of each instrument are best reserved for special effects, and if you do use them, try to avoid fast runs, which can be very difficult to play without sounding scrappy. Despite what you might find on the Internet regarding the theoretical ranges of string instruments, unless your players are professionals I'd recommend restricting yourself to the following MIDI note ranges (based on middle 'C' being C3), as that will make it much easier for your players reliably to give you a full sound: If you find notation a daunting prospect, don't worry: you can simply record or program parts as usual and use your sequencer's score editor to communicate the basics to a string player. If you also give the player a paper stave and a pencil, you'll probably find that they're happy to write the part out more fully for themselves.
- Violin: G2 to E5
- Viola: C2 to A5
- Cello: C1 to A4
- Double Bass: E0 to G2 (some double basses go down to C0, but it depends on the specific instrument.)
Once you've checked the ranges, switch over to the scoring window of your sequencer so that it shows the first part, and make sure that it's been given a suitable clef — usually there are built-in scoring templates which can be assigned to each part and which automatically select appropriate clefs, but if you have to select them manually, choose the treble clef for violins, an alto clef for violas, and a bass clef for the cellos and double-basses. Note that double-bass players play an octave below what they see written, so you might need to shift all the notes of the double-bass parts up by 12 semitones if your sequencer's templates don't do this for you in the score window automatically. Finally, quantising the string parts as much as you can get away with (while avoiding actually changing the basic rhythm of the part) is a good idea, as it'll make the printed part easier to read.
And that's all the score editing you should need to do, because although those parts may still be a bit rubbish to play from, you're not actually going to ask the players to do that. Instead, get hold of some pencils and some A4 sheets of looseleaf manuscript paper and ask the string players to jot down a part, based on the raw printout, for themselves to play.
This might seem like an unnecessary annoyance for the players, but there are several reasons why it can work really well. The first is that some string players have a tendency, when presented with printed parts, simply to play what is written, irrespective of whether it's going to sound any good. Putting together their own part based on your printed guide, however, makes it much more likely that they'll be pro-active about discussing adjustments to the part which might improve the sound, either for involved technical reasons, or simply because they are most acquainted with what they can and can't make sound good on their instrument. That said, this way of generating parts works best when there are only one or two players per part — if you're doing any string session larger than that, you'd be best advised to get someone to help you with putting together parts beforehand, to avoid wasting session time.
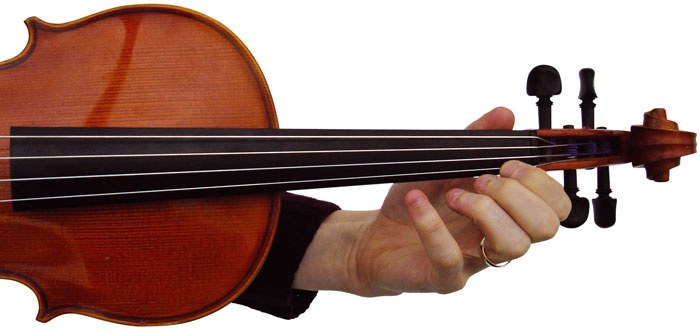
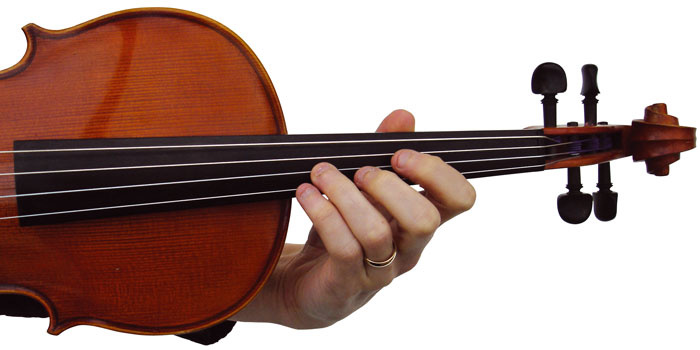

 being played on the four strings of a viola in this way. Although it takes a little more concentration to play with the left hand out of its default position, the other hand positions provide different (and often more suitable) tonalities that sample libraries rarely include.") String players usually have a choice of strings upon which to play any given pitch, although this involves moving the left hand from its default position near the tuning pegs. These four pictures here show the same pitch (A#) being played on the four strings of a viola in this way. Although it takes a little more concentration to play with the left hand out of its default position, the other hand positions provide different (and often more suitable) tonalities that sample libraries rarely include.With pencils already in action, you can also pick the players' brains about which bowings might work best. Faster figurations can often be made much more sweet-sounding when they are judiciously slurred, for example; stamping chords might work better with repeated down bows; and dramatic crescendo swells favour up bows. Expressive bowing is difficult to achieve with samples, so it's one effect which you might as well take full advantage of if you're going to go to all the trouble of setting up a live recording session.
String players usually have a choice of strings upon which to play any given pitch, although this involves moving the left hand from its default position near the tuning pegs. These four pictures here show the same pitch (A#) being played on the four strings of a viola in this way. Although it takes a little more concentration to play with the left hand out of its default position, the other hand positions provide different (and often more suitable) tonalities that sample libraries rarely include.With pencils already in action, you can also pick the players' brains about which bowings might work best. Faster figurations can often be made much more sweet-sounding when they are judiciously slurred, for example; stamping chords might work better with repeated down bows; and dramatic crescendo swells favour up bows. Expressive bowing is difficult to achieve with samples, so it's one effect which you might as well take full advantage of if you're going to go to all the trouble of setting up a live recording session.
Speaking of crescendos, you'll need to indicate to the players how loud or soft you want different sections to be played, and if there are any important build-ups. The players can then translate your instructions into their parts in the manner that is most useful to them. Furthermore, they'll be able to adjust their bowing to make sure they have enough bow to really let rip when you need them to.
One final thing I always insist on is that everyone writes bar numbers into their parts (to match up with the bar numbers in your sequencer), as this makes rehearsing and recording takes a lot quicker and easier.
Session Direction
You've done the arrangement. You've organised your string session. You've got notation in front of each of the players. So it should all be downhill from here, right? Well, not quite...
If you were working with top pros, you could pretty much sit back and relax, knowing that they'd be doing everything possible to make you (and them) sound good. However, most budget string-sessions rely on the services of amateur players who, as much as they're a whole lot better at playing their instruments than you are, can still often benefit from a little objective musical direction. So an important job you need to do during the recording session (in addition to handling your studio gear) is to listen critically to what is coming through the monitors, to be sure that it's all sounding the way you want it to.
There are lots of things to be on the look-out for, with less experienced players in particular. First of all, just as with guitar parts, check that the strings are in tune — this is especially important if there are any prominent open-string notes in the arrangement, as players are unable to adjust these by ear while playing, in the way they can with stopped notes. Don't be afraid to ask players to tune individually if necessary, as some amateur string-players won't concentrate enough on it otherwise. Even if the instruments are perfectly in tune, you still need to keep an ear out for dodgy tuning, much more than you might expect to with fretted stringed instruments such as guitars. In particular, listen out for any situations where pairs of instruments are doubling each other in octaves, as this can really expose tuning inaccuracies. Draw the players' attentions to any such doublings, so that they're primed to listen to each other carefully, and encourage the lower part to play a little more strongly than the upper part, as that tends to make small discrepancies less obvious.
Something I always make a special point of listening for is violinists playing their open 'E' strings. The 'E' string is actually of a different construction than the instrument's other three strings, and as a result has a habit of zinging out rather too piercingly compared with either stopped notes or any of the other open strings — particularly on instruments which don't cost the same as a three-bed semi-detached! Keep a close ear out for these, and if they are becoming obtrusive then talk to the players about possibilities for avoiding them, by playing the note on the neighbouring 'A' string instead. There is almost always a way around playing open 'E' strings — in fact there are apocryphal tales of some professional orchestras fining violinists for playing any! Violas can also exhibit the same problem with their top 'A' string, although it's usually offset a bit, in my experience, by the viola's more mellow overall tone.
Jargon Buster
- Arco: The normal string-playing technique using the bow.
- Bowing: String players can play with the bow by pushing their right hand either away from the instrument (a 'down bow') or towards it (an 'up bow'), and can also choose how many notes to play in a single bow stroke. The specific bowing that they use can dramatically affect the sound, so it is common practice for players to decorate their notated part with bowing indications for the sake of consistency.
- Clef: The notation symbol which usually appears at the left-hand edge of each line of traditional musical notation. It is used to indicate which lines and spaces correspond to which pitches.
- Col Legno: An unusual playing technique, where the wood of the bow touches the string, giving a thin, ghostly, glassy sound much loved by film composers for sci-fi and horror scenes.
- Con Sordino: These words in a printed part indicate to the players to attach a little mute to the bridge which gives the sound a more closed, reedy quality of which I'm a great fan. The mutes are detachable, though, and are easily lost, so if you plan on using mutes for a recording session, be sure to mention this to the players in advance.
- Fingerboard: The slightly curved black strip of wood running down the centre of the instrument where the player uses the fingers of their left hand to stop notes, effectively changing the length (and therefore the pitch) of the string.
- Fingering: String players can choose which finger to use on which string to reproduce a given notated part, and because there are often several different fingering options for a given piece of notation, players will often write numbers and Roman numerals above the notes to clarify which to use as they read.
- Legato: Smooth playing, often using only a few bows for many notes.
- Monophonic: Instruments are monophonic if they can play only one note at a time. Although string instruments are not strictly speaking monophonic, playing more than one note at a time (double-, triple-, or quadruple-stopping) is technically difficult to do and you'll almost certainly get nicer-sounding results on a budget session if you avoid it.
- Open String: A note played without stopping the string using the fingers of the player's left hand. This gives a more strident sound which rings on for longer.
- Portamento: When working with a MIDI instrument in monophonic mode, you can often set things up so that overlapping notes have an automatic expressive pitch-slide between them, called portamento (or sometimes 'glide'). If portamento is available, then there is usually some control over the rate of the pitch slide, via a parameter called Portamento Time.
- Pizzicato: Plucking the strings with the fingers of the right hand.
- Semitone: The pitch interval between adjacent MIDI notes, for example C4 and C#4.
- Slur: A curved line in traditional musical notation which indicates to the string player that several notes are to be played with a single stroke of the bow, giving smoother transitions between notes.
- Staccato: Detached, spiky playing style, contrasted to legato.
- Tremolo: A playing technique where the bow is moved backwards and forwards a small distance as fast as possible. In ensembles, this gives a shimmering effect, often used to indicate tension or suspense by film composers.
- Trill: Rapidly alternating between two closely-spaced notes, using the fingers of the left hand, while slurring them all together with the bow.
- Vibrato: An expressive pitch modulation introduced by wobbling the left hand back and forth during playing. String players learn to adjust the nature of their vibrato as each note progresses, for a variety of effects.
Fingering Positions & Ensemble Timing
Another important thing to bear in mind is that string players have a lot of choice as to which string they actually play any given note on. For example, the 'B' above middle 'C' could be played on any of the violin's lower three strings, but on the lower strings the player has to move their left hand away from its default location, close to the tuning pegs (this is called 'first position', and is where playing is usually easiest) and further up towards their nose (into a higher fingering position, which demands a little more concentration from the player). Many string players, left to their own devices, will blithely play your whole chart in first position, because it's easier for them, despite the fact that higher positions often provide a warmer, more evocative tone. So if an important melodic line is sounding a bit thin and/or edgy, try asking the players to play the same notes on the string below, where the necessity of playing in a higher fingering position will frequently round out the timbre.
 can make all the difference, and if you're mixing and matching different sounds, sending some of the signal to the same reverb can help make things sound much more 'together'.") The key consideration when mixing is your choice and use of reverb. A good convolution reverb, such as Altiverb (pictured) can make all the difference, and if you're mixing and matching different sounds, sending some of the signal to the same reverb can help make things sound much more 'together'.Fingering positions can also really help to add something special if there are melodic lines that include large upward leaps. The easiest way to play these leaps on a stringed instrument is by crossing over to a higher string. However, if you stay on the same string instead — and do the leap by moving the left hand into a higher fingering position (called 'shifting position') — you get a characteristic little pitch glide which can be very emotive. This is something that characterises good live string playing, and that samples simply can't do for you.
The key consideration when mixing is your choice and use of reverb. A good convolution reverb, such as Altiverb (pictured) can make all the difference, and if you're mixing and matching different sounds, sending some of the signal to the same reverb can help make things sound much more 'together'.Fingering positions can also really help to add something special if there are melodic lines that include large upward leaps. The easiest way to play these leaps on a stringed instrument is by crossing over to a higher string. However, if you stay on the same string instead — and do the leap by moving the left hand into a higher fingering position (called 'shifting position') — you get a characteristic little pitch glide which can be very emotive. This is something that characterises good live string playing, and that samples simply can't do for you.
For recording ensembles, timing can be another common issue. Some less confident string players have a habit of waiting a fraction of a second at the starts of sections — until they're sure their neighbour is playing! This can turn what should have been forceful entries into damp squibs. The easiest solution to this problem is breathing. Yes, I know that these aren't wind instruments, but the simple act of everyone taking a breath together on the beat before the entry is usually enough to get all the players coming in firmly on cue. If the ensemble are shifting out of time with each other midway through a section, try to encourage them to move a little with the beat, because the extra visual cues this sets up between them will help here.
Something people commonly want from string parts is intensity and passion, but some classically trained string players can be inclined towards a more measured delivery. A couple of quick ways I've found to encourage more gusto are asking the players to use more bow, or to use more vibrato. A side-effect of the latter request is that most string players will press slightly harder on the string with the fingers of their left hand, giving notes a greater sustain and a clearer sound-quality — great for nice fat pizzicato notes.
Layering Takes To Create An Ensemble Sound

 When you're short of players and you need to overdub, a good trick is to record the different takes in different positions. Keep the mic a fair distance away, so as to capture some room sound, which will help to make the tone different for different takes, thus creating the impression of different instruments and avoiding potential phase problems. It is very common for people to attempt to create the sound of a larger ensemble by layering together several takes with only a few players, but this usually gives a rather unrealistic kind of chorus effect instead. To avoid this, it's vital that you try to differentiate every take sonically. Many instrumentalists have more than one instrument, for example, so try layering takes of both — a pair of friendly violinists might even be happy to swap instruments between takes. Try getting the players to play some takes in different fingering positions, or con sordino. Change mics and mic positions to change the level and nature of the captured room sound, or, as an alternative with a one-person-per-part ensemble, set out chairs for a larger orchestral setup and then record subsequent takes with the players seated in the different chairs.
Mixing Considerations
The main consideration when it comes to mixing strings, whether sampled or real, is your use of reverb. Many sampled sounds are deliberately much drier than real recorded string sounds, so a good concert-hall reverb (something convolution-based would be ideal here) can enhance the impression tremendously. On the other hand, recorded live strings almost always have some reverb on them from the room they were recorded in, but when you're working on a budget they'll still benefit from something to give them a bit more of a 'big studio' sound. You may find that using a reverb patch with fewer early reflections and/or a longer pre-delay time will help to avoid it conflicting with the ambience within the recording itself.
If you're combining real string overdubs with a sampled backing, you should try to use at least one reverb which is common to both parts, to help them blend together, although I find that you usually need a little extra ambience on one of the parts as well, to sit it with the other. The big problem with adding reverb, though, is that it can quickly clutter up your mix, so be prepared to shorten reverb times, particularly when working with up-tempo tracks, and consider high-pass filtering the effect return — the low frequencies of concert-hall reverbs, in particular, can be problematic in commercial-style mixes. Other than reverb, a little chorusing can help to add complexity, and particularly stereo width, to strings, but if you overdo things you can end up with a sound like a string machine!
The string tracks themselves can easily clutter up a busy mix, even without added effects, and you'd be surprised how severely you can high-pass filter them in many cases — you may just need a slightly higher level of lower instruments in the string mix to help maintain the subjective balance in the remaining frequency regions. The other problem is that strings are often required to switch roles a lot, from background pad to foreground hook, which can make a decent static mix balance impossible to achieve for many arrangements. The most powerful remedy to this is level automation, which lets you dip the levels when the strings are holding background chords, and then just nudge up any little chord changes, fills, or melodies as required. Automated EQ may also help here, to give a little extra brightness and definition against sections of the song with lots of HF-rich instruments such as cymbals and distorted guitars.
Mantovani To Metallica
Whatever style of music you're working in, the desire for a nice, lush string sound seems to crop up once in a while. Hopefully this article has provided you with enough information to achieve reasonable results on those occasions, without having to shell out loads of cash or spend ages wrestling with notation.
Further Reading
- Wikipedia
Wikipedia is a surprisingly good bet if you want to find out a bit more about the workings of the different string instruments. Although people sometimes question the reliability of some of the user-generated content on Wikipedia, the pages covering violin, viola, cello, and double bass seem to me (as a string player myself) to be pretty much on the money.
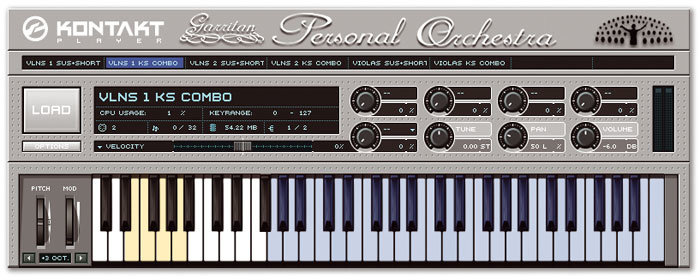
- Rimsky-Korsakov's Principles Of Orchestration — Garritan Interactive Version
Here you can find a free on-line version of one of the classic orchestration texts, complete with interactive audio examples realised by Garritan's Personal Orchestra. If you can handle notation and want to hone your string-arranging skills, there's a lot to be picked up here.
www.northernsounds.com/forum/forumdisplay.php?f=77
- Recording A String Section: Theory & Practice
Recording a very large string section is a task that is beyond the scope of the current article. Thankfully, though, this subject was covered in depth by Hugh Robjohns, back in SOS May 2006. As well as taking you through mic techniques, this article also includes some very useful comparative audio examples.
www.soundonsound.com/sos/may06/articles/recordingstrings.htm