 Screen 1: Alchemy can import WAV and AIFF files, or entire EXS24 keymaps, to build patches.
In our second workshop on Logic Pro X’s Alchemy synth, we look at its creative sample-manipulation capabilities.
With the launch of Live 9.5 and Push 2, Ableton showed off the Glide function added to their Simpler sample engine. In their product demo, a U2 song was played and then re-pitched on the fly without re-triggering it or changing its speed. What you may not be aware of is that you can accomplish exactly the same thing using the Alchemy synth in Logic Pro X, and in this month’s workshop I’ll show you how. We will also cover how to load and edit a sample in Alchemy, and look at how to manipulate its spectral content using the Spectral edit window.
In a new Logic project, create a new Software Instrument track, and add an instance of Alchemy to it. By default, Alchemy loads with a preset that already contains various effects and modulation assignments. From the File menu in Alchemy, choose the Clear option. This starts us off with an entirely reset instance of Alchemy with no effects or modulation assignments. If you wish to make this fully reset preset your default, go to the top left-hand corner of the plug-in window, click on the drop-down Preset menu and choose ‘Save As Default’.
 Screen 2: Here I have assigned a sample across the entire key range in the Keymap Editor and tweaked its start and end points in the waveform editor.
Let’s import a sample into Alchemy and configure it to allow us to play the sample across the keyboard without changing its speed. Click on the Advanced tab. Notice how the top left area can be switched to display the four oscillators that make up an Alchemy patch by clicking the Global option. You can get a more detailed view of each oscillator by clicking on A, B, C or D. For this example we are only using one oscillator, so click on oscillator A to display only its controls. Next, click on Saw in the oscillator menu and from the combo box choose Import Audio. The Import Browser window will appear; from here we can import WAV and AIFF audio files or entire EXS24 keymaps. You can navigate around your hard drive using the Places column, and audition audio files from the Samples column by selecting Preview and clicking on your files (see Screen 1).
Pitch & Time
 Screen 3: With oscillator A set to play back a sample, go to the Voices section and set the Mode to Legato and Num to 1. Use your keyboard to re-pitch a sample as it plays by slurring or overlapping the notes.
As we are focusing on sample manipulation, choose a single audio file that will be interesting to manipulate. It’s good to go for something fairly short. I have taken just the intro from ‘Crew Love’ by Drake ft. The Weeknd, where the lead vocal is suitably exposed and perfect for mangling. At the bottom left of the browser you can choose the type of engine Alchemy will use to perform the sample manipulation. Choose the Spectral option and click Import to map the sample across the keyboard. Play a few notes on your keyboard and you should hear that the sample plays across the entire key range and maintains its duration at all pitches. Now we’ll edit the sample to pick out the part that we wish to play; from the oscillator section, click the Edit button to bring up the Keymap Editor window (see Screen 2).
The waveform of the sample you just imported is at the bottom. From here you can use the start and end handles to adjust where the sample plays from and to. To zoom in or out, click and drag the handles at either end of the grey bar that appear beneath the waveform. To close the Keymap Editor, click on the cross in the top right-hand corner. Once again, play the sample across the key range and enjoy the exceptional quality of Alchemy’s time-stretching and pitch-shifting. To push the quality of your results even further, go to the Quality combo box located at the top right-hand corner of the synthesizer and set it to Ultra. Do bear in mind that this will use more of your CPU resources, though.
 Screens 4 and 5: I have used the Spectral view to remove all the lower frequencies from my sample to better isolate the vocal.
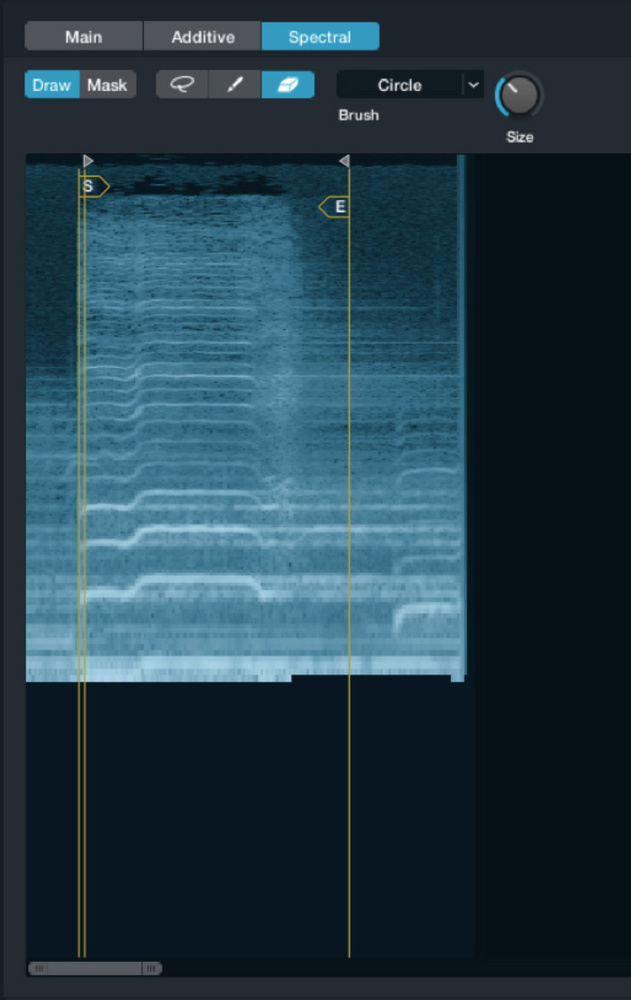
Let’s now slow the tempo of the sample down whilst maintaining the pitch. Slowing down the playback of harmonically rich material, like vocals, can be amazing for creating atmospheric pads. To alter the speed of the playback, go to the oscillator section and move the Speed knob counter-clockwise. Notice that when you reduce the Speed parameter to its minimum value it will slow the sample playback down to the point where it effectively freezes the spectral content at the start point.
Now we’ll change the pitch of a sample without re-triggering it. Still working with the previous example, on the Advanced page, click on the Global tab located in the oscillator section to display the overall parameters of the synth engine. Go to the Voices panel on the right-hand side and, from the Mode combo box, choose Legato. Set the Num field combo box value to 1 so the synth plays monophonically (see Screen 3).
 Screen 6: In the Spectral edit window you can set the mode to Mask so that only the spectral area you highlight is heard. This is great for isolating a specific area of the frequency spectrum.
Spectral Selections
Play a simple melody on your keyboard, making sure you overlap or slur the notes. Notice that the sample doesn’t retrigger until you leave a gap between the notes. This is useful because it allows you to take a sample such as a vocal or trumpet line, trigger the sample and then re-play the pitches of the line as it progresses through the phrase. You can smooth the transition between pitches by going to the Voices panel and adjusting the Glide control to taste — I find a little bit goes a long way.
Another stand-out feature of Alchemy is its spectral editing. This is useful for isolating specific instruments or frequencies within a sample. Using the same sample as before, click on oscillator A and then click on Edit to bring up the Keymap Editor. At the top of the window, click the Spectral tab. You can now use the Lasso, Eraser and Pencil tools to change the spectral content of your sample. In my example, I have cleaned the sample up by using the spectral tools to remove the bass and keyboard that sat underneath the vocal (see Screens 4 and 5).
Try this yourself by choosing the Eraser tool, then adjusting the Size knob so that the Eraser tool has a point size that is useful; I set mine to 36 percent. Now click and drag the Eraser tool across the spectrogram, removing the lower-frequency elements. If you go too far you can always step back by using the Undo button that is located inside the Alchemy window above the spectrogram to the right. Alternatively, you can switch from Draw mode to Mask mode by clicking Mask. Mask mode works by only playing the spectral information that you highlight. Use the Pencil tool to highlight just the spectral information you want to hear. In my example I have isolated the vocal by drawing a simple box across the mid-range area (see Screen 6). Once you have created something interesting, close the Spectral edit window by clicking the cross in the right-hand corner.
Lastly, its worth spending some time experimenting with the parameters in oscillator A’s Spectral and Formant sections and applying things like the effects and arpeggiation covered in last month’s Logic column to finish off your patches.


