When is a multi‑band compressor not a compressor? When it's an equaliser!
Multi‑band processing is the key to creating effects that would be impossible to obtain in any other way, but the only multi‑band effect in Sonar is multi‑band compression. However, there's no law that says we have to use it as a compressor: it can also be turned into a very versatile equaliser that can then split signals into different bands for processing. We'll cover that later. First, let's get started with a really simple multi‑band application.
Simple Frequency Splitter
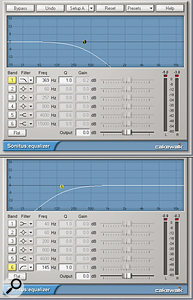
Suppose you have a drum loop and you'd like to put a dotted half‑note echo on the high‑frequency drums, but none on the kick. The solution is to split the track into two frequency bands so you can delay the high frequencies only. One way to do this is to clone the track and insert a Sonitus equaliser in each track. Set one track's EQ response to low‑pass, and the other to high‑pass. The echo inserts with the high‑pass filter.  Setting up a low‑pass filter in one equaliser and a high‑pass filter in another allows you to split a track into two frequency bands.
Selecting the appropriate cutoff frequency and Q is important if you don't want to emphasise one frequency band over another. Q is a trade off, as you need to choose the sweet spot between a sharp dividing curve and minimal coloration (which results from a gentler curve). Settings between 1.0 and 1.7 seem to work well. As to frequency, I set them up so that each curve goes through –3dB at the same frequency.
After inserting the echo in the high‑frequency track split, it's uncanny how the kick drum is completely unaffected while the high frequencies do their echo thing. Reverb is also a good candidate for placing in the high‑frequency band, but not the low‑frequency one.
Compressor As EQ
Here's an entirely different kind of EQ, with a very different character compared to a parametric and it lives within Sonar, disguised as a multi‑band compressor. The response is a cross between a shelf and a parametric peak.
Before you go mad, though, adjusting parameters in a multi‑band compressor can try your patience. Multiply the number of parameters by the number of bands, and that's a lot of editing. Fortunately, there are some shortcuts in the Sonitus Multi‑band compressor that simplify the process.
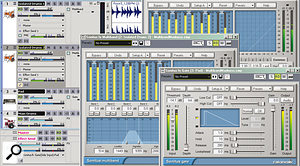
Go to the Common tab and you'll see all compressor parameters for all bands arranged in a matrix. Here you can adjust individual band parameters, but more importantly, note the column of parameter names on the left. Click on one of these and drag up or down and all parameters for all bands will follow suit. If there's an offset between parameter values, that offset will be preserved unless you continue dragging. At some point you'll drag all the values to maximum or minimum. All bands have been set for no compression, but a band stretching from 957 to 9355 Hz is providing a boost within that range.
Note that all the ratios have been set to 1.0. The attack time, decay time and knee parameters don't really matter, because we're not adding any compression. The thresholds (the blue sliders between each pair of meters toward the upper left) are all at 0. However, note the Gain: all bands have been set to –18dB (the minimum gain possible) except for the third band, which is set to 0.0dB of gain. This provides the 'peak shelf' that extends from about 1 to 10 kHz.
Isolation Via Multi‑band EQ
In the previous example, we saw that bands can't go any lower than –18dB. Or can they? Actually, you can make bands pretty much disappear, and that's useful if you want to isolate a particular part of the spectrum. Here's one reason why this can be useful.
I often like to synchronise one sound with another, using envelope followers, key inputs, or side‑chains. Often the key to effective triggering is to condition the signal doing the triggering. For example, I wanted to gate a pad with a drum loop, but found that hi‑hats, cymbals and toms got in the way of the staccato triggering I wanted from just the kick beater and the snare. Even the kick's 'boom' kept the gate open too long; I wanted only the initial beater 'thwack' from the kick. Simple filtering was not good enough. Fortunately, you can isolate part of a track's frequency spectrum easily with the multi‑band compressor. But before getting into how to isolate part of the drums, here's an overview of what we want to do.
The pad sound goes through a gate, which has a side‑chain input. We want to hear the drums but, as mentioned, they're not really suitable as a triggering source. Therefore, we have to modify the drums to provide the desired type of trigger, then feed the trigger to the gate's side‑chain input. In some cases it may be necessary to use two drum tracks, which necessitates sending their outputs to a bus, with the bus output providing the trigger signal for the gate side‑chain input. Now, here's how to isolate the drums:  In this setup, the main drums are intended to trigger the gate in a pad. However, the drum sound is too busy, so it's been cloned to two other tracks, which are dedicated 'triggering tracks' that have been set up to isolate only the kick's beater sound and the snare.
- Insert a multi‑band compressor in the track that's intended to do the triggering.
- Set all multi‑band band gains to –18db except for one, which should be around 0dB. Adjust the high and low limits of this band to isolate the desired part of the spectrum (in this case, the kick beater sound and the snare).
- If this filtering is effective, assign the track output to the gate side‑chain input and you're done. If lowering the frequencies above and below the desired band by –18dB isn't enough, clone the track so you can take more drastic measures.
- Reduce the gain of the bands on the cloned track's multi‑band compressor to –18dB.
- Flip the phase on the cloned track (or the original, it doesn't really matter) by 180 degrees. Now everything cancels out completely except for the band on the original track that's set to 0dB. Remember that once you flip the phase, you don't want to make any level changes on either track, so that the outputs are equal in level and opposite in phase.
- We still need to take this isolated sound and turn it into a trigger. Create an effects bus, then an effects send in both the trigger track and its out‑of‑phase clone. These sends should both be pre‑fader and have identical level and pan settings.
- Assign the bus output to the noise gate input. Done!
All this might seem like a lot of work, but rest assured that it's actually more daunting in print than it is in practice.
So, when set not to compress, a multi‑band compressor can also serve as a powerful EQ. And, of course, you still have the option to compress the signal, which adds a whole new set of options. However, we're out of space, so any more talk of multi‑band compression will just have to wait for another issue.


