Automatic double-tracking is a doddle in Reason.
Whether it's the foundation of your vocal sound, or something you use more sparingly to provide contrast and interest, double-tracking is a fundamental production technique for pop and rock. This month we're going to look at how you can create the effect in Reason.
Double-tracking as a pop production technique is as old as the hills. Most often used for vocals, but also handy for lead guitar and even synth solos, it's the process of layering two (or more) almost-identical versions of the same audio. Compared to a conventional single-tracked alternative, double-tracked audio can sound subjectively thicker, broader, 'looser' and sometimes more powerful too. You can use it to beef up a weak vocal, certainly, but it can make already good singers sound even better. You might use it all the time, or perhaps just in song choruses for an occasional stronger effect — however you like to do it Reason can help you get the effect you want.
Tried & Tested
Double-tracking is often done as it was first of all, in strictly analogue days, by simply recording the same material repeatedly, and playing it back simultaneously on several tracks. Humans being what they are, the subsequent takes are never quite the same, and it's the subtle pitch and timing differences that are the key to the whole thing. This is of course trivially easy to do in Reason. You lay down your first vocal line, create a fresh audio track, and do it all over again.
![]() Mismatching double-tracked phrases can be easily dealt with by cutting up one track, adjusting clip position, and using the handles and fades to smoothly roll off word endings.Easy, for sure, but there are subtleties to be had still in the final effect. Try panning the two resulting tracks a little way apart from centre (or even hard left and right) to create a more expansive and wide feel. Or keep them both dead centre, but treat one with a short reverb while the other remains bone dry.
Mismatching double-tracked phrases can be easily dealt with by cutting up one track, adjusting clip position, and using the handles and fades to smoothly roll off word endings.Easy, for sure, but there are subtleties to be had still in the final effect. Try panning the two resulting tracks a little way apart from centre (or even hard left and right) to create a more expansive and wide feel. Or keep them both dead centre, but treat one with a short reverb while the other remains bone dry.
Remember too that really good double-tracking is quite hard for singers to pull off. It requires a high level of control and consistency, and in particular makes the placing of final consonants and word endings really critical. That pleasant looseness can all too easily turn into a scrappy mess. If you are faced with making the best of this kind of mismatching double-tracking, much can be achieved with conventional editing techniques. In Reason's sequencer split the audio of the worst-offending vocal tracks into separate clips using the razor tool (keystroke: R). You might need to turn off Snap, incidentally, to allow you to cut exactly where you need to. Then switch back to the selection tool (Q), use the clip-resize handles to trim off those troublesome consonants, and apply a smooth fade if necessary, by dragging the fade-out handles, to disguise any abruptness. The outcome should be good-quality double-tracking for most of the time, but with the super-clean word and phrase endings provided by the single main vocal track.
Still in the sequencer, try selecting all or just some of the audio clips in a doubling track, and use the Transpose field to nudge them sharp or flat a touch. Clicking the up/down value button only dials in semitone transpositions — much too coarse. But if you click and vertically drag on the value itself, after the decimal point, transpositions with 1/100th semitone resolution can be set. Try 0.20 as a starting point and lower the track level 5 or 6 dB below the main vocal. This can introduce a useful chorus-like effect that many singers would struggle to achieve consistently themselves. If you're feeling experimental, crank the transposition value to 12 semitones (ie. an octave) up or down, or try +7 (a fifth up) or -5 (a fourth down). The effect will be bizarre to be begin with, but layered subtly at a significantly lower level in the mix, it can be very effective.
Automatic Weapons
After traditional techniques come a slew of artificial approaches to double-tracking, often collectively lumped together under the 'ADT' label. The idea is that you'll use them on a single, normal vocal take, and let Reason create the impression of additional takes.
The most basic treatment is a simple delay. Create a DDL1 Digital Delay Line (one of the old-school 'half-rack' Reason effects) for your vocal's Audio Track device in the Rack. Switch the delay time unit to MS (milliseconds), set the value display somewhere between 50 to 100, turn Feedback to 0, and the Dry/Wet knob to balance the dry vocal with the artificial double-track. The effect is distinctive and can be just what's needed sometimes, though in no way does it sound like real double-tracking.
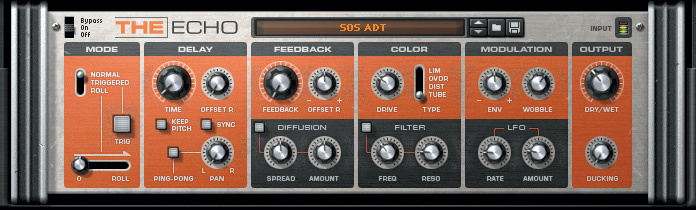
 A trio of delay-based Propellerhead devices all generate good ADT — the humble DDL1, retro-inspired The Echo, and potent Polar.To get closer to that you need the delay time to be varying a little over time — a modulated delay. That has a useful side-effect too, of creating small pitch shifts up and down, which for artificial double-tracking is very desirable.
Another Propellerhead rack device, The Echo, does the job admirably. In its Normal mode the same short delay time can be set (turn off the Sync option to specify it in milliseconds). Then turning up the Wobble parameter in the Modulation section adds random pitch fluctuations — perfect for our needs. For the icing on the cake nudge up the LFO Amount, and set a Rate of 1Hz or lower. This modulates the delay time, but in opposite polarities for left and right channels — the effect is very nice! Once again, use the Dry/Wet knob to find a balance between dry and double-tracked signals if you've applied The Echo directly to your Audio Track device.
 A more complex option is to use the Polar Dual Pitch Shifter Rack Extension (€55$69). Begin by resetting everything (right-click the RE and choose Reset Device) and then select Fast and Smooth options in the Algorithm section. Reinstate your dry vocal by switching on the Dry Signal section. Then, turn Shifter 1's Fine knob up or down a little. If you like, enable Shifter 2 as well (using its red button next to the word 'Shifter') and set a deliberately different amount of shift. Turn up a small amount of Delay (in the Delay Buffer section) to add in some time smearing, and, back in the shifter sections, turn up the LFO knobs a very small amount. That last step essentially adds in vibrato at the rate set in the LFO section. Everything considered, it's possible to get quite a sophisticated effect.
Early Doors
Yet another approach, producing its own distinctive brand of ADT, is to treat your vocal with a reverb, but use only the early reflections part, and not the more obvious 'tail'. It's quite controlled and natural sounding, often very likeable. Sadly the venerable RV7000 won't let you do it, but three third-party Rack Extensions do.
 U-he's Uhbik-A Ambience Processor (€32$39) produces only early reflections when its main Reverb blend knob is all the way left, set to 'Early'. Then plenty of variation is possible by switching between its three main algorithms (in the Operation pop-up menu), and adjusting the Early Size and Spread parameters.
In Softube's TSAR1 (€159$199) it's a similar story, although there are fewer parameters on offer and the effect is more subtle. Turn the Early Reflections knob all the way to the right, then just select one of the three sizes.
Lastly, in Rob Papen's RP-Verb (€65$79) you can switch off all other sections except Early Reflection, and use the many parameters therein to control the effect. It's the 'length' knob that really makes a difference; everything from tight doubling to full-on smearing. You must select the 'direct' instead of 'into reverb' option for the effect to be audible without a reverb tail though.
Whichever you use, the Dry/Wet knobs balance dry with the effected audio, although relatively wet settings seem to work best here.
It Came From Neptune
There's yet one more ADT possibility in Reason, which takes a tiny bit longer to set up but might just provide the most natural-sounding results of all.
If you're working in Reason 7, locate your vocal channel in the Main Mixer, right-click it and choose Create Parallel Channel. Then for the newly created Mix Device add a Neptune Pitch Adjuster. In Reason 6 you don't get the parallel option, but instead can right-click the vocal track, choose Duplicate Channels and Tracks, and create a Neptune for the new audio track that appears.
 The early reflection sections of two fine Rack Extensions reverbs can be used for surprisingly effective ADT.The thinking here is that you'll run the original vocal track/channel in parallel with one processed by Neptune. You end up with perfect sync but a slightly different pitch relationship from moment to moment. It's advisable to stick to the default 'Chromatic' setting, but then even quite extreme Pitch Adjust settings can be masked by the presence of the original, natural vocal. It's not all about pitch correction either; Neptune can add Vibrato (via its modulation wheel and the Rate knob), as well as overall subtle or larger pitch shifts in the Transpose section, and even character-changing Formant shifts. There's a lot of flexibility on offer and great ADT just seems to flow out of it, just remember to control the relative levels of original and 'adjusted' signal using the level faders in the mixer.


