We offer a second set of tips to enhance your corrective and creative mixing skills.
Last month, I offered some tips and ideas to help with mixing in Logic Pro, focusing predominantly on setup and preparation for a mix, and then on ways of manipulating the bass and drums. In the concluding part of this series, having laid our foundation, we'll examine how we might further enhance our mix using various techniques and covering different mixing scenarios.
EQ'ing Effects
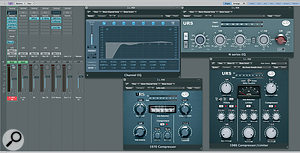
 Logic's Tape Delay plug‑in. You can see how I've reduced the frequency range of the delayed signal so that the effect takes up less space in the mix.Adding delay or reverb clouds my mix.
This is a common mixing complaint. Time‑based effects inherently take up large amounts of space in a mix. To minimise their clouding effect, you could try experimenting with panning, but it may be more useful to reduce the spectral range of the effects themselves. Try EQ'ing the aux returns for the effects or, if you prefer, the sends to the effects. Either way, the object is to thin out the sound of the reverb or delay, thus reducing the 'mud' around the direct sound. If, for example, a lead vocal is very sibilant, adding lots of delay will only create further problems with 's' sounds. Narrowing the frequency range of the delay can make the effect complement rather than detracting from the vocal. In Logic Pro, the Tape Delay plug‑in makes this easy, as it has a simple high/low‑cut filter, which you can see in the screen above. Reverb can also create 'mud' when added to a track. Try cutting in the 250‑500Hz area and using a low‑pass filter set at around 7kHz to thin out the sound. Like Tape Delay, the Space Designer reverb has its own EQ built in.
Arranging With Effects
How can I make a vocal build throughout a track?
By changing effects or adding different effects in different sections of a song, you can give the impression of the vocal evolving. For example, the verse might just have a short delay, during the bridge you might then add a reverb, and in the chorus a doubler effect, giving each section a distinctive sound. This could be taken to the extreme by also changing the EQ for each section.
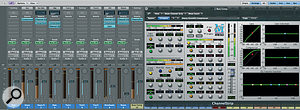
In Logic, you could implement this technique by placing all the effects on inserts and then bringing each one in by automating the bypass buttons on the effects. Alternatively — and possibly more flexibly — you could put the vocal processors on aux tracks and use sends from your vocal track, employing automation to not only control the send bypass but also the send amount. The screenshot at top right shows a vocal track being sent to a delay, doubler and reverb. As an aside, notice how easy it is to see the signal flow in the mixer using Single view rather than Arrange view! It's also easy to change the order of the plug‑ins or copy them in Logic Pro. Command‑drag to swap the plug‑ins around and use Option‑Command to copy a plug‑in.
Vocal Processing
Is there an ideal order for a lead-vocal processing chain?
 Processing chain applied to a lead vocal, as seen in 'Single' view from Logic's Mixer page.There are no hard and fast rules for the order of processes in a vocal chain, but each one may affect the others. I like to use EQ/Limiter/EQ/Compressor/De‑esser, but this is just a guide. The first EQ is for surgical changes, notching out unwanted artifacts or simply removing muddiness or sibilance. The limiter evens out any major level fluctuations. The second EQ is used to improve character and usually has a fairly gentle, shelf‑like design (a Neve/API type); I typically use it to add 'air' around 12kHz or warmth around 100Hz. The compressor is used to tighten the sound and possibly add some extra excitement, and will generally have a ratio of around 4:1 but may need to go as high as 20:1. Finally, a De‑esser is used, if necessary, to tame any excessive sibilance.
Going Through A Phase
My individual tracks sound great in isolation, but some sounds seem to disappear once they are in the mix.
Though this might simply be an EQ problem with certain sounds in your mix (some sounds don't need to actually be that 'big' to cut through!), it could also be a phase‑cancellation problem. In adjusting the phase, you are effectively changing the time relationship between sounds, and you could experiment by literally inserting very short delays, but as a starting point it's far easier to simply reverse the phase between tracks (Logic's Gain plug‑in has a phase‑reverse button and also has the ability to swap the left and right channels). For example, we could try 'flipping' the phase between a DI'd bass and the same bass recorded via a miked‑up amplifier, and between the hi‑hat and the snare mics. Typically, some sounds may become 'thin' or, in extreme cases, seem to be coming from behind your head! This phenomenon can sometimes be used to your advantage, to make backing vocals or synth pads appear to come from beyond the speakers.
Parallel Compression
What's parallel compression, and how can I use it in Logic Pro?
 Very extreme compression applied to a drum kit via sends. The signals are sent pre‑fade, which is indicated by the green colouring of the send knobs.Parallel compression, sometimes known as New York compression, is a process whereby the dry signal is mixed with a heavily compressed version of an identical signal — like using a compressor with a Wet/ Dry knob! The effect becomes extremely useful when you use buses to control the amount sent from an audio or instrument track to an aux return object. While still maintaining the dynamic range and imaging of the original, unprocessed signal, you can use very extreme compression settings on the compressed version to add excitement to your track. (You're not restricted to using compression, and could just as easily add parallel EQ.)
The technique is easily set up in Logic by placing a compressor on an aux track fed from a bus, as shown in the screenshot above. The compressor is set up with very extreme settings, making it easy to hear the effect of adding the parallel compression.
• Insert a send on an audio or software instrument track, and route the signal to an unused bus.
• On the aux track that Logic has created, insert a compressor plug‑in.
• Adjust the settings of the compressor to give quite an extreme, aggressive effect (fast attack and release, high ratio and plenty of gain reduction).
• Make sure the aux send on the source track is set to pre‑fade so that any level adjustments on the direct signal will not affect the level of the processed signal.
• Adjust the level of the compressed aux track to add it to the unprocessed signal.
Conclusion
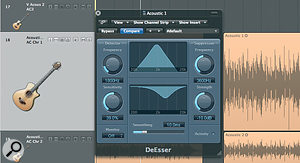
 The De‑esser plug‑in used on an acoustic guitar. This is slightly unorthodox usage, but the plug‑in works very efficiently to reduce unwanted squeaks or other offending noises.
When it comes to mixing, Logic can seem like a daunting piece of software for less experienced users. However, keeping the screen uncluttered and carefully controlling what you are displaying, as explained last month, makes the process, certainly visually, far more intuitive. Adopting a method and evolving a set of 'go to' techniques also greatly adds to the enjoyment of the job. Mixing is meant to be like painting a picture, not running a marathon, so the more we keep the technology under control, the less arduous the task will be. It's worth noting that even experienced mixers hit barriers; here's a final thought from one of the world's greats, George Massenburg: "A mix is never finished, you just have to abandon it!”.
Using External Hardware With Logic
I want to use my analogue outboard gear during mixing in Logic. How do I do this?
Logic has an I/O plug‑in, found in the Utility folder, which enables you to send a signal out of the software and back through the audio interface you're using. As long as PDC (Plug‑in Delay Compensation) is set to 'All', the delay incurred by the process of going out and coming back in will be compensated for by Logic. But what Logic cannot do is measure the exact delay incurred by a specific audio interface. It can only make a generic setting for delay compensation. This is obviously not a problem if you're inserting an effect across your stereo bus, as all audio is travelling down the same path and will be delayed by the same amount, but if you're inserting across individual tracks this could be a problem.
To deal with this issue, I use a plug‑in called Latency Fixer, made by Expert Sleepers. The plug‑in, when used in conjunction with Logic's own I/O utility, enables me to manually enter a delay setting, in samples, which Logic can then use to exactly compensate for the delay created by the sound travelling out of the audio interface and back again. The sample delay measurement might be made by sending out a rimshot sound or similar percussive sound that you've recorded, through the outputs of the audio interface and recording it back into Logic. If we zoom in on the waveforms it is then easy to see and measure the delay between the two. Artificial Audio's Latency Bundle is also very effective at getting round this problem, and does all the hard work for you without the need to record audio back into Logic.
Playing The Stereo Field
Why do my mixes never sound as wide as my favourite records?
I believe it was Bob Clearmountain who once said that if everything in a mix is in stereo, what you wind up with is two lots of mono!
What he is getting at is if all the source material is recorded in stereo, with a left and a right side panned to the extreme sides of a mix, you wind up with very little direct weight in the centre and, more importantly, no real sense of individual sounds placed in a stereo field. It's far more effective, and often produces much more impact, to place the kick, snare, bass and vocal in the middle and the guitar coming from just the left side, for instance, with maybe piano just from the right. This is over‑simplified, but to create an interesting stereo balance it's best to have things occupying their own place in the stereo field rather than competing for a space with other instruments. In Logic, the Direction Mixer, found in the Imaging plug‑in submenu, can be used to great effect to pan stereo source material to either side of the stereo spectrum.


