Raindirk consoles have been used in the past by the likes of Deep Purple, the Who, and even Rupert Neve. Do these new modules live up to the company's illustrious heritage?
To the 'younger generation' of SOS reader, the name Raindirk may be unfamiliar, but to the grey‑haired amongst us it's a name that conjures up plentiful associations with classic British rock. The story dates back to the early 1970s, when Raindirk founder Cyril Jones was asked to design a 24‑track recording console for the band Deep Purple, to be installed at the old De Lane Lea studios in Kingsway, London. That console went on to record the likes of the Who, the Animals, ELO, Iron Maiden, Leo Sayer, Paul McCartney and Wings, and many others. Amazingly, although that console is nearly 40 years old, it is still going strong at the Atom H studio in Dusseldorf, Germany! Shortly after that first console proved such a success, Cyril built three more for Olympic Studios in London. Apparently, Cyril's work was recognised by Rupert Neve, who purchased a console himself for his religious foundation work!
By the end of the 1970s, Raindirk had become fully fledged mixing-console manufacturers, delivering the first 'In Line' production console, called the 'Concorde' — one of which went to the Who's Pete Townsend. Not all the work was for the music industry, though, and Raindirk produced 45 bespoke TV broadcast consoles for South Africa in the early 1980s. Towards the end of the 1980s, Raindirk launched the Symphony console range, with music recording, film dubbing and mobile variants. The electronic design was astonishing, managing to keep the noise floor from 24 active channels 90dB below 0VU — a fantastic achievement, even by today's standards.
By the end of the 1990s, the large‑format studio-console market had declined to the point where Raindirk could no longer remain competitive as console manufacturers, and Cyril turned to redeploying his console-design skills and expertise in the manufacture of studio outboard products.
I think it's fair to say that Cyril's console design work should have received much more attention and respect than it did. In fact, many would argue that he is one of the best console designers in the world, and I've not encountered anyone who has suffered a bad experience with any Raindirk console — which is more than can be said for most big‑name consoles! Perhaps the real strength of Raindirk's consoles is the cohesiveness of the whole package, combining excellent sound quality with good ergonomics, compact but attractive styling, well thought‑out facilities, exceptional reliability and perfectly engineered technical specifications. These days, Cyril is busy maintaining customer consoles and with bespoke design work, as well as building his current product range in a converted bakery in Norfolk, and he continues to uphold the high‑quality and exemplary real‑world designs for which he is known.
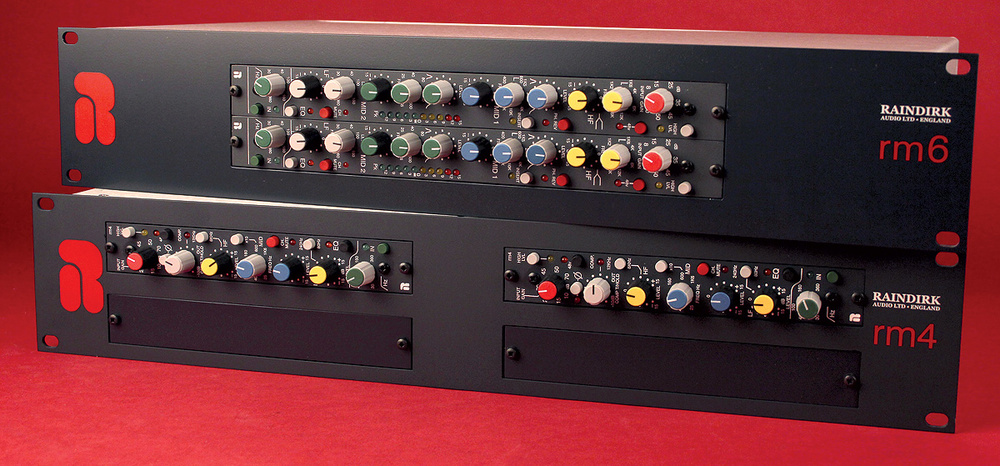
The two units featured in this review are the mid‑range products, the RM6 and RM4 channel modules. The company also produce the larger RM8 module, which is very similar but with the addition of a pan control and fader (a matching master output module is also available), and the smaller RM3 compact mic-preamp module, as well as a very interesting DI box that boasts active, passive and re‑amping modes, all in the one device!
RM6 Mic Preamp & EQ
 The front of the RM6 modules — which are orientated horizontally when racked.
The 'RM6 microphone pre‑amplifier with parametric EQ' is, as the name suggests, a conventional big-console input channel strip, with all the features and facilities you might associate with that role. In fact, it is derived from the input module of the Raindirk Symphony LN2/3 consoles. The RM6 version is available packaged in two forms, either vertically (with up to 15 others) in a 6U-high rackmount frame, or horizontally, in a 2U-high rack frame capable of accommodating two modules. It was this latter form that was supplied for review, and while I can appreciate the cost‑effectiveness of the solution, I have to say straight away that I find horizontally mounted modules designed for vertical use extremely frustrating! It's a personal bugbear, but I'm sure the RM6 would have a far stronger appeal, and would be far more usable in this physical format, if it was presented with revised front‑panel labelling.
As far as the construction is concerned, this is a very nicely engineered module, built in the traditional way — which means easy to service and maintain — and with high‑quality components throughout. All the connectivity is via a ribbon connector on the back edge of the module, which is wired to the audio I/O mounted on the rear panel of the 19‑inch rack frame and to a compact linear power-supply module fixed towards the back of the case with a torroidal mains transformer. The PSU provides regulated ±18V rails for the audio electronics, plus 48V for the phantom-power supply. Mains power is connected via the usual IEC inlet, but there is, surprisingly, no mains on‑off power switch, either at the rear or on the front panel.
The module's balanced input and output are presented on both TRS and XLR connectors, wired in parallel. A pair of quarter‑inch TRS sockets provides separate balanced insert send and return connections, the send signal being normalled through the return socket. However, while the double‑format input and output connections provide useful flexibility, it does mean that phantom power appears on the TRS input socket as well as the input XLR. Should an unwary user connect a line-level source to the TRS input in the assumption that it provides a dedicated line input, that source device could be damaged if phantom power were accidentally switched on. There are no warnings on the unit about this and none in the manual… because there doesn't appear to be a manual available at all!
In terms of the electronic circuitry, the RM6 module employs high-quality and carefully specified components, not stupidly exotic and expensive devices. I think this is the mark of a well-designed system, where overall performance is optimised throughout the signal path. For example, the front end employs NJM2114 high‑performance, low‑noise dual op‑amps in conjunction with a discrete transistorised input gain stage. These op‑amps provide better slew rate, bandwidth, noise, distortion and offset voltage than the more well-known NE5532, which is widely used in this application. The gain elements used throughout most of the rest of the circuitry are NJM4580 dual op‑amps (10 of them, in fact!), while a solitary NE5532 chip appears to be used to drive the outputs and a TLO72 is also present on the circuit board. All the op‑amps are socketed for easy maintenance.
Controls
![]() The controls of the RM4 module.
The controls of the RM4 module.
The RM6 controls are laid out as you'd expect on a conventional channel strip and, as I've already mentioned, the control legends are oriented as for a vertical module. In the 2U rack form, the unit is installed horizontally, with the 'top' at the left hand side. The first rotary control adjusts the input gain from 10 to 70dB. I measured the maximum gain as a very generous 72.5dB, and the maximum input level with the gain at its minimum setting (in normal mic mode) is ‑4dBu (for one percent distortion). I measured an EIN figure of ‑129dB with a 100Ω source. A grey push-button with associated LED just above the gain control inserts a 20dB pad to accommodate higher‑level inputs, and in this configuration the maximum input level appeared to be +12dBu (for one percent distortion). This is great for a loud microphone signal, but is rather low for standard line‑level signals. Given this lack of headroom, and the presence of phantom power on the TRS input socket, it appears that the RM6 module is designed specifically to accommodate microphone signals, and is not ideally equipped to handle line‑level signals. A red push-button with associated LED activates the phantom power.
Almost all of the remaining controls provide the channel equalisation facilities. The RM6 is equipped with a five-band equaliser comprising high and low shelf stages, two parametric mid-range sections and a variable high‑pass filter. The HF shelf has an adjustable turnover frequency from 1 to 15kHz, with a ±15dB gain range, while the LF shelf has the same gain range and can be adjusted from 30 to 360Hz. The gain controls all have centre detents at the unity position.
The two mid-range parametric sections provide ±15dB of boost or cut, again, and have overlapping frequency ranges, 'Mid 1' spanning 100Hz to 16kHz and 'Mid 2' 25Hz to 1.6kHz. Both sections have continuously adjustable bandwidths, with Qs of between 5 and 0.5 (roughly 0.2 to 2.5 octaves). An overall EQ‑in button is provided (with an LED) to bypass the EQ section completely if required. The high‑pass filter has its own independent bypass button (with LED), and is adjustable from 30 to 350 Hz.
The RM6 module incorporates a simple LED bar-graph meter, scaled from +15 to ‑12, and calibrated such that the zero LED illuminates when the module output is +4dBu. A red Channel Mute button (with LED) just below the meter does exactly what the label says it does. The two further push-buttons (both with LED indicators) engage a polarity reversal and activate the insert return. This insert point is pre‑EQ, with the insert send being available at all times (and at the same level as the main output when the EQ is bypassed). The send signal is normalled through the return socket, so that if the Insert button is pressed when nothing is plugged into the return, the signal path is unbroken.
Quality Job
 The rear panels of both units are identical, with both offering an insert send and return.
The RM6 really has to be evaluated as a console input module. It was not designed as a high‑end stand-alone mic preamp, but rather as part of a wider, more integrated system — even if it is being used as a stand-alone module — and I state this fact because exotic, high‑end, single‑purpose, stand-alone mic preamps will ultimately out-perform it. Nevertheless, the RM6's technical specifications and performance are very impressive — easily matching those of the very best high‑end consoles. The mic preamp is extremely quiet and very neutral, with masses of gain on hand to cope with distant mic placement and insensitive microphones. It handles transient signals very well, with a fast, clean character, and isn't at all fazed by the harmonic complexities of, say, a 12‑string acoustic guitar. I have some reservations about using the RM6 with the kind of elevated line‑level signals you might find at the output of a professional D‑A converter, but perhaps that's not really the intended role for this module.
The equalisation is well conceived and very versatile, with textbook curves throughout (see the test plots online at /sos/jan12/articles/raindirk_rm4rm6media.htm). The range of control, both at the frequency extremes and through the critical mid-range, is excellent, enabling both creative and corrective equalisation to be applied easily and cleanly.
Overall, this is an excellent input stage, with nicely optimised technical performance and operational features, which gets the job done with the minimum of fuss and the maximum of quality. Ergonomically, it works better as a vertical module, of course, but where space is an issue, or only two modules are required, the horizontal arrangement is manageable. As the basis for a high‑quality DAW front-end, or a location recording package, the RM6 is a very attractive contender indeed.
RM4 Channel Strip
The RM4 modules supplied for review were a pair of channel strips mounted in a quad‑slot, 2U-high, rackmount frame. Again, in this configuration the units are presented horizontally, although they are designed as vertical units. A 4U frame is also available that can accommodate up to 16 vertical modules. In addition to the channel-strip module, the RM4 range also includes a channel aux send and pan module, a Master Section, master fader modules and talkback and monitoring modules — enough components to build a compact rackmounted console!
The RM4 comprises a mic preamp, simple compressor, three-band equaliser and high‑pass filter. Although it's very compact in terms of panel space, the controls are well laid out and as easy to use as those of its larger RM6 cousin. Internally, the rack case is constructed in a similar way to the RM6 system, with an internal PSU module mounted near the back. Mains power is connected via the usual IEC inlet, but once again there is no mains on‑off switch. All audio connections are via XLRs, the case being pre‑fitted with four sets of I/O, despite there being only two modules installed.
Again, the circuit boards are manufactured to a very high standard, using the same quality op‑amps as the RM6. Indeed, I suspect that the circuitry is actually very similar. For the nerds amongst us, each RM4 board carries three NJM2114s, three TLO72s and five NJM4580 op‑amps. The circuit board also has provision for a Lundahl 1527 input transformer, if required.
The front‑panel control layout is very logical, starting with the input gain control (10 to 70dB) and associated high‑level input button (with warning LED). In this case I measured a maximum gain of 70dB and an EIN figure of ‑129dB. Phantom power is activated by another push‑button, alongside a polarity reversal button — both with warning LEDs.
The next control is labelled 'Compressor Threshold', marked from ‑10dB to 'Out', although it actually controls a FET‑based limiter. A yellow LED flashes when gain reduction is being applied, and the attack and release parameters are fixed. There is no bypass button, either.
The EQ section is simpler than that of the RM6, this time providing high and low shelf sections, each with two switchable turnover frequencies of 8 and 12 kHz, and 60 and 240 Hz, respectively. The mid‑range section can be adjusted from 25Hz to 1.6kHz or, by pressing the 'x10' button, from 250Hz to 16kHz. All three sections can be adjusted over a ±15dB gain range, with centre detents at the unity positions, and an overall EQ‑in button is provided (with warning LED).
The high‑pass filter section has its own 'In' button and can be adjusted from 30 to 350 Hz. A channel Mute button is also provided, but there is no level metering at all — there simply isn't enough panel space for it!
In Use
Perhaps not surprisingly, the RM4's microphone preamp shares the same characteristics as its RM6 sibling. It is fast, clean, quiet and accurate. This is a neutral preamp that captures the microphone's output and makes it bigger, without imposing any character of its own, yet making the most of what's there in the source — both musically and technically.
The EQ, again, is clean and versatile, delivering audible changes from the smallest adjustment, but with masses of range on hand if really needed. There must be masses of headroom internally, because the EQ never sounds harsh or gritty, even when pushed to silly extremes, and although this EQ section is far simpler than that of the RM6, it is still very capable and easy to use.
The compressor seems to be optimised for gentle but compelling peak-level control, rather than for creative dynamic shaping. I believe the design concept of the RM4 was to serve as a DAW front-end, and the compressor function is optimised to prevent nasty A‑D overloads. That compromise may well disappoint those who relish more dramatic dynamic control and who seek something with a wider creative potential or a signature sound… but perhaps Cyril will oblige in the future if the user feedback warrants it. As it stands, the compressor provides a workmanlike service, and when switched out it seems to leave no obvious sonic mask.
Conclusions
If asked for a single-word description for the RM6 and the RM4 modules, I think that word would have to be 'classy'. There's nothing overtly showy about the construction, the aesthetics or the sound of these modules — but when you use them everything is very classy, very professional and, put simply, very good — both in sound quality and in operational ergonomics. The use of warning LEDs on all the mode buttons is a simple thing, but it makes a real difference in the heat of a session. The clear and logical control layout with sensibly sized knobs spaced so that you can get your fingers around them comfortably, makes a real difference. Well thought-out circuitry, field‑proven over many years in the most demanding applications and engineered skilfully with reliable components, makes a real difference.
These aren't products that make you say 'Wow!' the moment you see them or hear them. But after using them for a while you'll discover the real 'Wow!' factor, and it's in the recognition that these things have been designed to do a specific job well, and they achieve that both effortlessly and magnificently. Moreover, they do it at a remarkably sensible price! Well worth investigating if you are looking for a compact but versatile front end for a DAW, or for location recording.
Alternatives
There are plenty of 'channel strip' products on the market, some designed from the outset as stand-alone units, other derived from console modules in one form or another. The Raindirk RM6 and RM4 modules are comparable to the likes of the SSL X‑rack input and EQ modules, and other rackmounted and API Lunchbox-format modules — although the larger physical size of the Raindirk units allows a greater range of facilities to be accessed.
Pricing Information
As discussed in the main text of this review, the RM4 and RM6 modules can be configured in different rackmount systems, and the pricing will vary according to which is used and how many modules are purchased. Typical pricing is as follows:
- RM6 dual‑module rack unit: £1,353£1623.60.
- RM4 quad‑module rack unit, fitted with two RM4 modules: £1,244£1492.80.
- Separate RM4 modules (sold in pairs): £690£828 each.
- Prices include VAT.
Technical Performance: Test Results
 RM6: this plot shows the overlapping frequency ranges of the two mid‑range parametric EQ sections, with the MF1 range show in the boost curves and the MF2 range in the cut curves.
 RM6: this illustrates the parametric midrange section with a variety of Q settings.
 RM6: the HF and LF shelf EQ responses, revealing the wide range of turnover frequencies.
  RM6: the overall bandwidth of the RM4 with all EQ bypassed, and with various high‑pass filter settings
. When driven hard it appears to over‑limit slightly") RM4: this plot shows the dynamic action of the compressor/limiter at various threshold settings (and Out). When driven hard it appears to over‑limit slightly
RM4: this plot shows the dynamic action of the compressor/limiter at various threshold settings (and Out). When driven hard it appears to over‑limit slightly RM4: this plot illustrates the two frequency ranges of the mid‑EQ section, the boost curves showing the standard range, and the cut curves showing the x10 range.
 RM4: the simple HF and LF shelf responses, each with two selectable turnover frequencies.
 RM4: the overall bandwidth of the RM4 with all EQ bypassed, and with various high‑pass filter settings
To reveal more details about the technical performance of the RM4 and RM6 modules, Hugh used an Audio Precision Analyser during the course of his review. The resulting test plots are shown here.
Pros
- Big‑console performance but at real‑world prices.
- Professional ergonomics and attention to detail.
- Exemplary technical performance.
- Extremely versatile EQ on RM6.
Cons
- Phantom power on TRS input of the RM6 module.
- No mains on‑off switches.
- Not able to handle hot line‑levels comfortably.
Summary
Big console channel-strip technology re‑engineered into stand-alone formats at affordable prices. The Raindirk name might not be as familiar these days as SSL, AMS Neve and API, but the quality, the reliability and the facilities are in the very same ballpark. These input modules are well worth investigating.