A combination power soak, DI box, speaker simulator and phase alignment tool, Radial’s Headload has a role in almost any guitar rig.
I can’t be certain that Radial Engineering’s founder Peter Janis maintains a network of spies who lurk around studios and stages looking for problems for his company to solve, but it’s hard to imagine another explanation! Amongst the 40-plus DI boxes, switchers, splitters, processors and interfaces that form a significant part of the Radial product line, there are plenty of boxes that have, at one time or another, saved my proverbial bacon.
Radial’s reputation sits solidly on their design innovation and a build quality that revolves around solid steel casings, heavy-duty circuit boards and the liberal use of transformers when appropriate. Their latest product, the Headload V8 Guitar Amp Loadbox and DI (let’s just call it the Headload), follows that paradigm, and its all-discrete circuitry packs resistor-based volume attenuation together with Radial’s existing JDX Reactor DI and Phazer analogue phase alignment tool into a chunky all-steel case, with the sort of price tag you might expect given all that’s on offer.
Overview
The blue-enamelled steel case is vented high up on all four sides and at the back edge of the top plate, which implies that heat is going to be generated in the Headload’s upper reaches. Whipping off the top cover reveals a phalanx of cement-encased resistors that can attenuate a maximum of 120W RMS of valve amplification. Achieving this means dissipating up to a peak of 180 Watts as heat, and a temperature-controlled fan is strategically positioned to drive airflow across the resistor board.
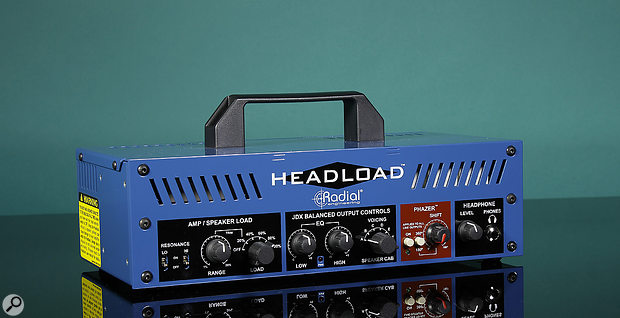
The front-panel controls are divided into four functional areas, the leftmost of which contains the five-position attenuation level selector switch, which reduces the amplifier output level leaving the Headload from 100 percent down to zero in increments of 20. At the 20 percent position, a trim control (which has the feel of a wire-wound variable resistor) comes into play, allowing you to reduce the amplifier output anywhere from 20 down to one percent.
Associated with the attenuation level selector are the separate Hi and Lo Resonance on/off switches. These act in much the same way as the loudness control on a stereo system, by compensating for the vagaries of the human hearing at low volume levels, boosting 6.5kHz and 60Hz respectively by +3dB at 20 percent reduction, rising in +3dB steps to a +12dB boost at 80 percent reduction.
The central area carries the controls for the JDX Reactor outputs. The JDX input is taken pre-attenuation and passes straight to a transformer, which effectively sits in parallel with the loudspeaker. The transformer and loudspeaker act together to form a reactive load which is not only designed to capture the amplifier’s output and the effect of the back-EMF (electro-motive force) generated by the loudspeaker’s voice coil as it moves within the loudspeaker magnet’s magnetic field, but also to provide a realistic playing experience for the guitarist. From there, the signal passes into an active, multi-stage band-pass filter, which is designed to replicate the sound you’d get from a Shure SM57 sitting a couple of inches away from one of the loudspeakers in a Marshall 4x12 cabinet.
At that point, the signal splits in two, one part passing via a balancing transformer and polarity-invert switch to the pre-EQ XLR output, and the other through a voicing section that adds five cabinet emulations and offers a two-band EQ for further tonal fine-tuning. From here, the signal is split to feed three outputs: the front-panel headphone jack, an unbalanced, line-level, post-EQ, post-JDX jack and, via an active balanced driver and polarity-invert switch, a second, post-EQ balanced XLR output.
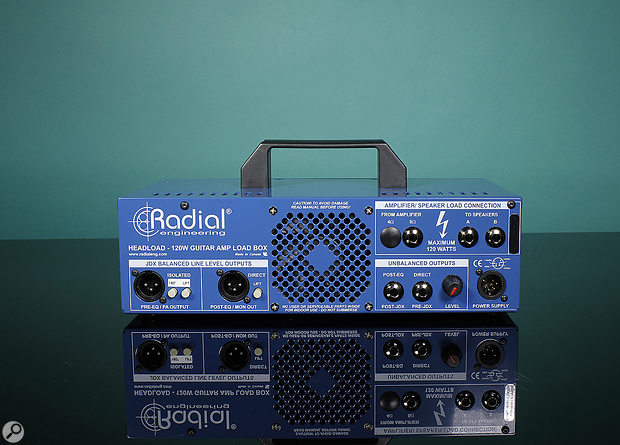
 Different impedance versions are available, and depending on which you buy, you’ll find one of the inputs blanked off.
The unbalanced line-level output shares a volume control with another unbalanced jack output that carries an unfiltered, pre-attenuation, line-level version of the amplifier output taken pre-JDX and pre-Phazer.
The Phazer enables you to align the phase of the Headload output with the signal from, for example, a microphone set up a couple of feet back from the amplifier cabinet or a digital processor acting on one of the outputs. If you think about it, your amplifier’s output signal will travel down the cable from the Headload to your mixing console or DAW at the speed of light while the sound from your speaker cab will have to travel across a foot or two of air at the speed of sound (which will take a couple of milliseconds) to reach the microphone before getting up to light speed. Similarly, if you’ve got a digital processor on one of the Headload’s unbalanced outputs, there will be a few milliseconds of delay introduced by the A-D and D-A conversion processes.
You’ll hear these time differences as phase effects when you combine the signals at the console. In action, the Phazer delays the signal feeding the Headload’s back-panel line-level outputs by a slight amount in order to produce a phase shift of up to 180 degrees. The amount of phase shift is controlled by a rotary potentiometer and a further switch that brings in an additional 180 degrees of shift, giving a total of 360 degrees to play with. If using the Headload on stage, you’ll find that adjusting the phase between the sound of your amplifier coming through the PA via the Headload and the room sound from your speaker cab can often pay big dividends.
Finally, Radial earn themselves a chunk of kudos for the full-size, four-pin, locking XLR connector that carries the voltages from the Headload’s external power supply.
In Use
The Headload is available in 16, 8 and 4 Ω versions. Depending on the version, one of the two ‘From Amplifier’ inputs will be blanked off — for the 8Ω review model, the 4Ω jack was blanked off. You need to think a bit about your impedance selection if you’re using a two-cab setup, as the outputs run in parallel. This means that you’d need two 16Ω cabs to work with this 8Ω version, or, if you were using two 8Ω cabs, you’d need to purchase the 4Ω version.
The whole point of using a valve amp with an attenuator/speaker emulator is to enable you to experience the sound of your amplifier running in its (inevitably loud) sweet spot and the Headload is (to my mind) one of the best at providing this that I’ve played through. The playing experience felt right at all attenuated levels — even right down at the one percent setting. The Hi and Lo resonance switches let me tune the speaker output to keep a pretty accurate representation of the unattenuated sound coming from the cabinet in use. Obviously it would be unreasonable to expect to get an absolutely exact facsimile of the original amp/cab tone at high attenuation levels, but what I did get sounded (and felt) close enough across the whole attenuation range to keep me more than happy.
The JDX DI section performs equally impressively. Position A on the speaker cab Voicing control bypasses the voicing section so that the ‘classic’ JDX Shure SM57/Marshall 4x12 sound appears at all the pre-EQ and post-EQ outputs.
In a live situation, the intended use of the pre-EQ XLR output is as the feed for the PA FOH, while the post-EQ XLR is designated as a source for IEM or stage monitors. With the growing prevalence of IEM systems, guitarists (and bassists) are becoming more dependent on attenuated or emulated guitar sounds and the Headload fits into this niche by offering an additional five voicing choices, all of which can be further refined by the associated two-band EQ.
Of course, these differing voicings also come into play in a studio setting, and I have to say that I was very impressed by the choices on offer. When I want to get loud and distorted guitar sounds, I usually run my amps into a 1x10 isolation cab, and I’m pretty happy with the results that I get — or at least I was happy until the Headload turned up! It’s not that the Headload is intrinsically a better solution but, out in the real world, the results were as good as any from my isolation cab.
The Phazer is an interesting additional facility. It does what it says on the tin and allows you to pull a cab/room mic into phase with the DI output, or to introduce a phase anomaly between them for creative effect. I’m used to carrying out these processes in the digital domain, so I’m not sure that I’d personally use this facility much when recording, but I think that I’d find the Phazer’s facility useful when engineering live sound.
Finally, there are the additional options offered by the pre- and post-JDX unbalanced line-level outputs to bear in mind. These offer the possibility of connecting (for example) another cabinet emulator via the pre-JDX jack and/or an effects unit through the post-JDX output.
Conclusion
The Headload V8 certainly isn’t the first analogue loadbox/DI combination that I’ve seen, but it is one of the most comprehensively equipped examples in terms of control and output connections that I’ve come across. Playing through it feels and (with a bit of tweaking) sounds very close to the source amplifier/speaker combination, even at high attenuation settings.
Radial Engineering’s Headload V8 is a professional tool and thus it doesn’t come cheap. While this means it’s not going to be an impulse buy for the typical home recordist, its build quality and performance more than justify its premium price. The Headload would certainly pay its way for any guitarist, bassist or studio engineer who needs a high-quality, fully featured amplifier attenuator, dummy load, loudspeaker emulator, DI and phase alignment tool. And having all of these in one box with a variety of connection capabilities is appealing. I’m certainly more than happy to record — and gig — my valve amps with a Headload V8, and I’m not at all sure that I’ll be letting this one leave me any time soon.
Alternatives
At this price level, the only units that I can think of that directly compete with the Headload V8 are the Two Notes Torpedo Studio and Torpedo Live ‘Digital Loadboxes’. The major difference between these and the Headload is that the Torpedo units process the attenuated amplifier output digitally, to emulate a wider range of mic/cabinet combinations than you get with the all-analogue emulation of the Headload V8. Both approaches have their merits and both are capable of extremely impressive results, depending on your application and personal taste. Coming down the price scale, you’ll find a wide variety of choices from the likes of Rivera, Palmer and SPL, and there’s also the UK-designed and -built Sequis Motherload Elemental to consider.
Pros
- Built to a professional standard.
- Feels great to play through.
- Easy to get a great sound.
- Good value for money.
Cons
- You have to pay for this kind of quality!
Summary
Combining an amplifier attenuator, loudspeaker emulator, DI, phase alignment tool and a range of interconnection options, the Radial Engineering Headload V8 is one of the most comprehensively equipped units in its class. The unit’s premium price is more than justified by its build quality and performance, and it is definitely one to audition for anyone seeking to record or gig with up to 120 Watts of guitar or bass valve amplification without deafening the neighbourhood.
information
Shure Distribution +44 (0)1992 703058


